How to Use Git to Track, Transport, and Share Your Work

Imagine this: you and a teammate are writing a book together. Your teammate drafts the outline first, then you add and revise content. If every update is shared by manually sending files back and forth, your computers quickly fill up with copies like ‘final-v2-real-final’. Even worse, if your teammate updates something without telling you, and you edit the same part, you’ll have to manually compare and decide whose version to keep.
To solve this, you decide to use a ‘middleman’ to manage all versions in one place: always fetch the latest version before editing, submit changes after editing, and roll back whenever needed. Git plays exactly that ‘version middleman’ role.
Install Git
Install Git with an Agent
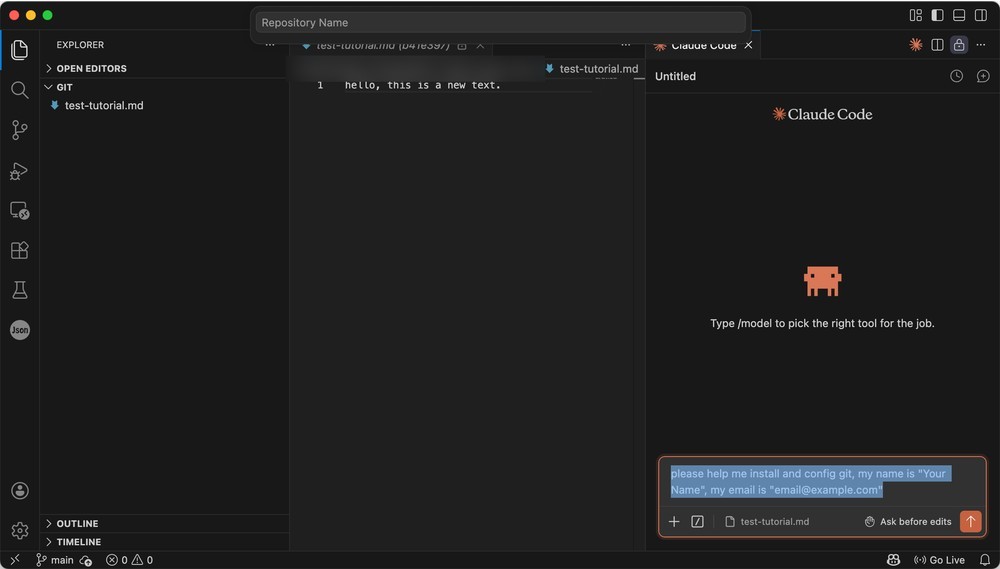
Open your Agent tool, enter the following, then wait for the task to finish:
Please help me install and config git, my name is 'Your Name', my email is '[email protected]'.
Git does not strictly require a real username or email. It will still work with ‘Your Name’ and ’[email protected]’. But once you push to the cloud, others can see your commit identity, so it’s better to use your real nickname and email.
Basic Git Operations
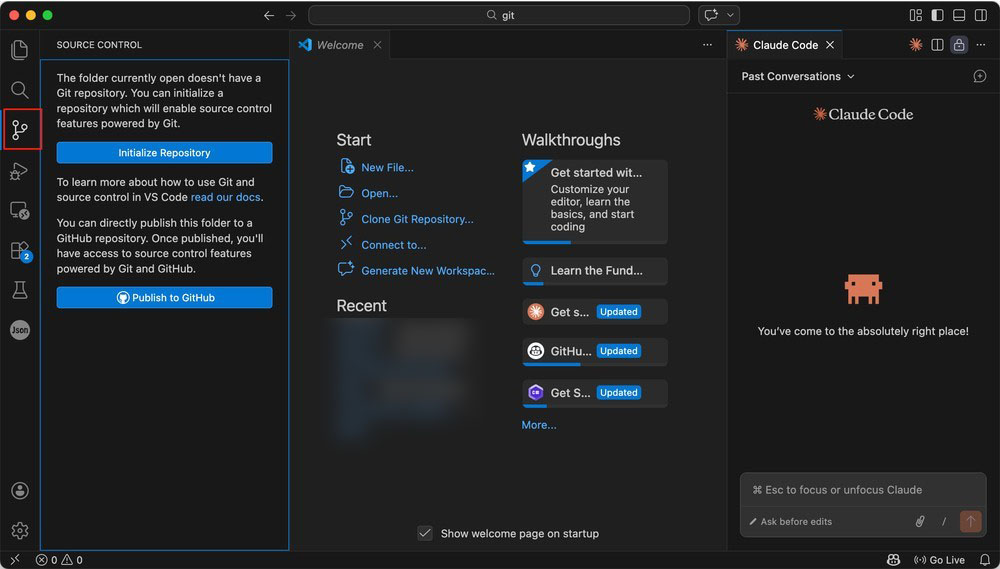
Open Visual Studio Code (VS Code), choose a working folder, then click the branch-like Source Control icon in the left sidebar.
At first, there is no version history yet. Only projects tracked by Git will record file history, so it’s best to initialise your repository early. Click Initialise Repository to turn the current folder into a tracked repository.
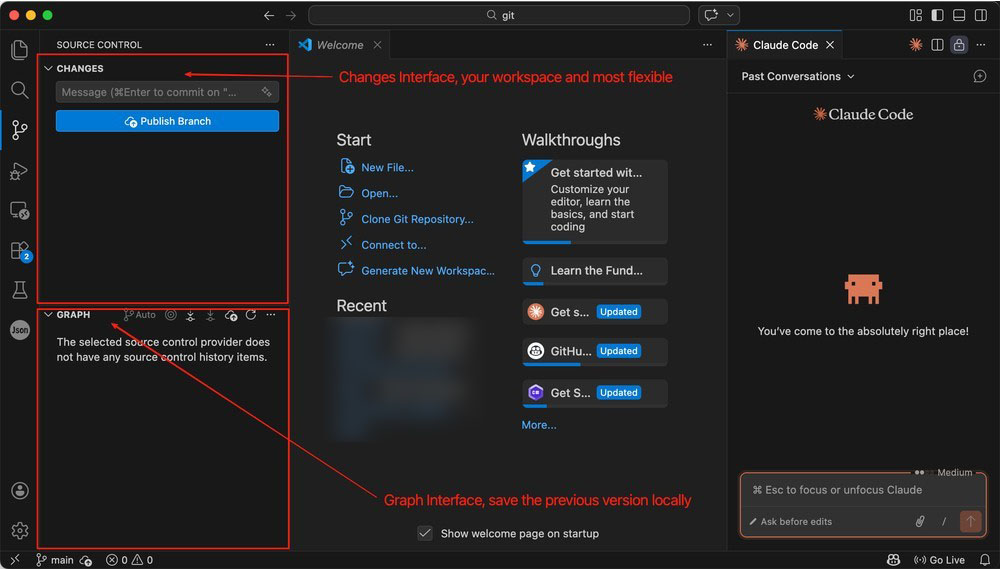
This is the main Git workspace. The CHANGES area at the top is for reviewing and handling edits, such as staging or undoing. The GRAPH area below shows commit history. You can think of each commit as a reviewable and shareable snapshot.
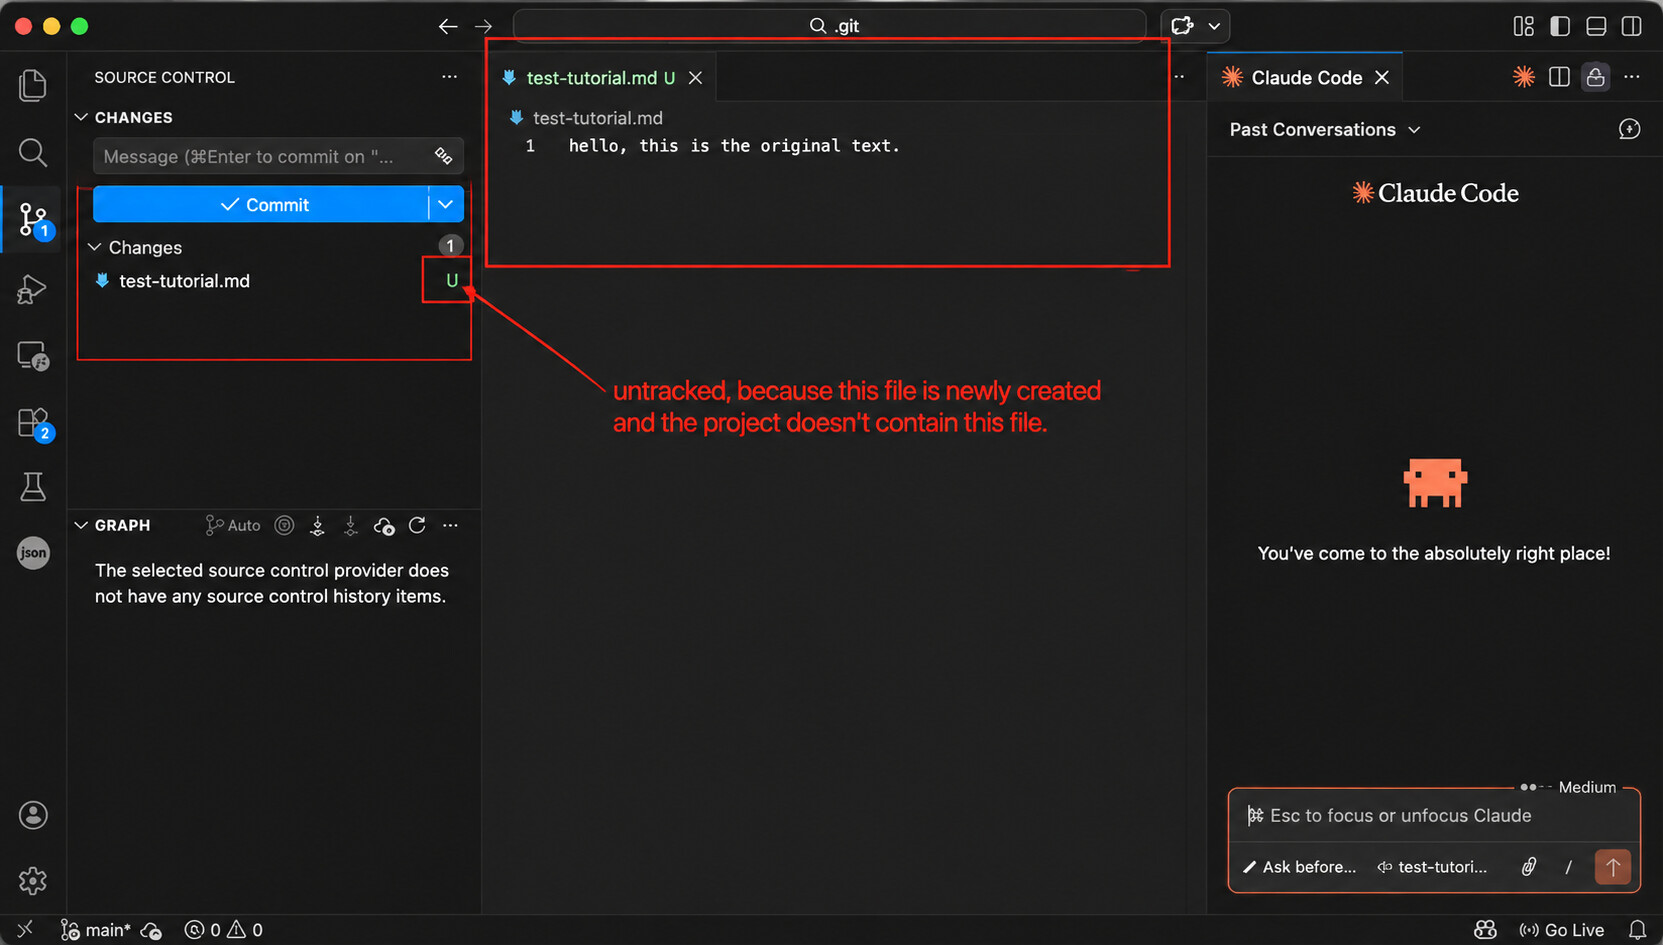
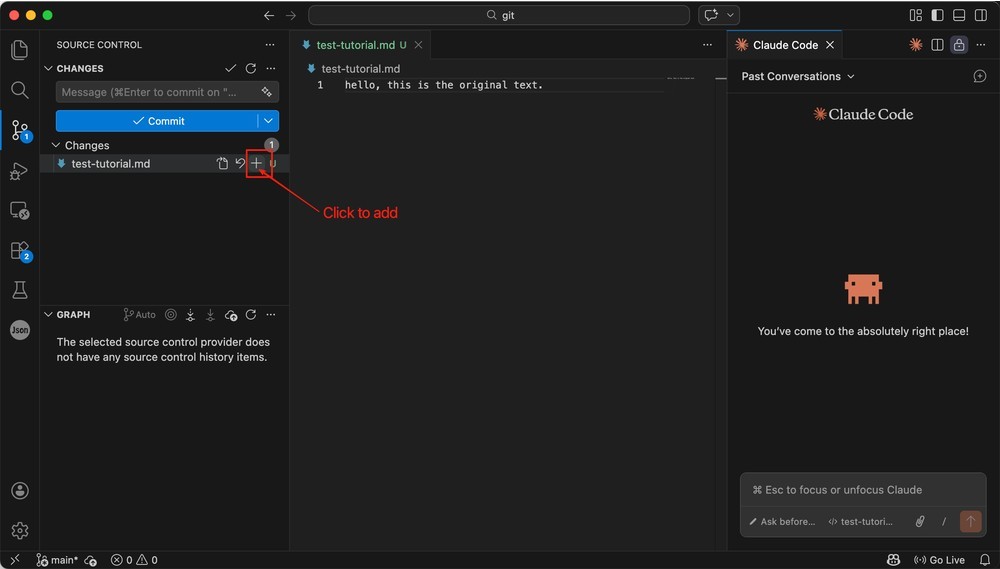
After creating a test file in the folder, you’ll see ‘U’ next to the file name. That means the file is untracked. Git doesn’t know what baseline to compare against yet, so you need to add it to tracking first.
Click the ‘+’ button shown below to add the file to the staging area (Staged Changes).
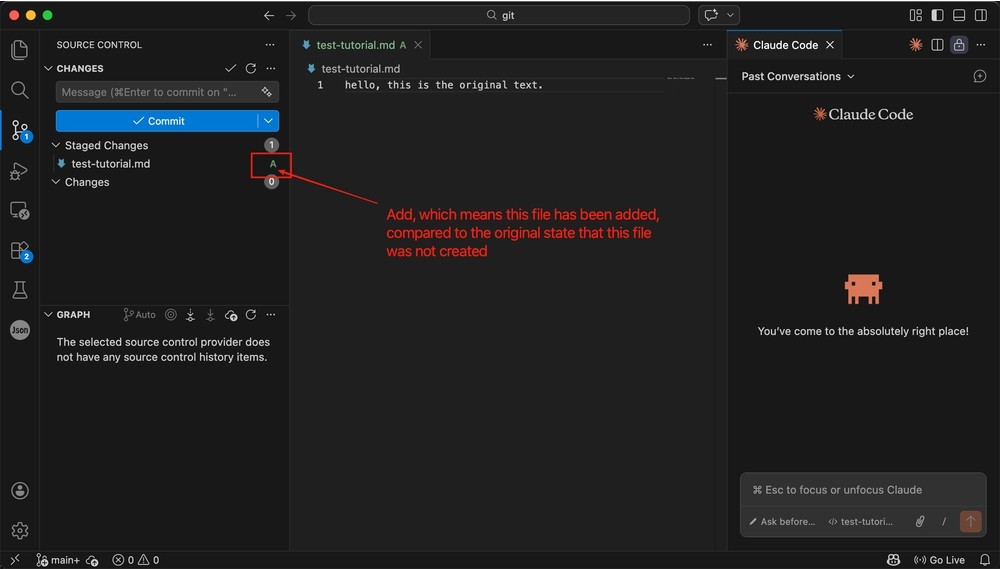
Now the file moves into Staged Changes, and the left-side symbol becomes ‘A’, meaning this is a newly added file (Added).
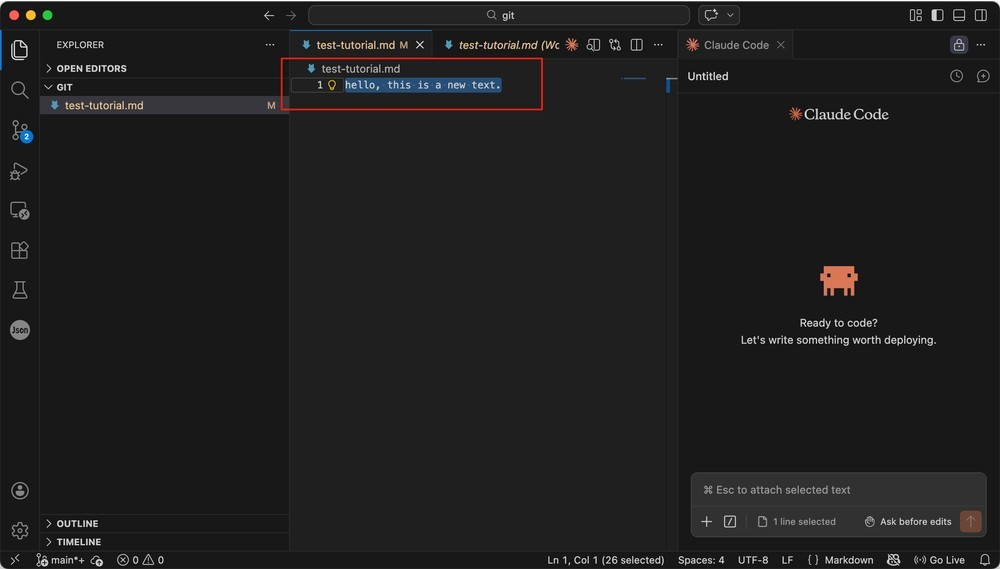
Now change the text to ‘hello, this is a new text’.
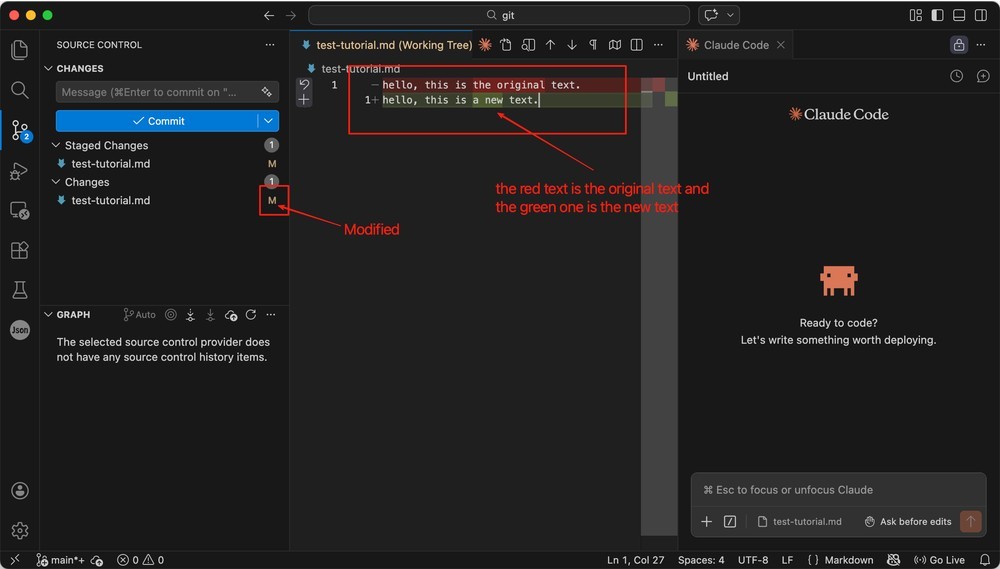
Back in the Git panel, the file changes to ‘M’, meaning it has been modified. The diff editor on the right shows changes: red means deleted content, green means added content.
In this case, ‘hello, this is the original text’ is removed and ‘hello, this is a new text’ is added.
Git tracks changes line by line. Even if you change just one word, Git may show it as deleting the old line and adding a new one.
If you’re not happy with the file and delete it, you’ll see a file with ‘D’ in ‘Changes’, meaning it has been deleted.
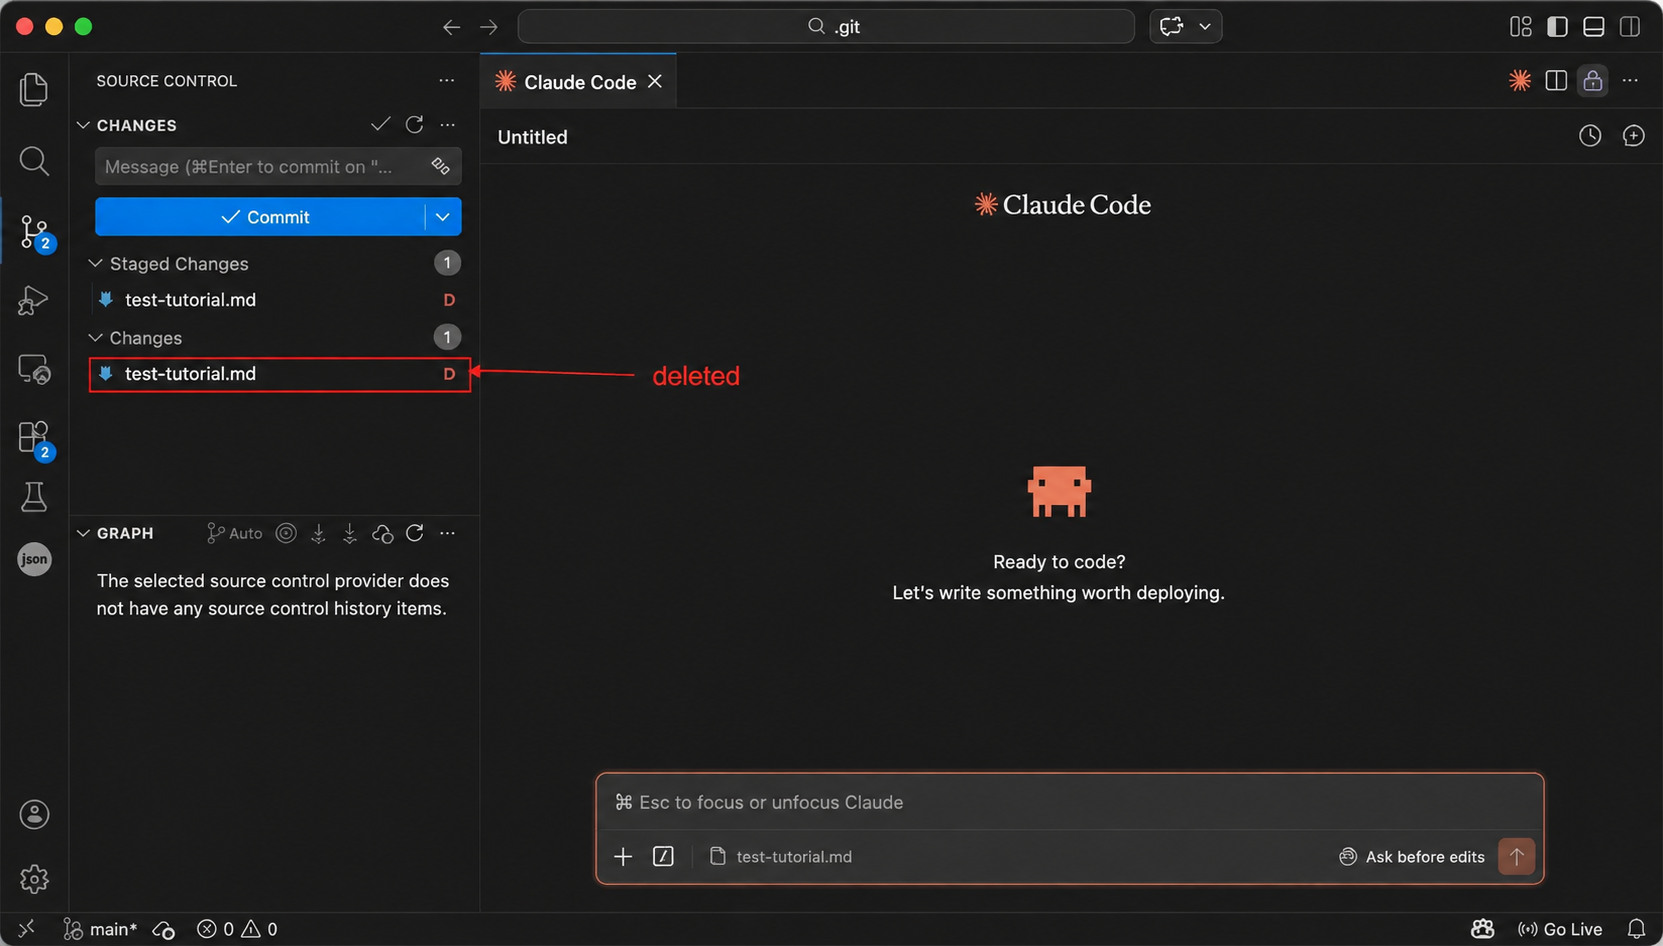
To undo this action, click the undo button highlighted below to restore the file.
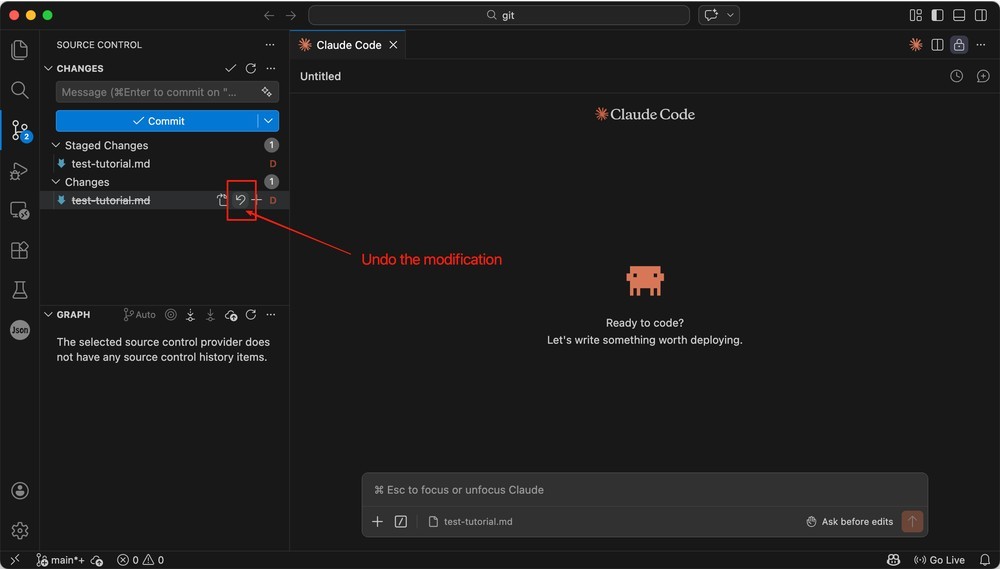
You can also click Unstage Changes to move staged content back to the ‘Changes’ area.
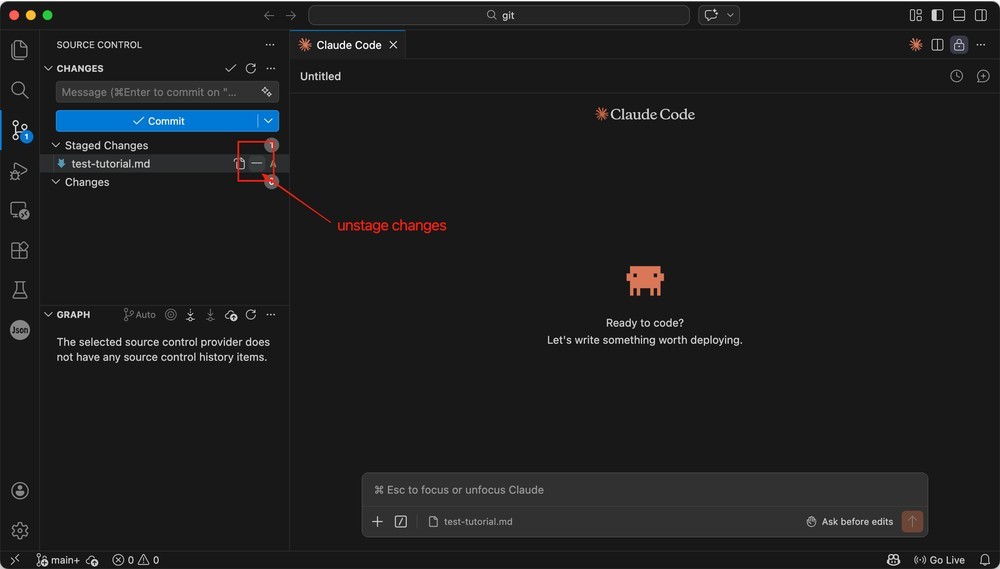
When you’re satisfied with content in ‘Staged Changes’, write a commit message and click Commit to save a new version.
Note that a commit message is required. For example, you could use messages such as ‘Create the initial version’ or ‘Revise Part B of Article A’. A clear commit message helps others understand what this commit changes without having to inspect the content.
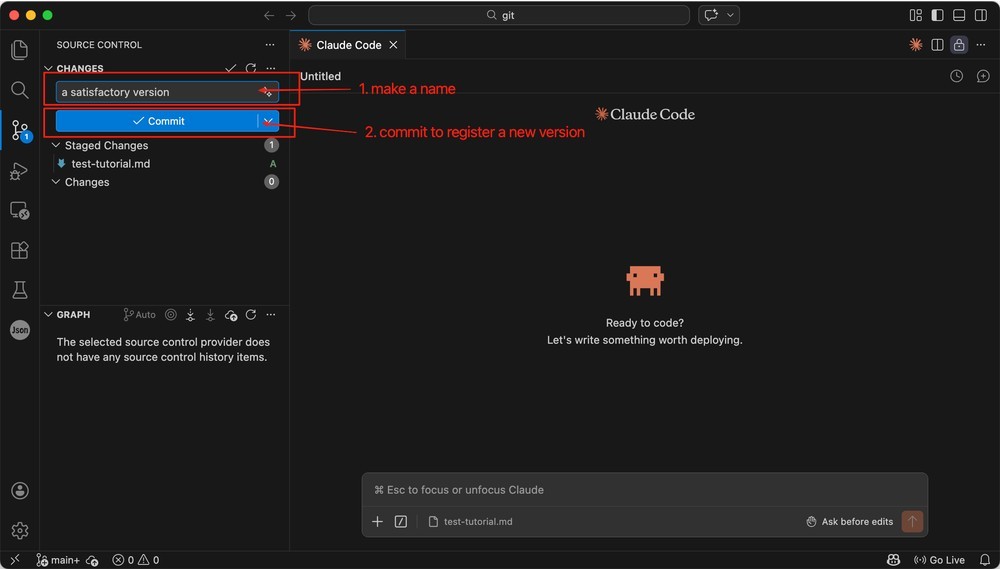
If you don’t enter a commit message and try to commit, VS Code will open a new tab prompting you to provide one before the commit can be completed.
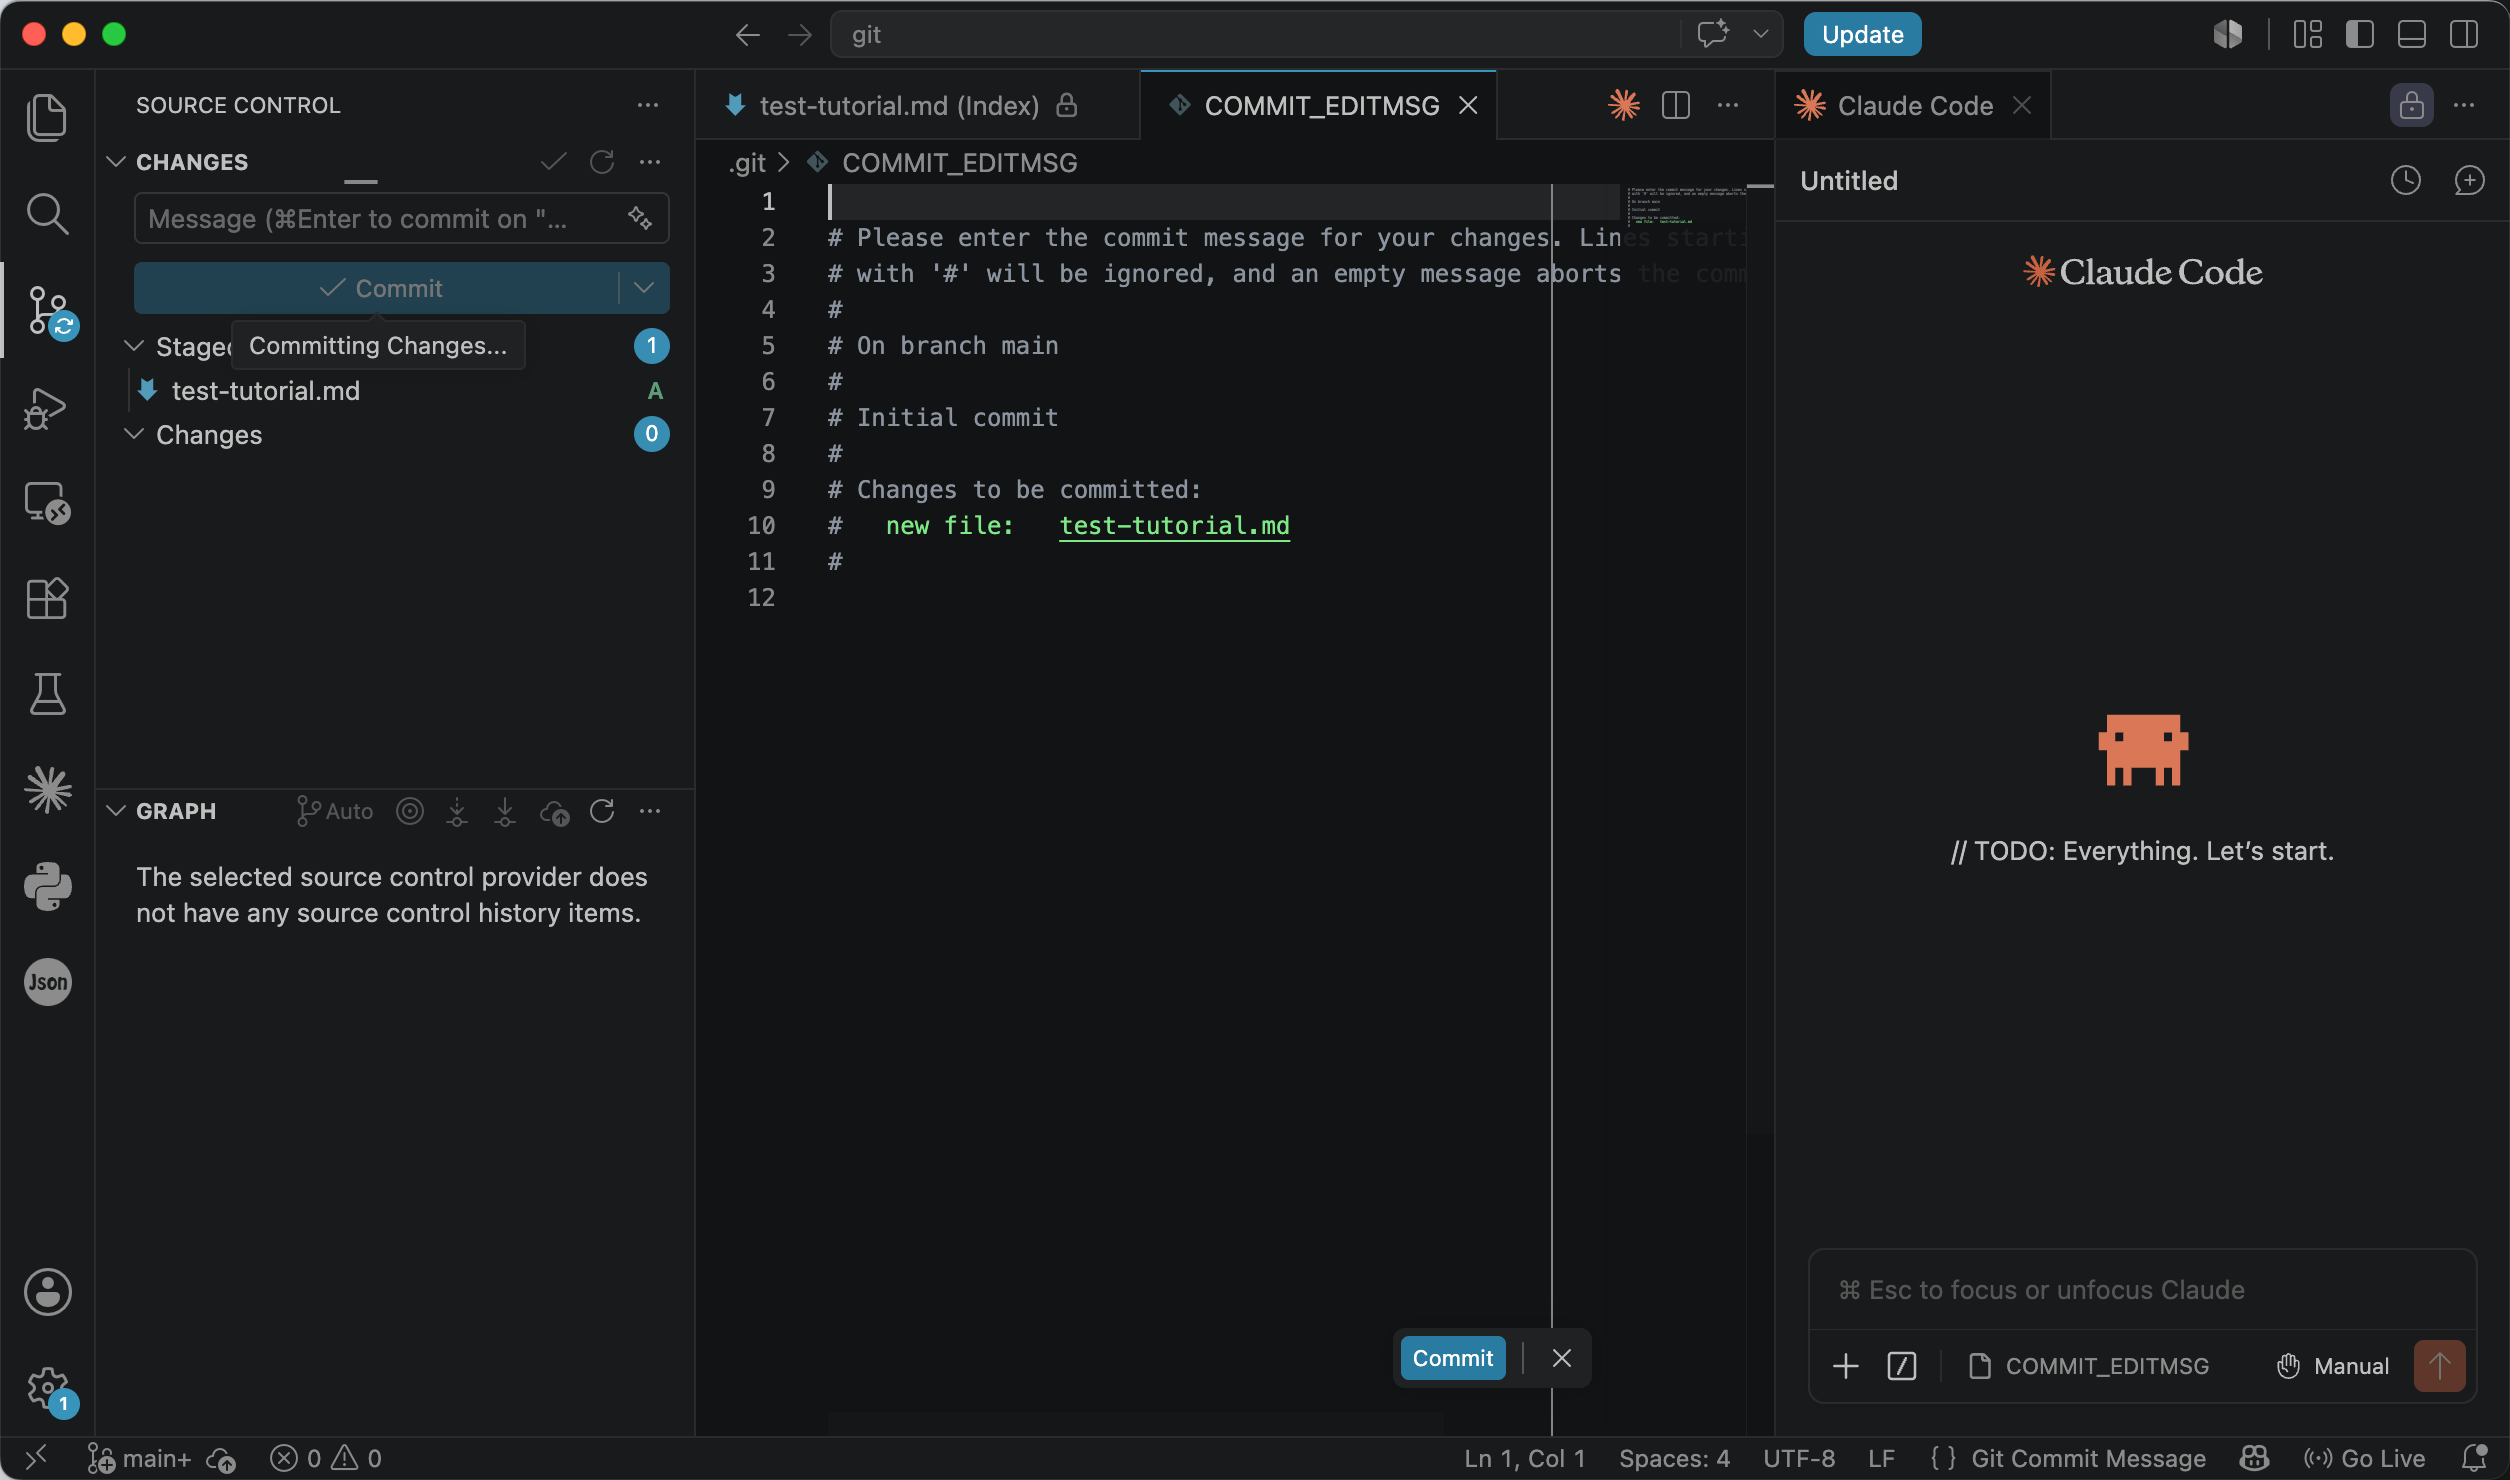
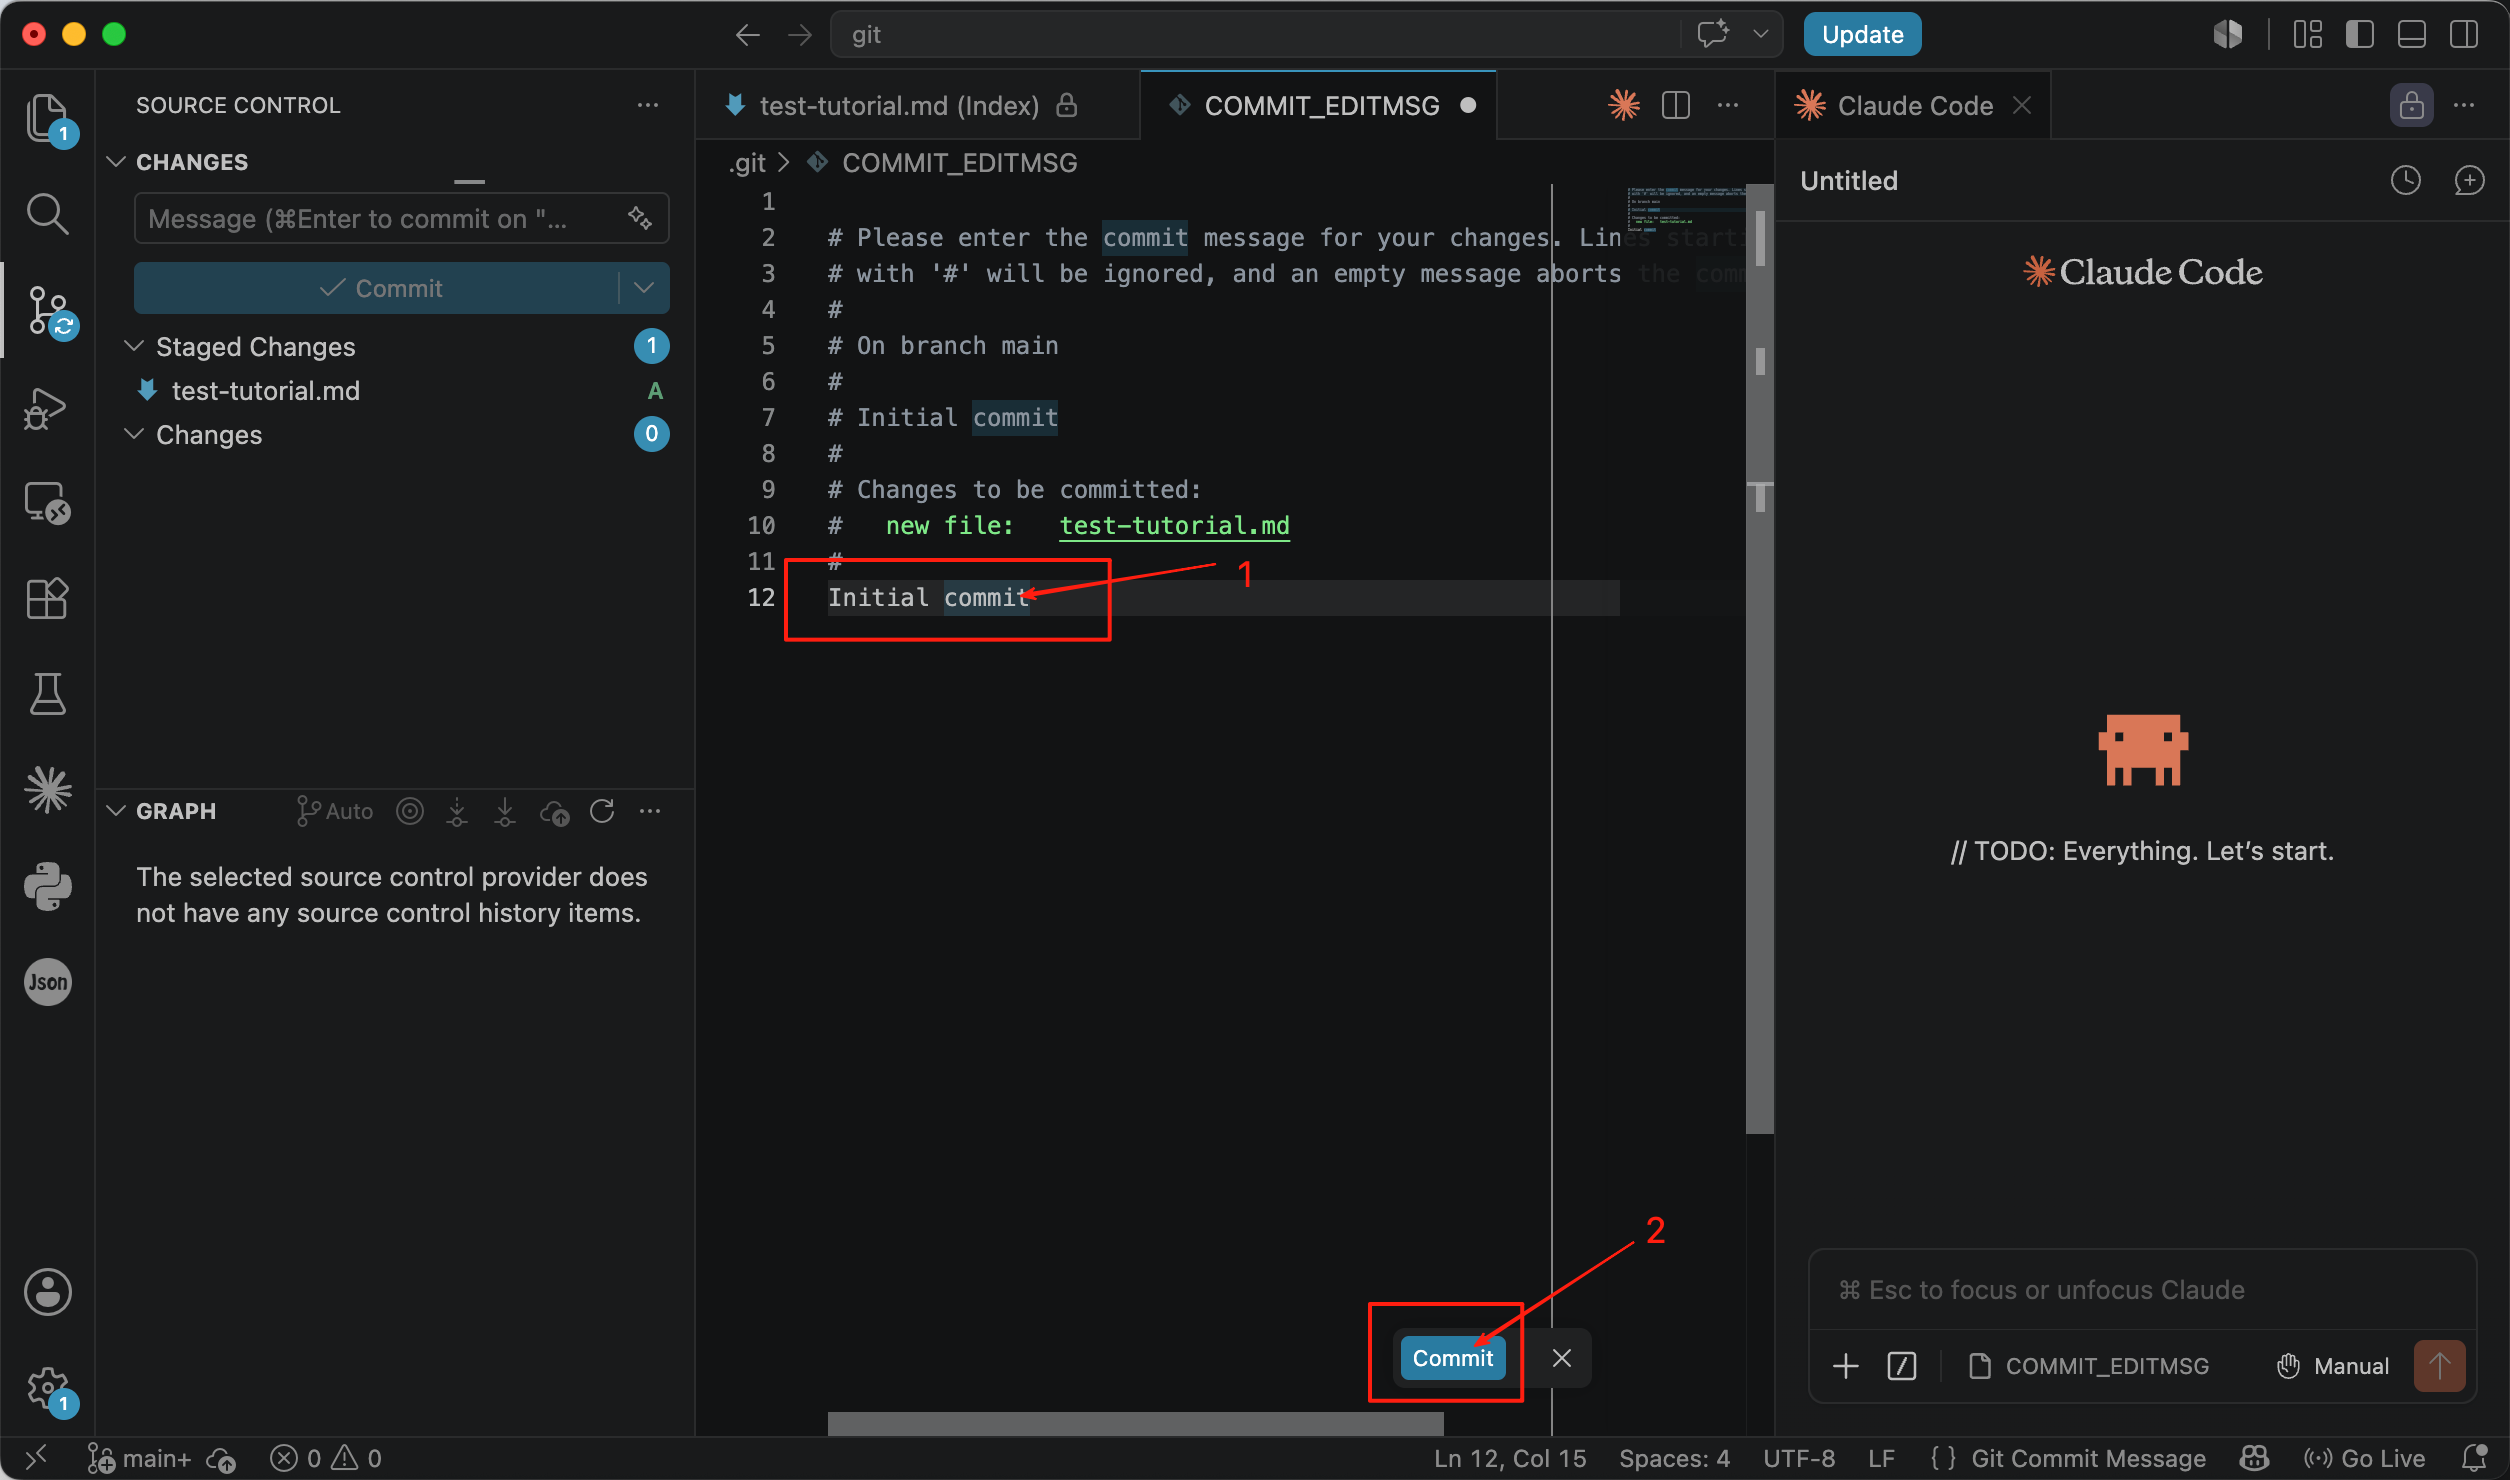
In this tab, enter your commit message below the lines beginning with ‘#’, then save and close the tab and click Commit again.
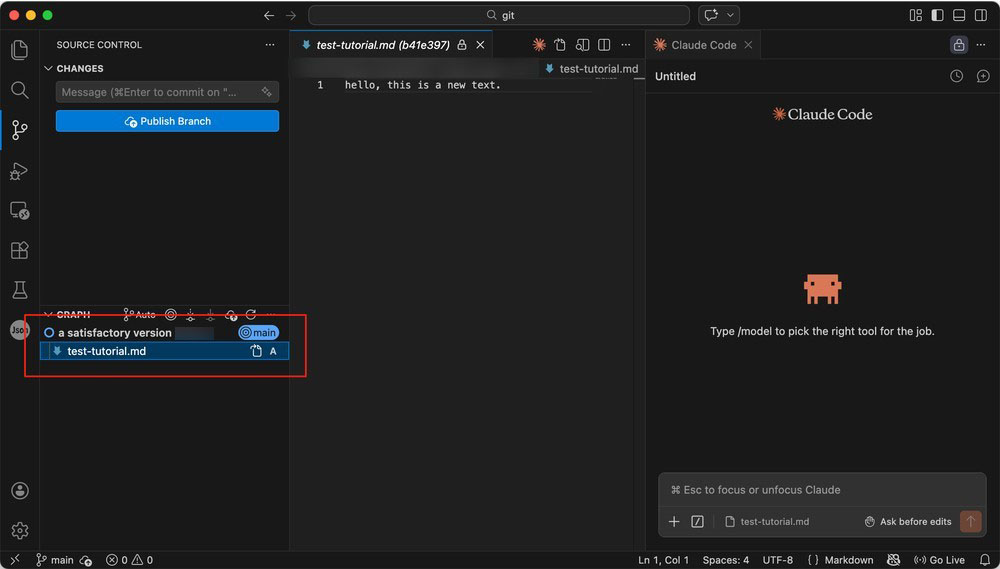
You can now see this new commit in the Graph view.
If your project has a complex directory structure or includes a large number of files, locating a specific file in the default interface can become difficult. Fortunately, you can adjust the display settings to make navigation easier. In the following example, we created a folder and a subfolder, each containing a file.
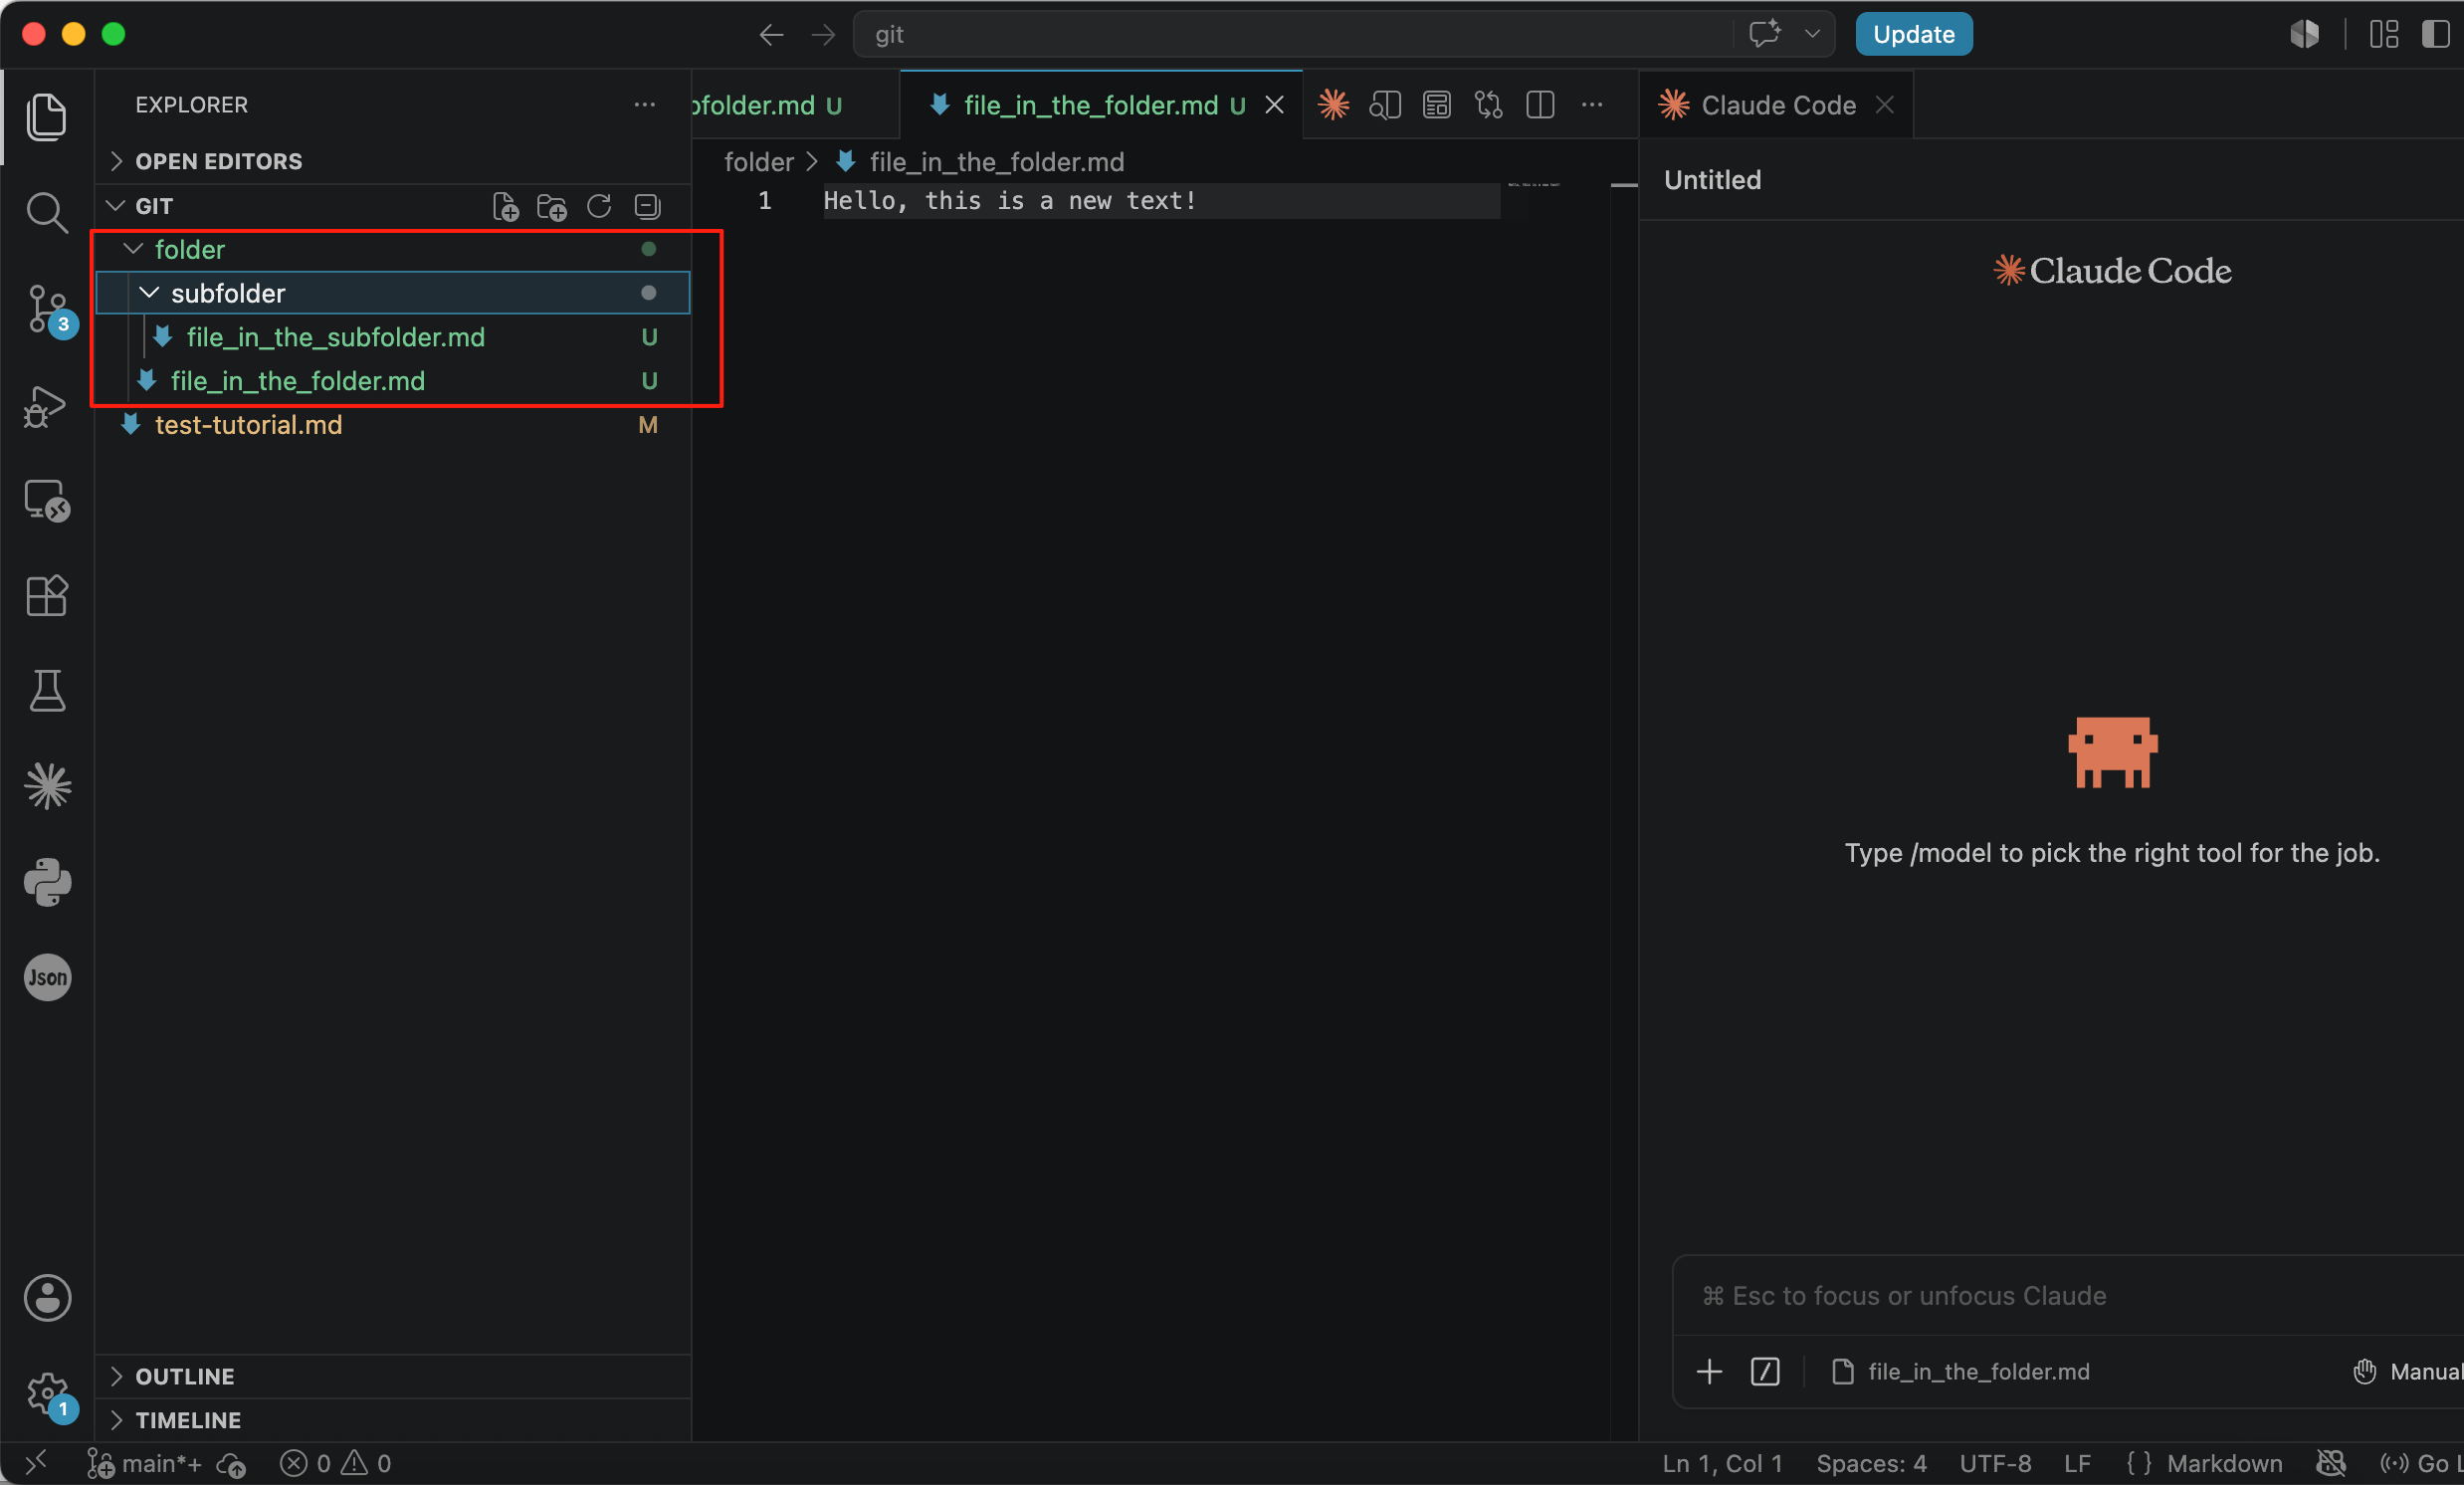
In the default view, it is not immediately clear which files belong to which folders. As the number of files increases, navigating the list becomes increasingly difficult.
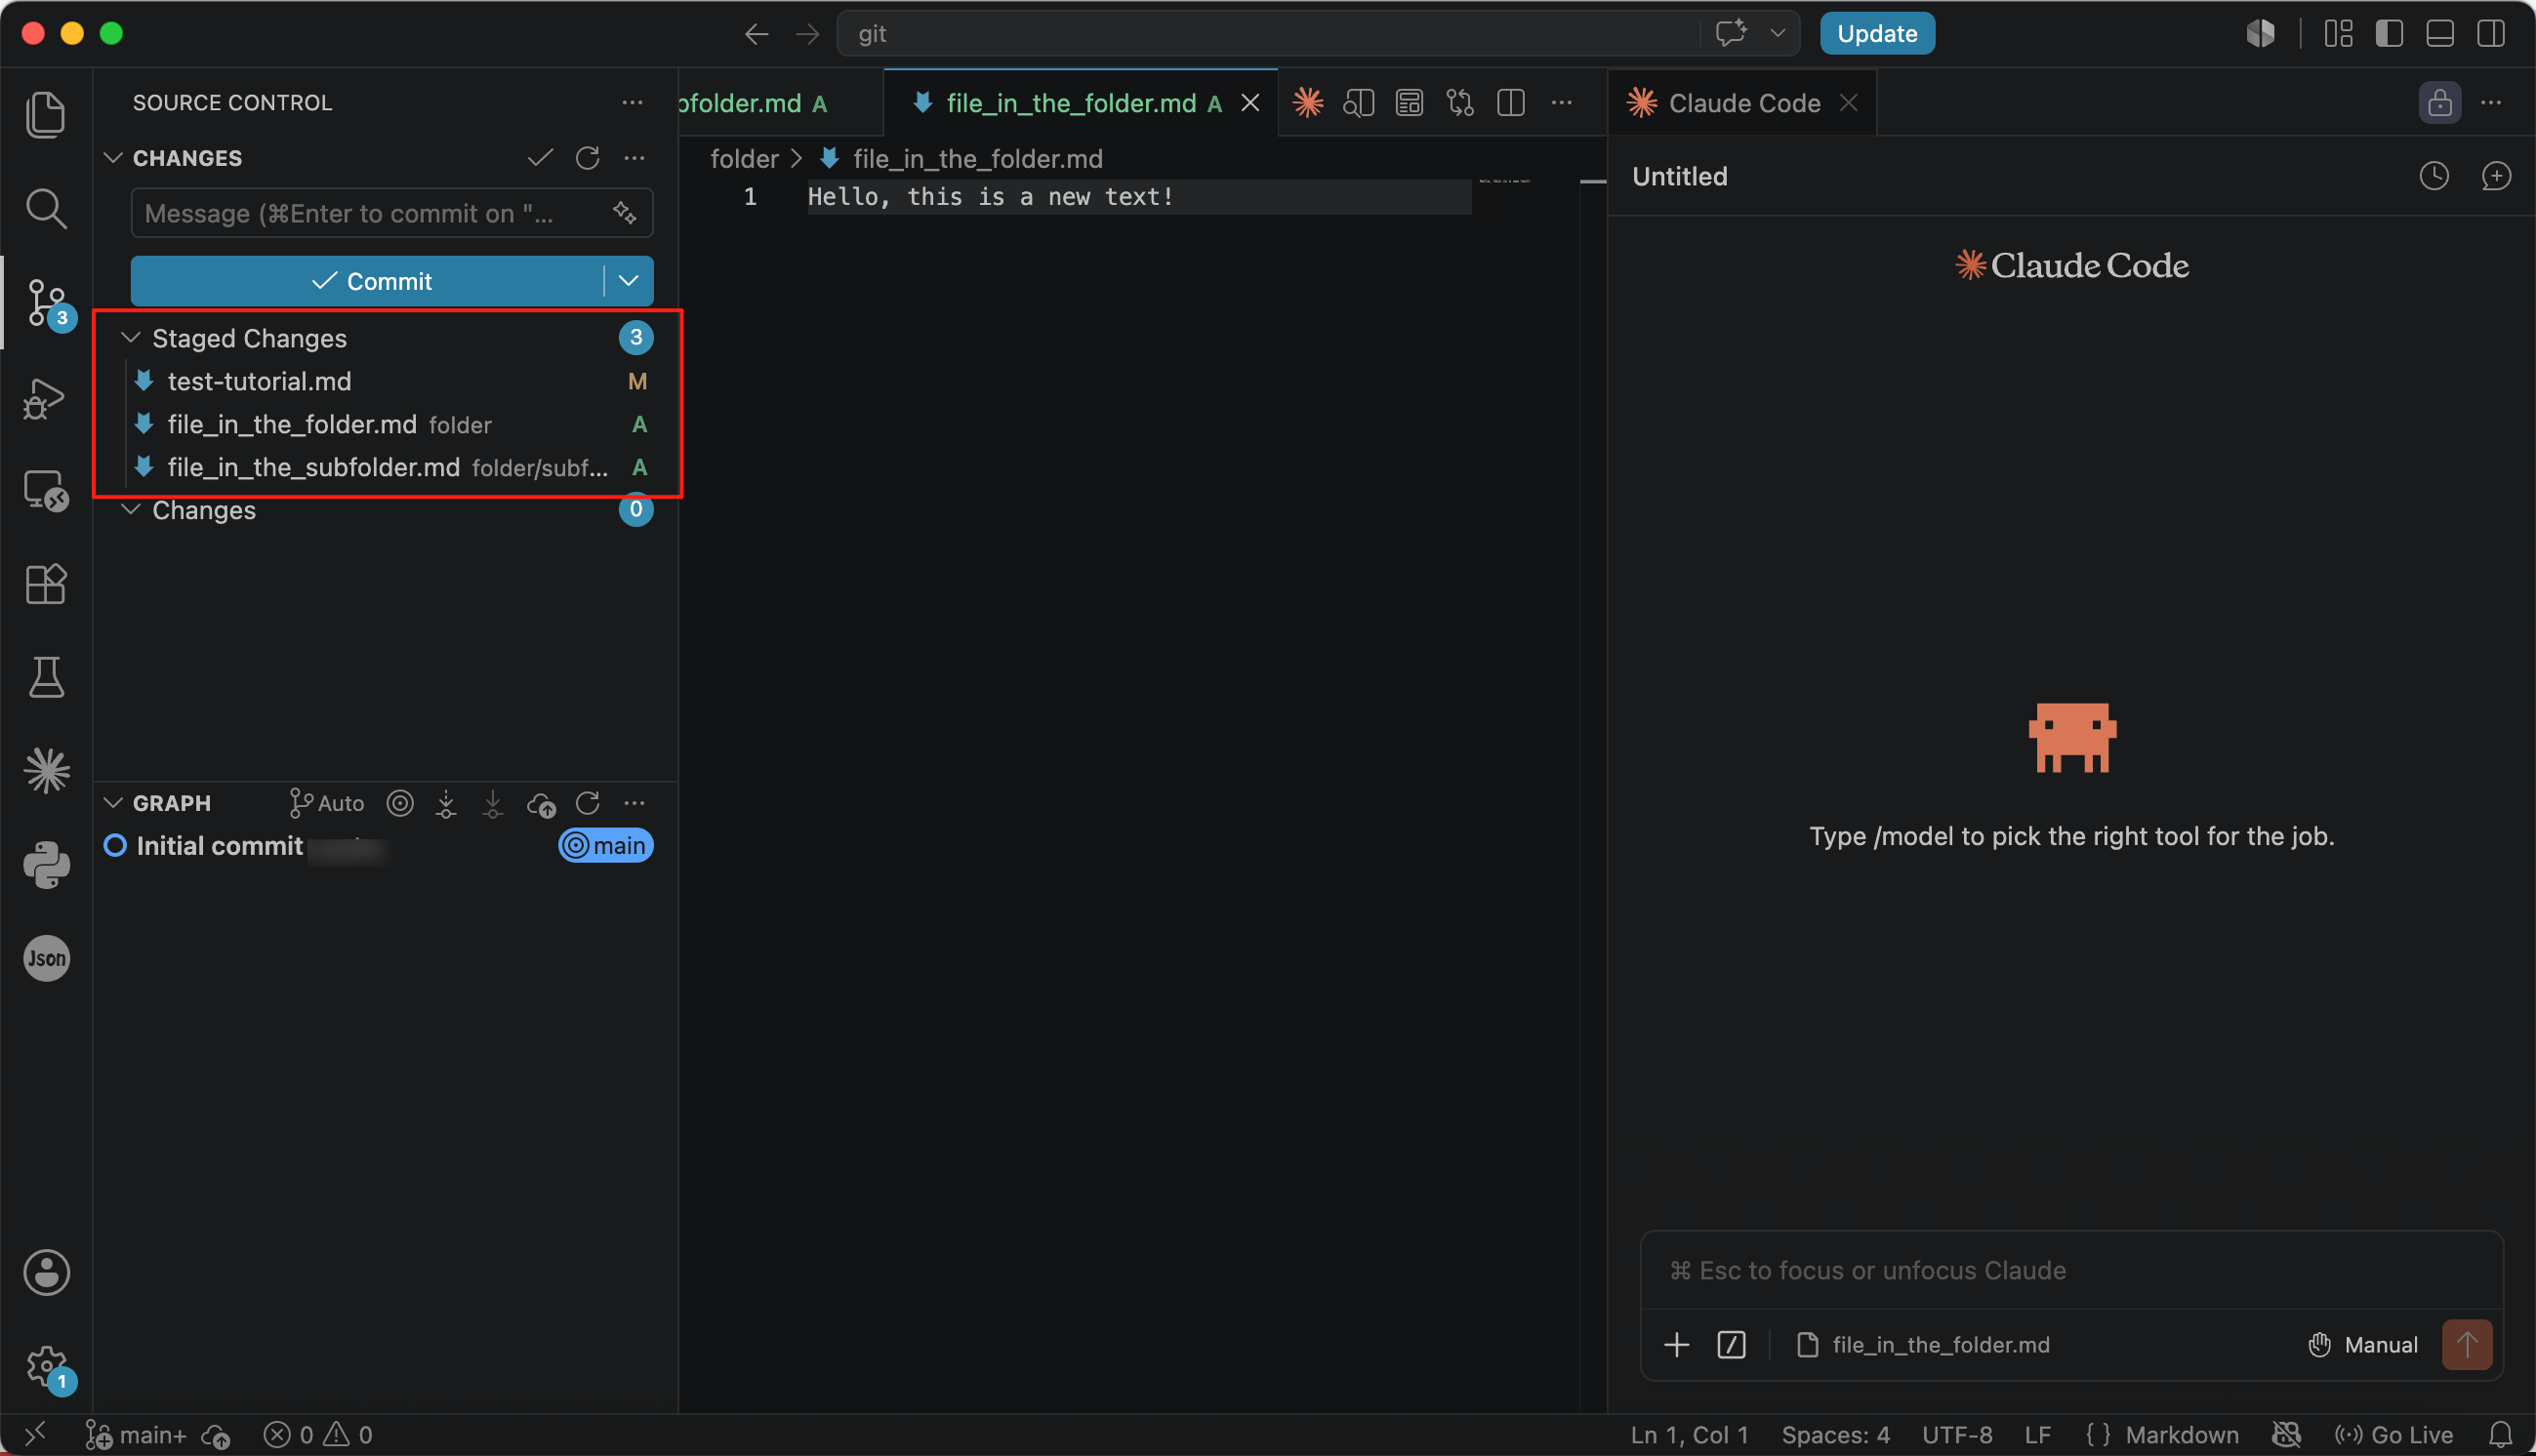
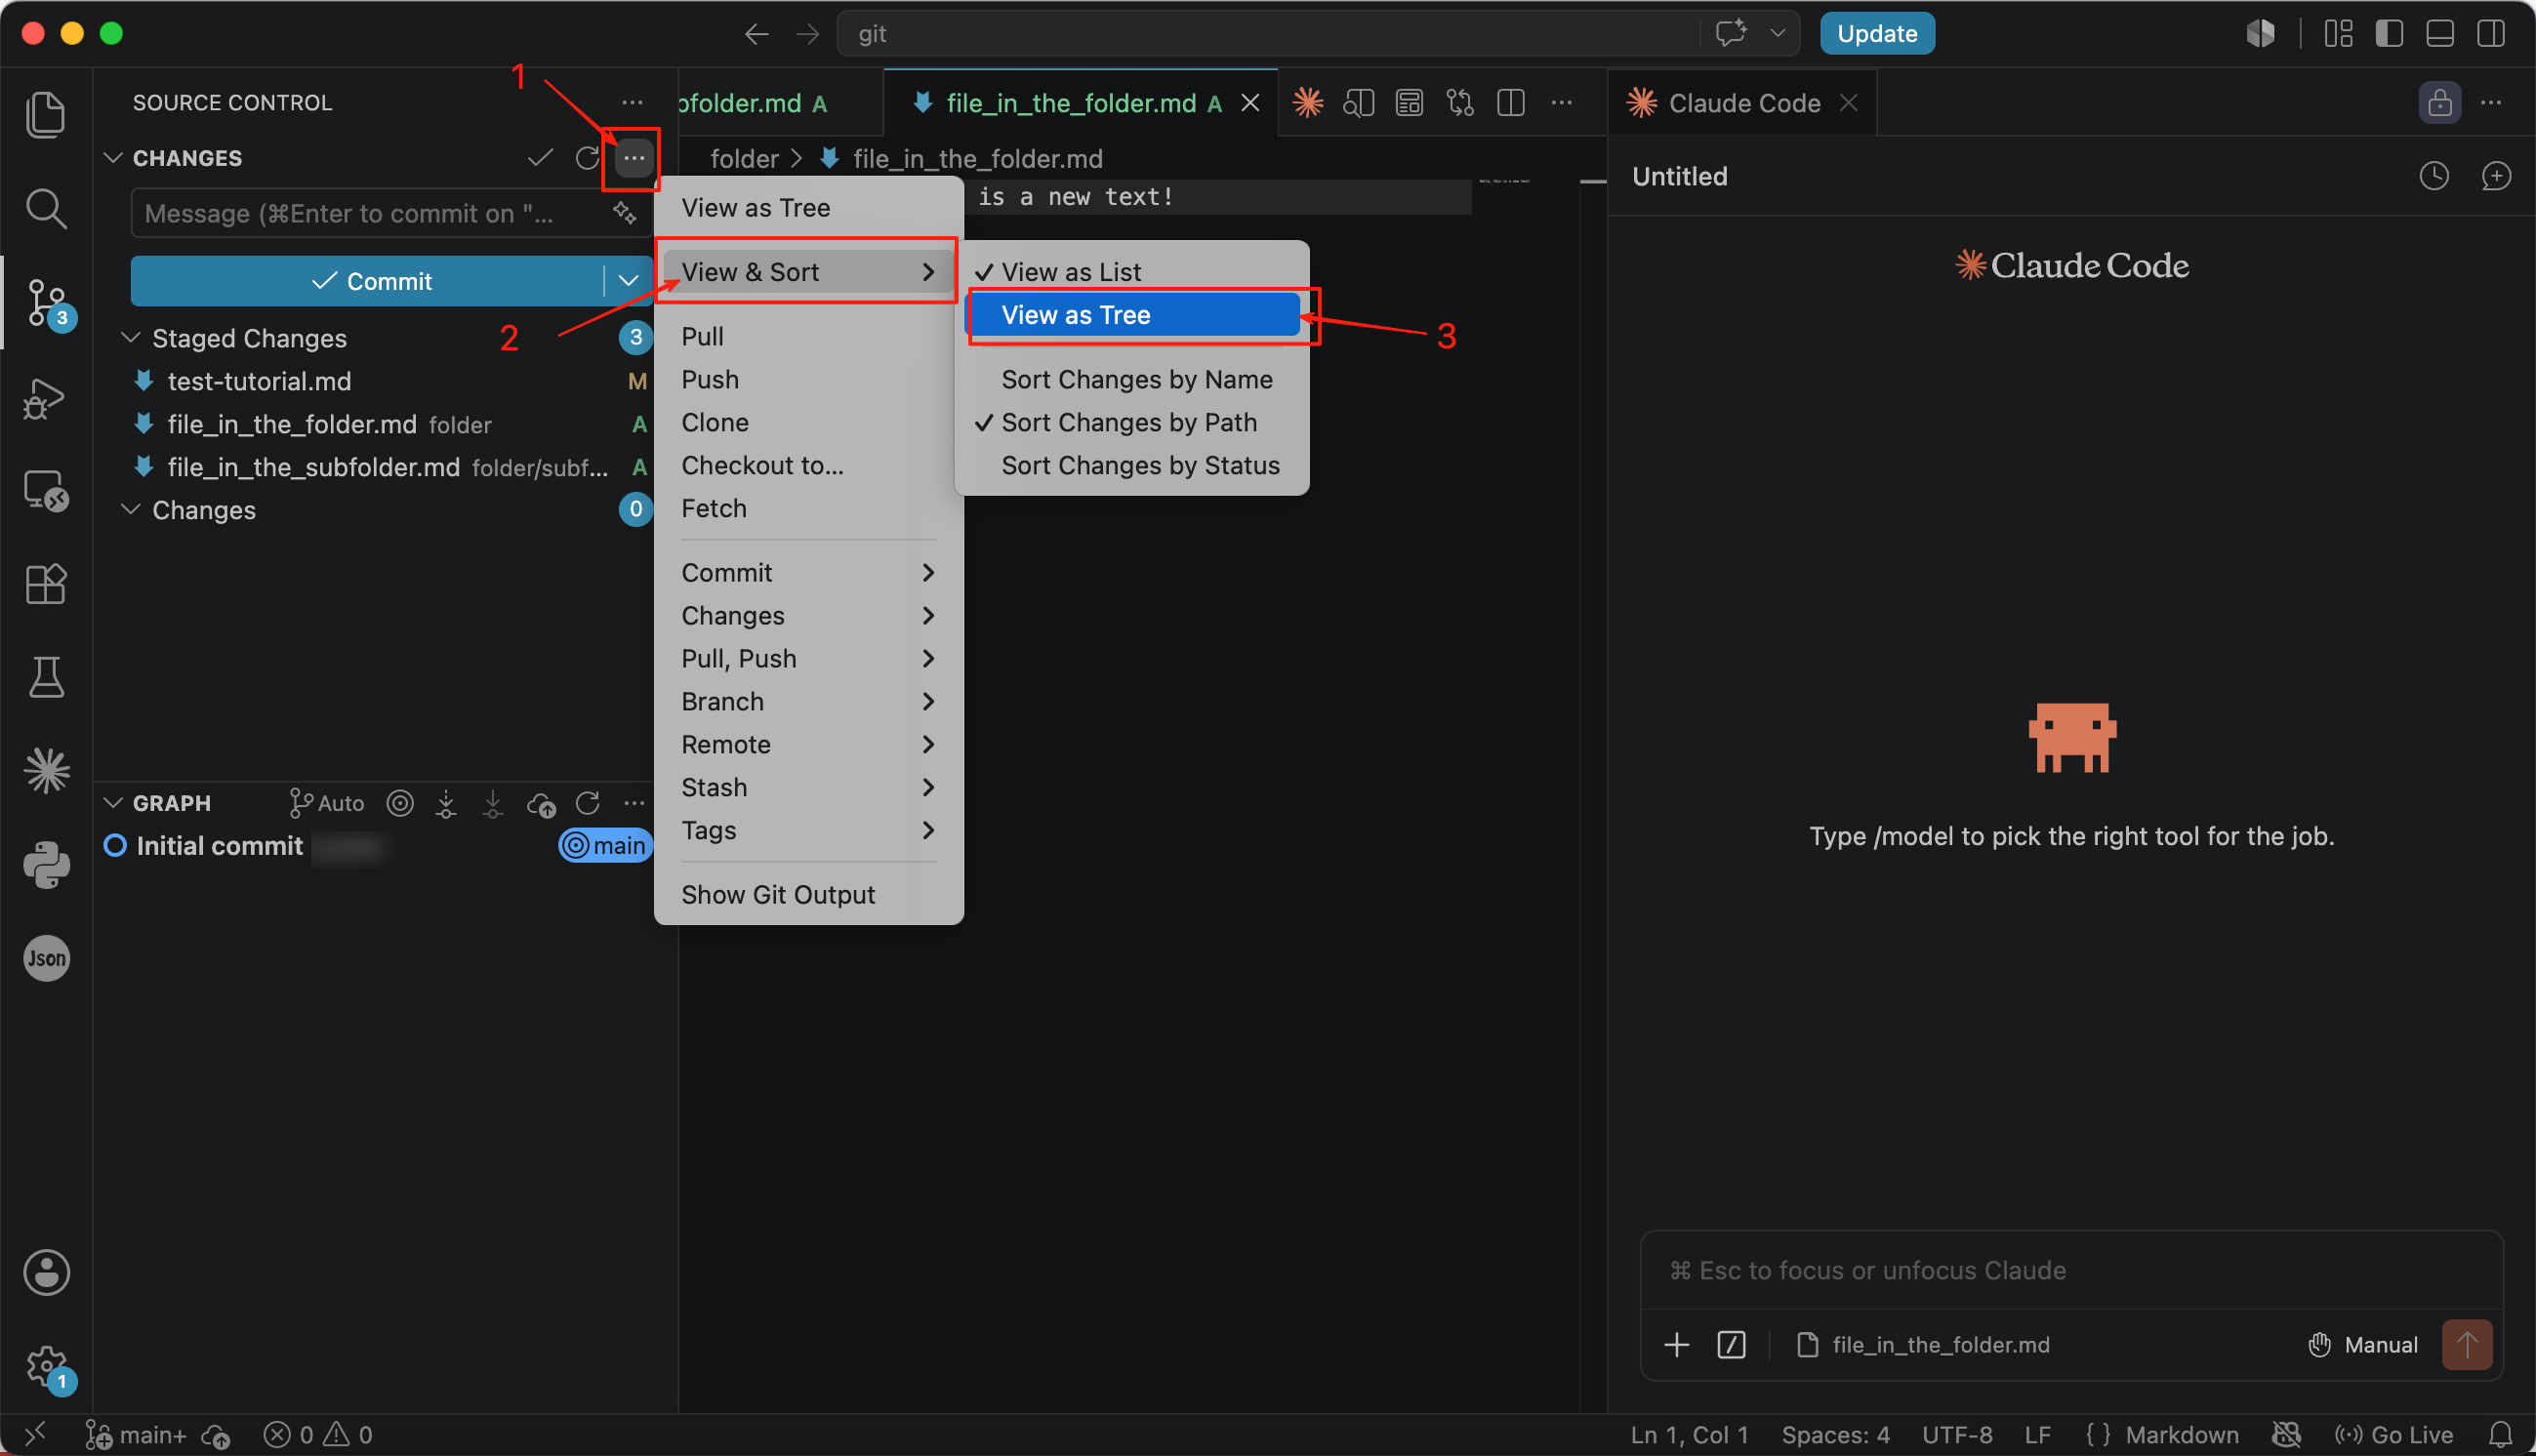
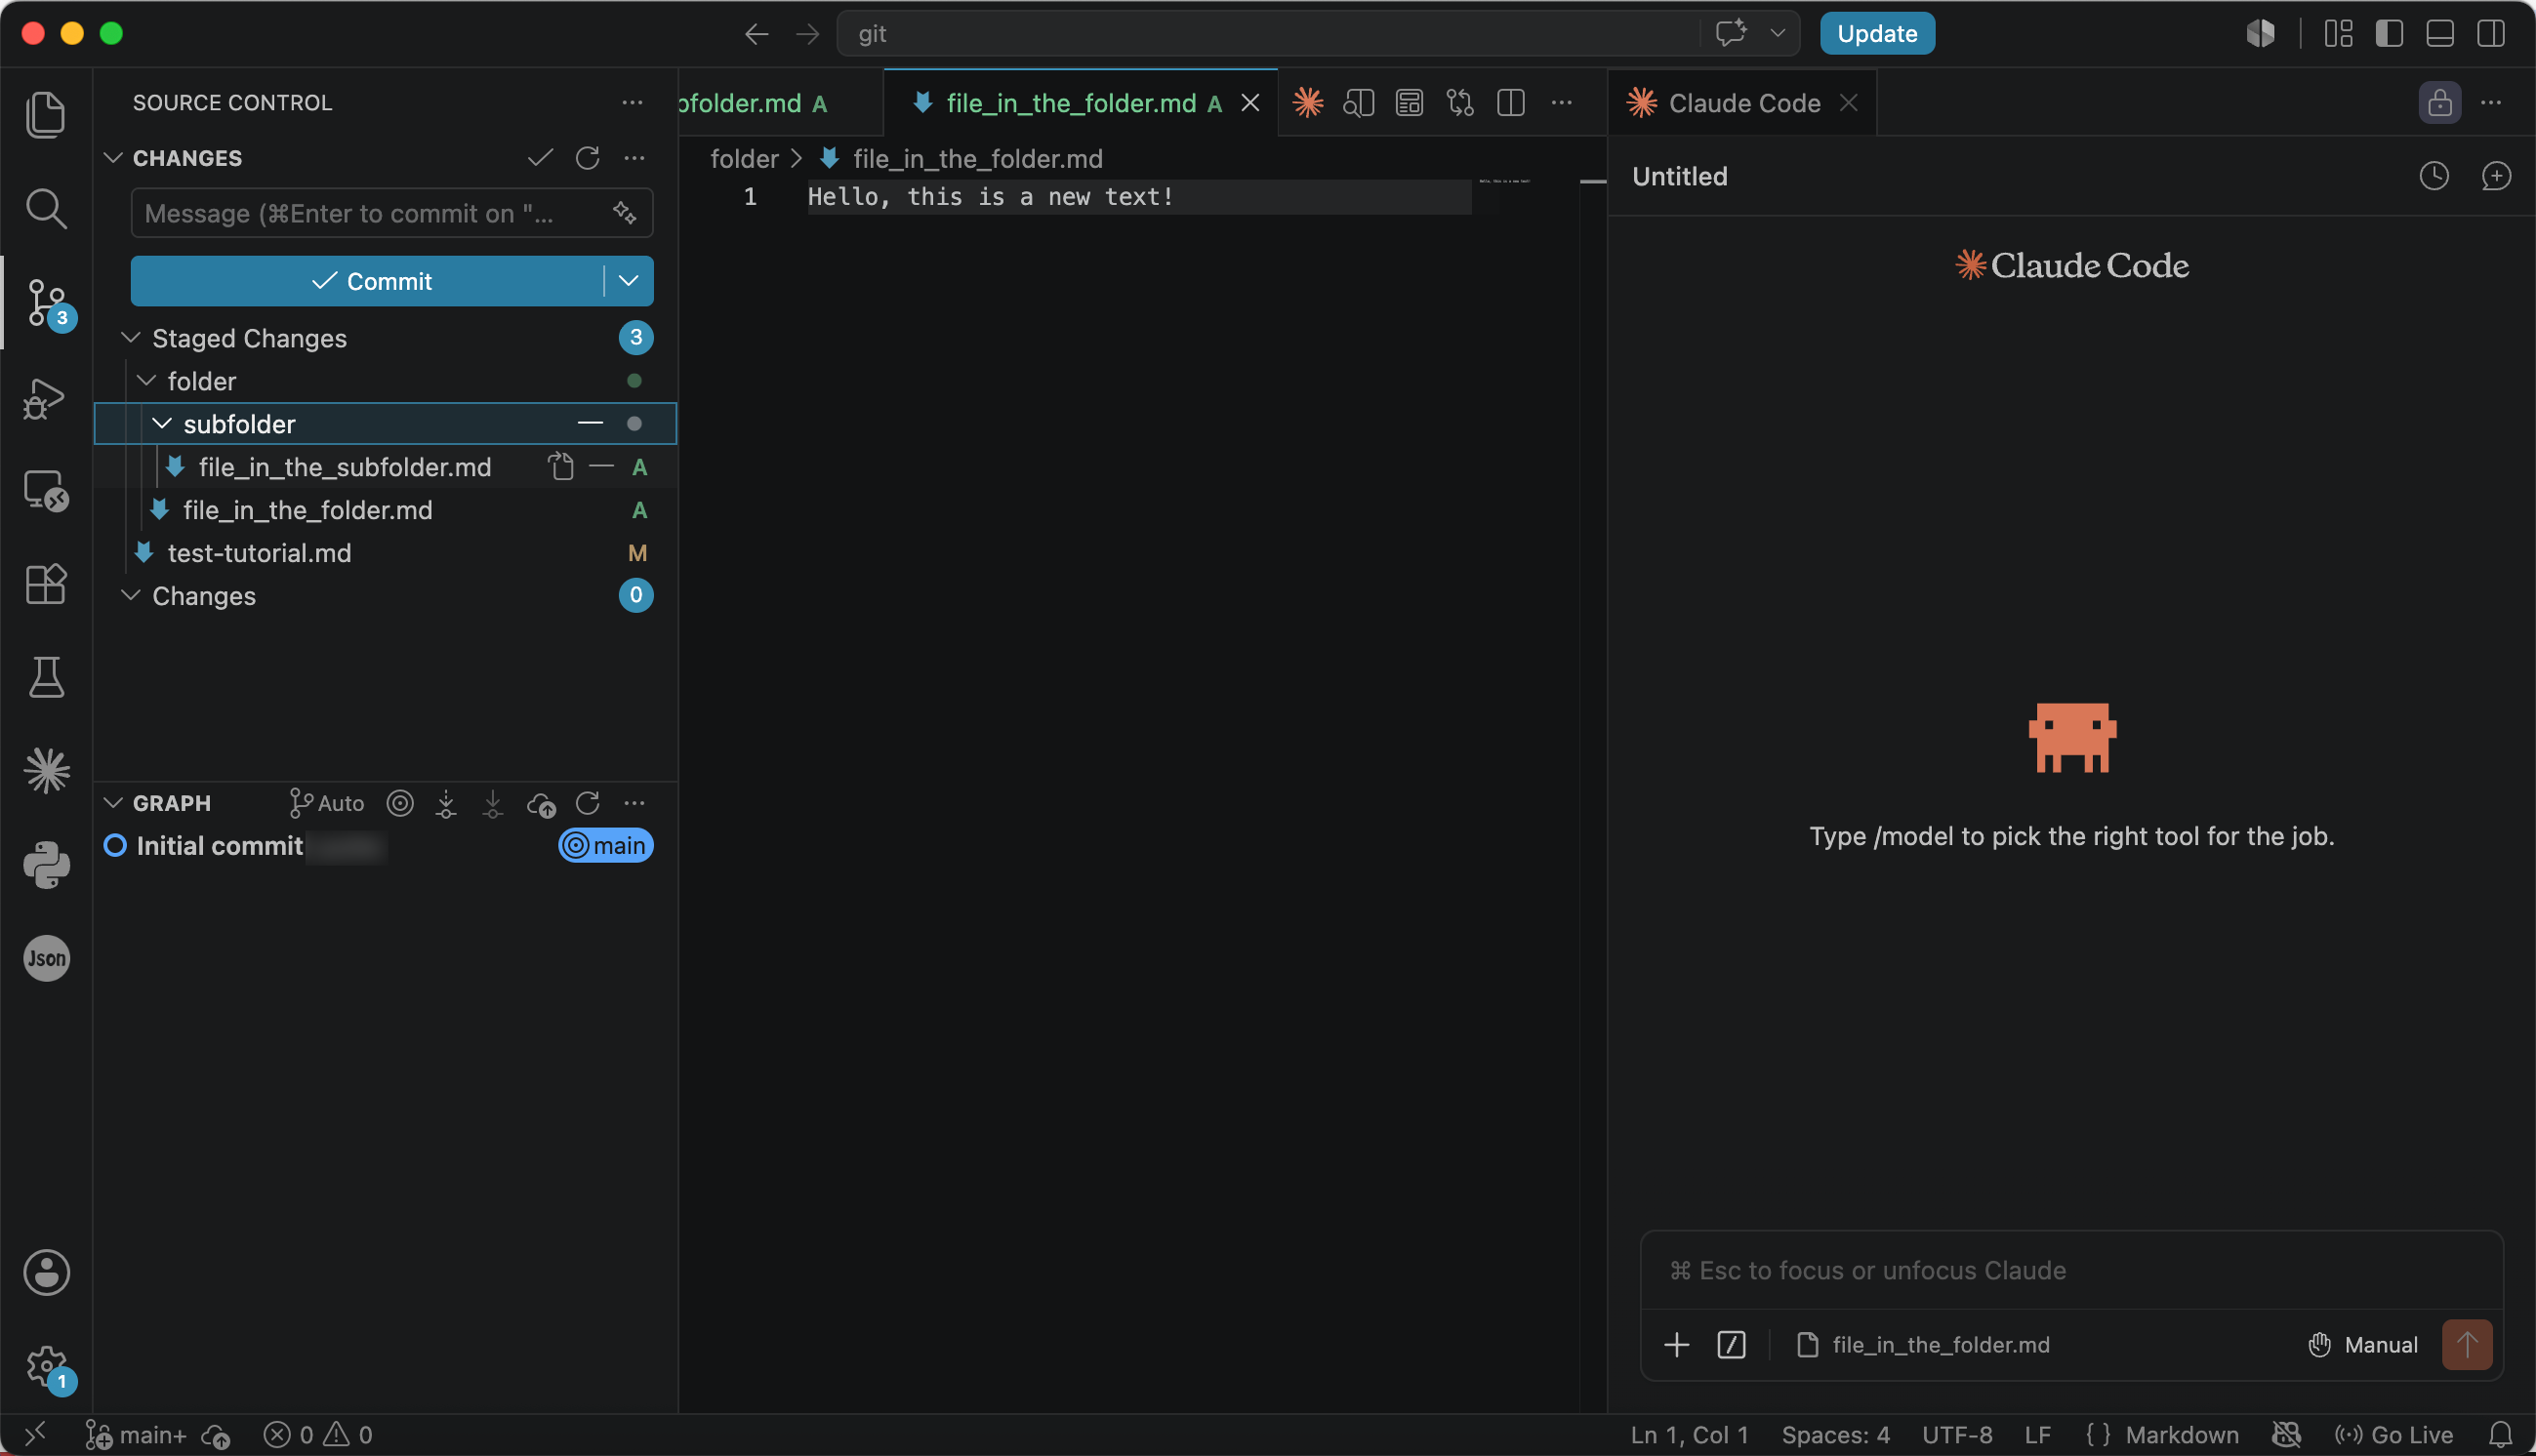
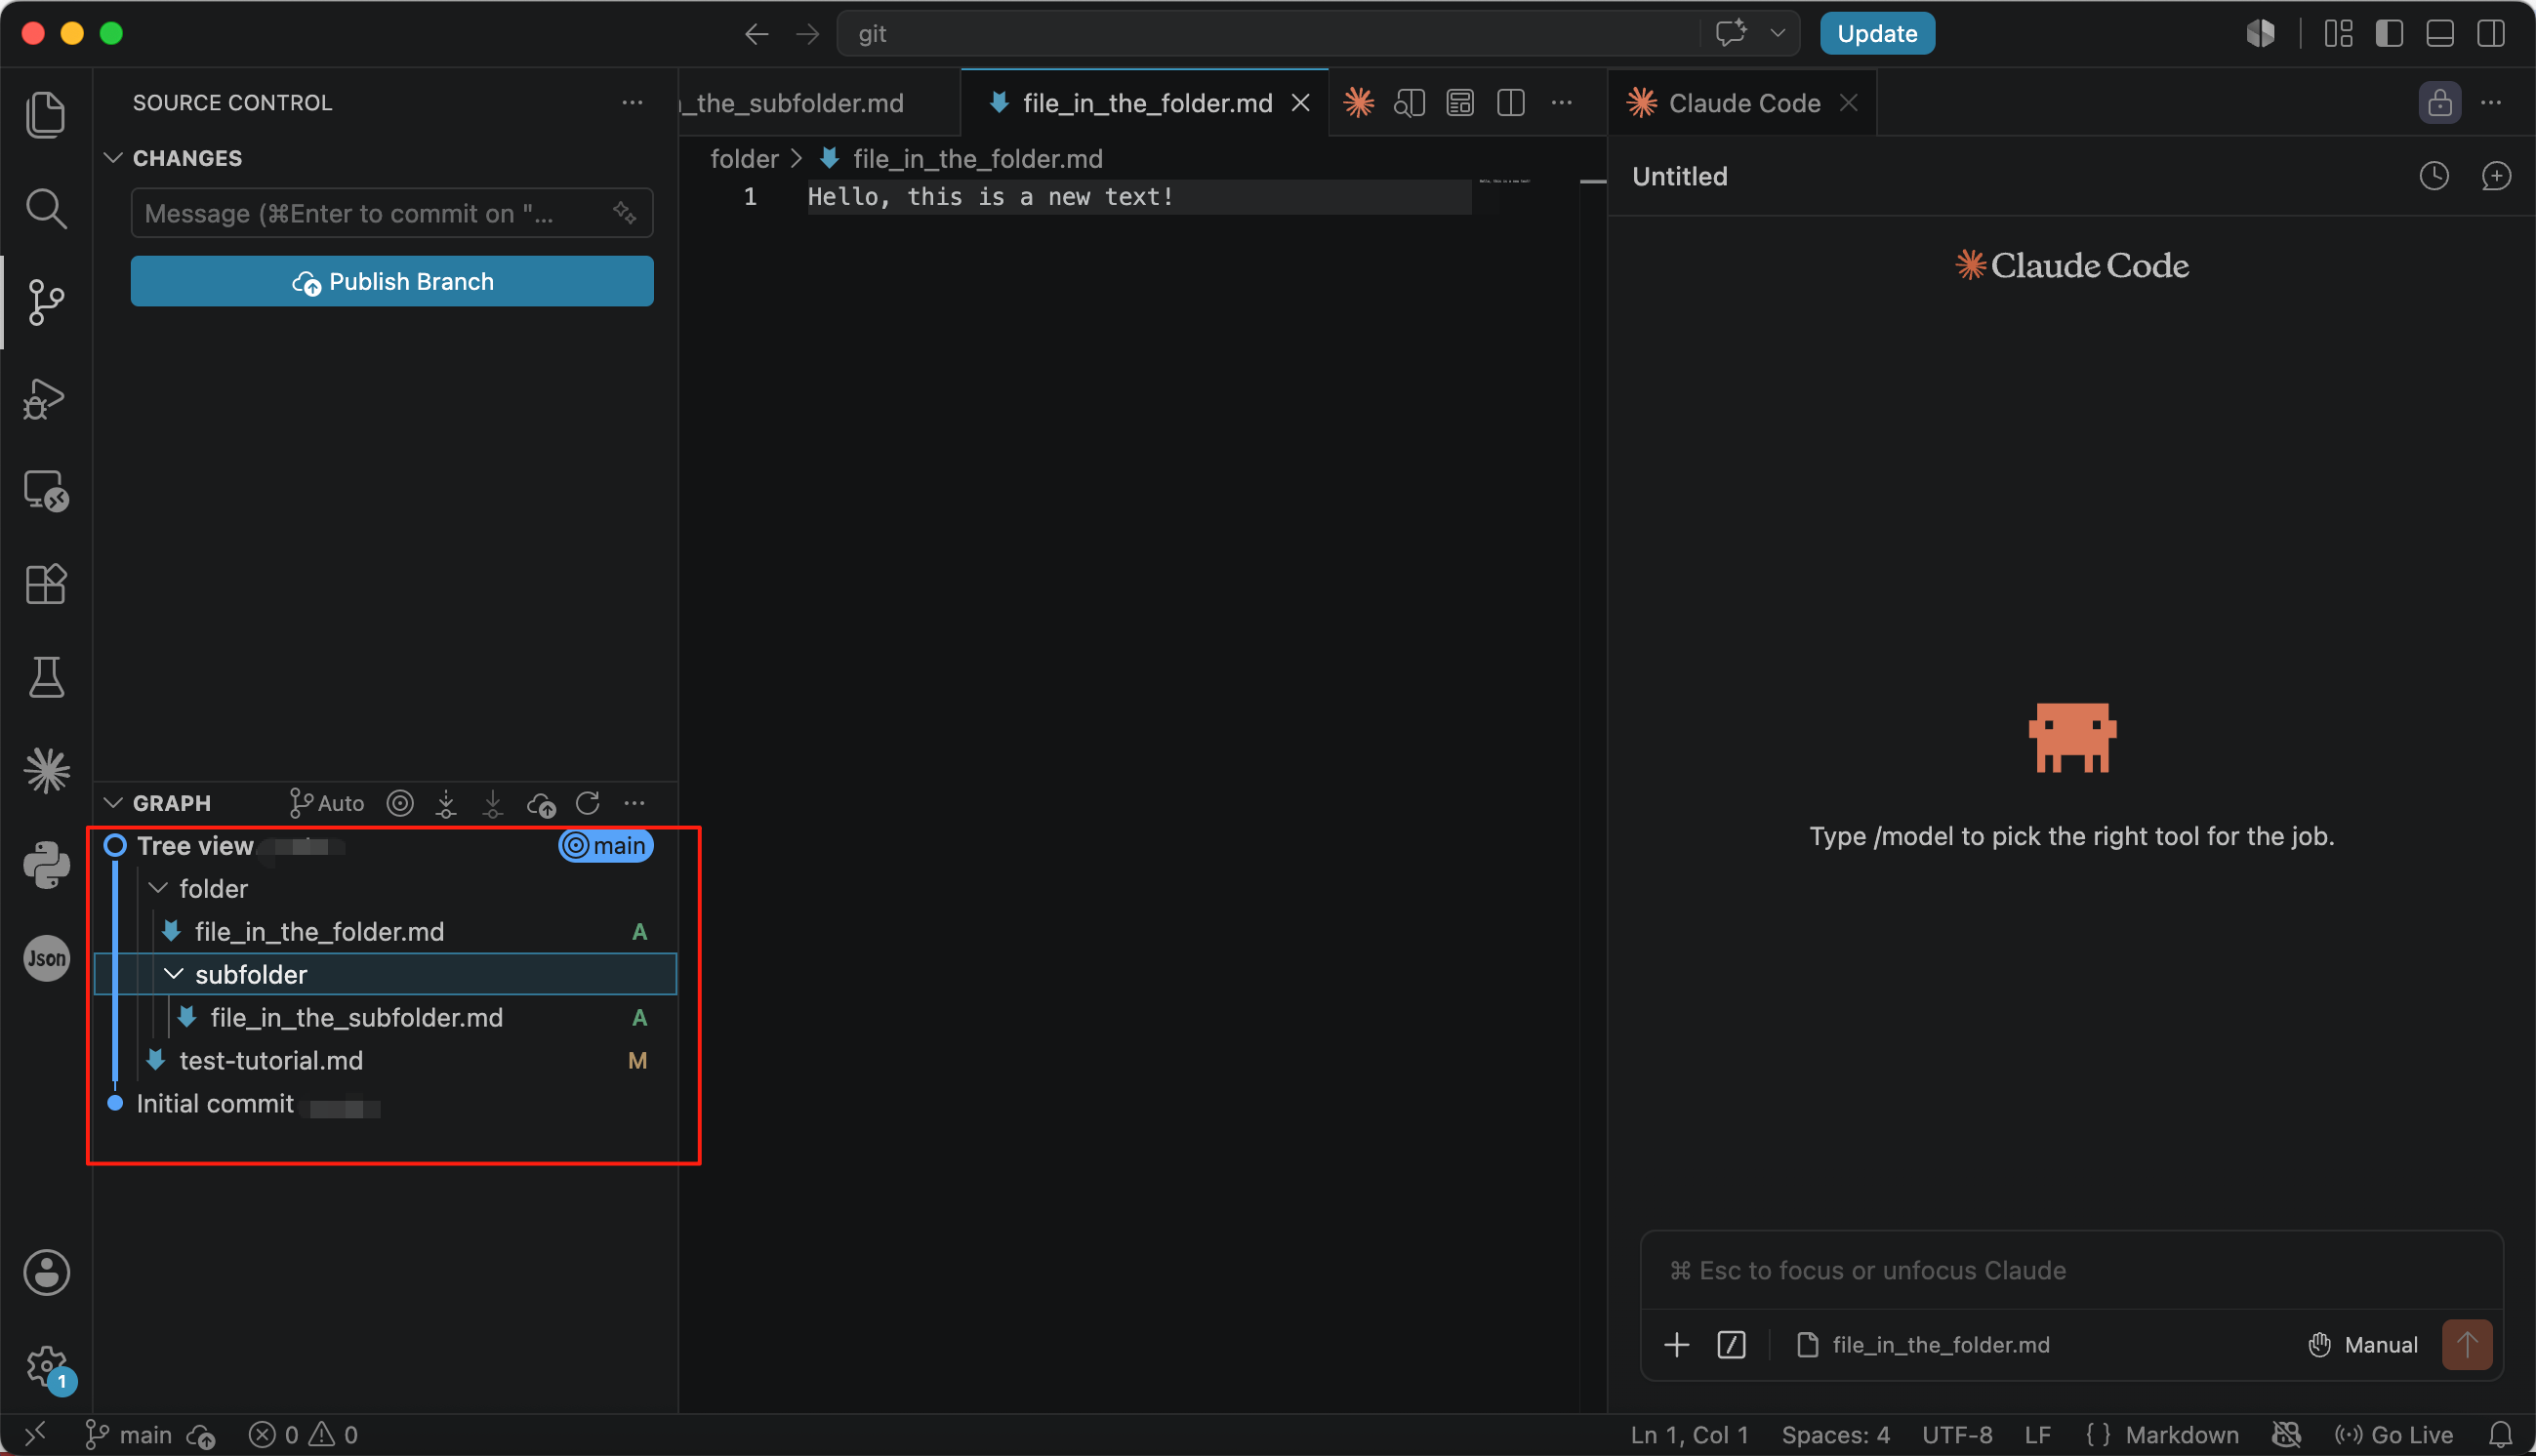
To display the files in a hierarchical directory structure, click ··· → View & Sort → View as Tree. The file list will then be organised like the VS Code File Explorer, allowing folders to be expanded and collapsed.
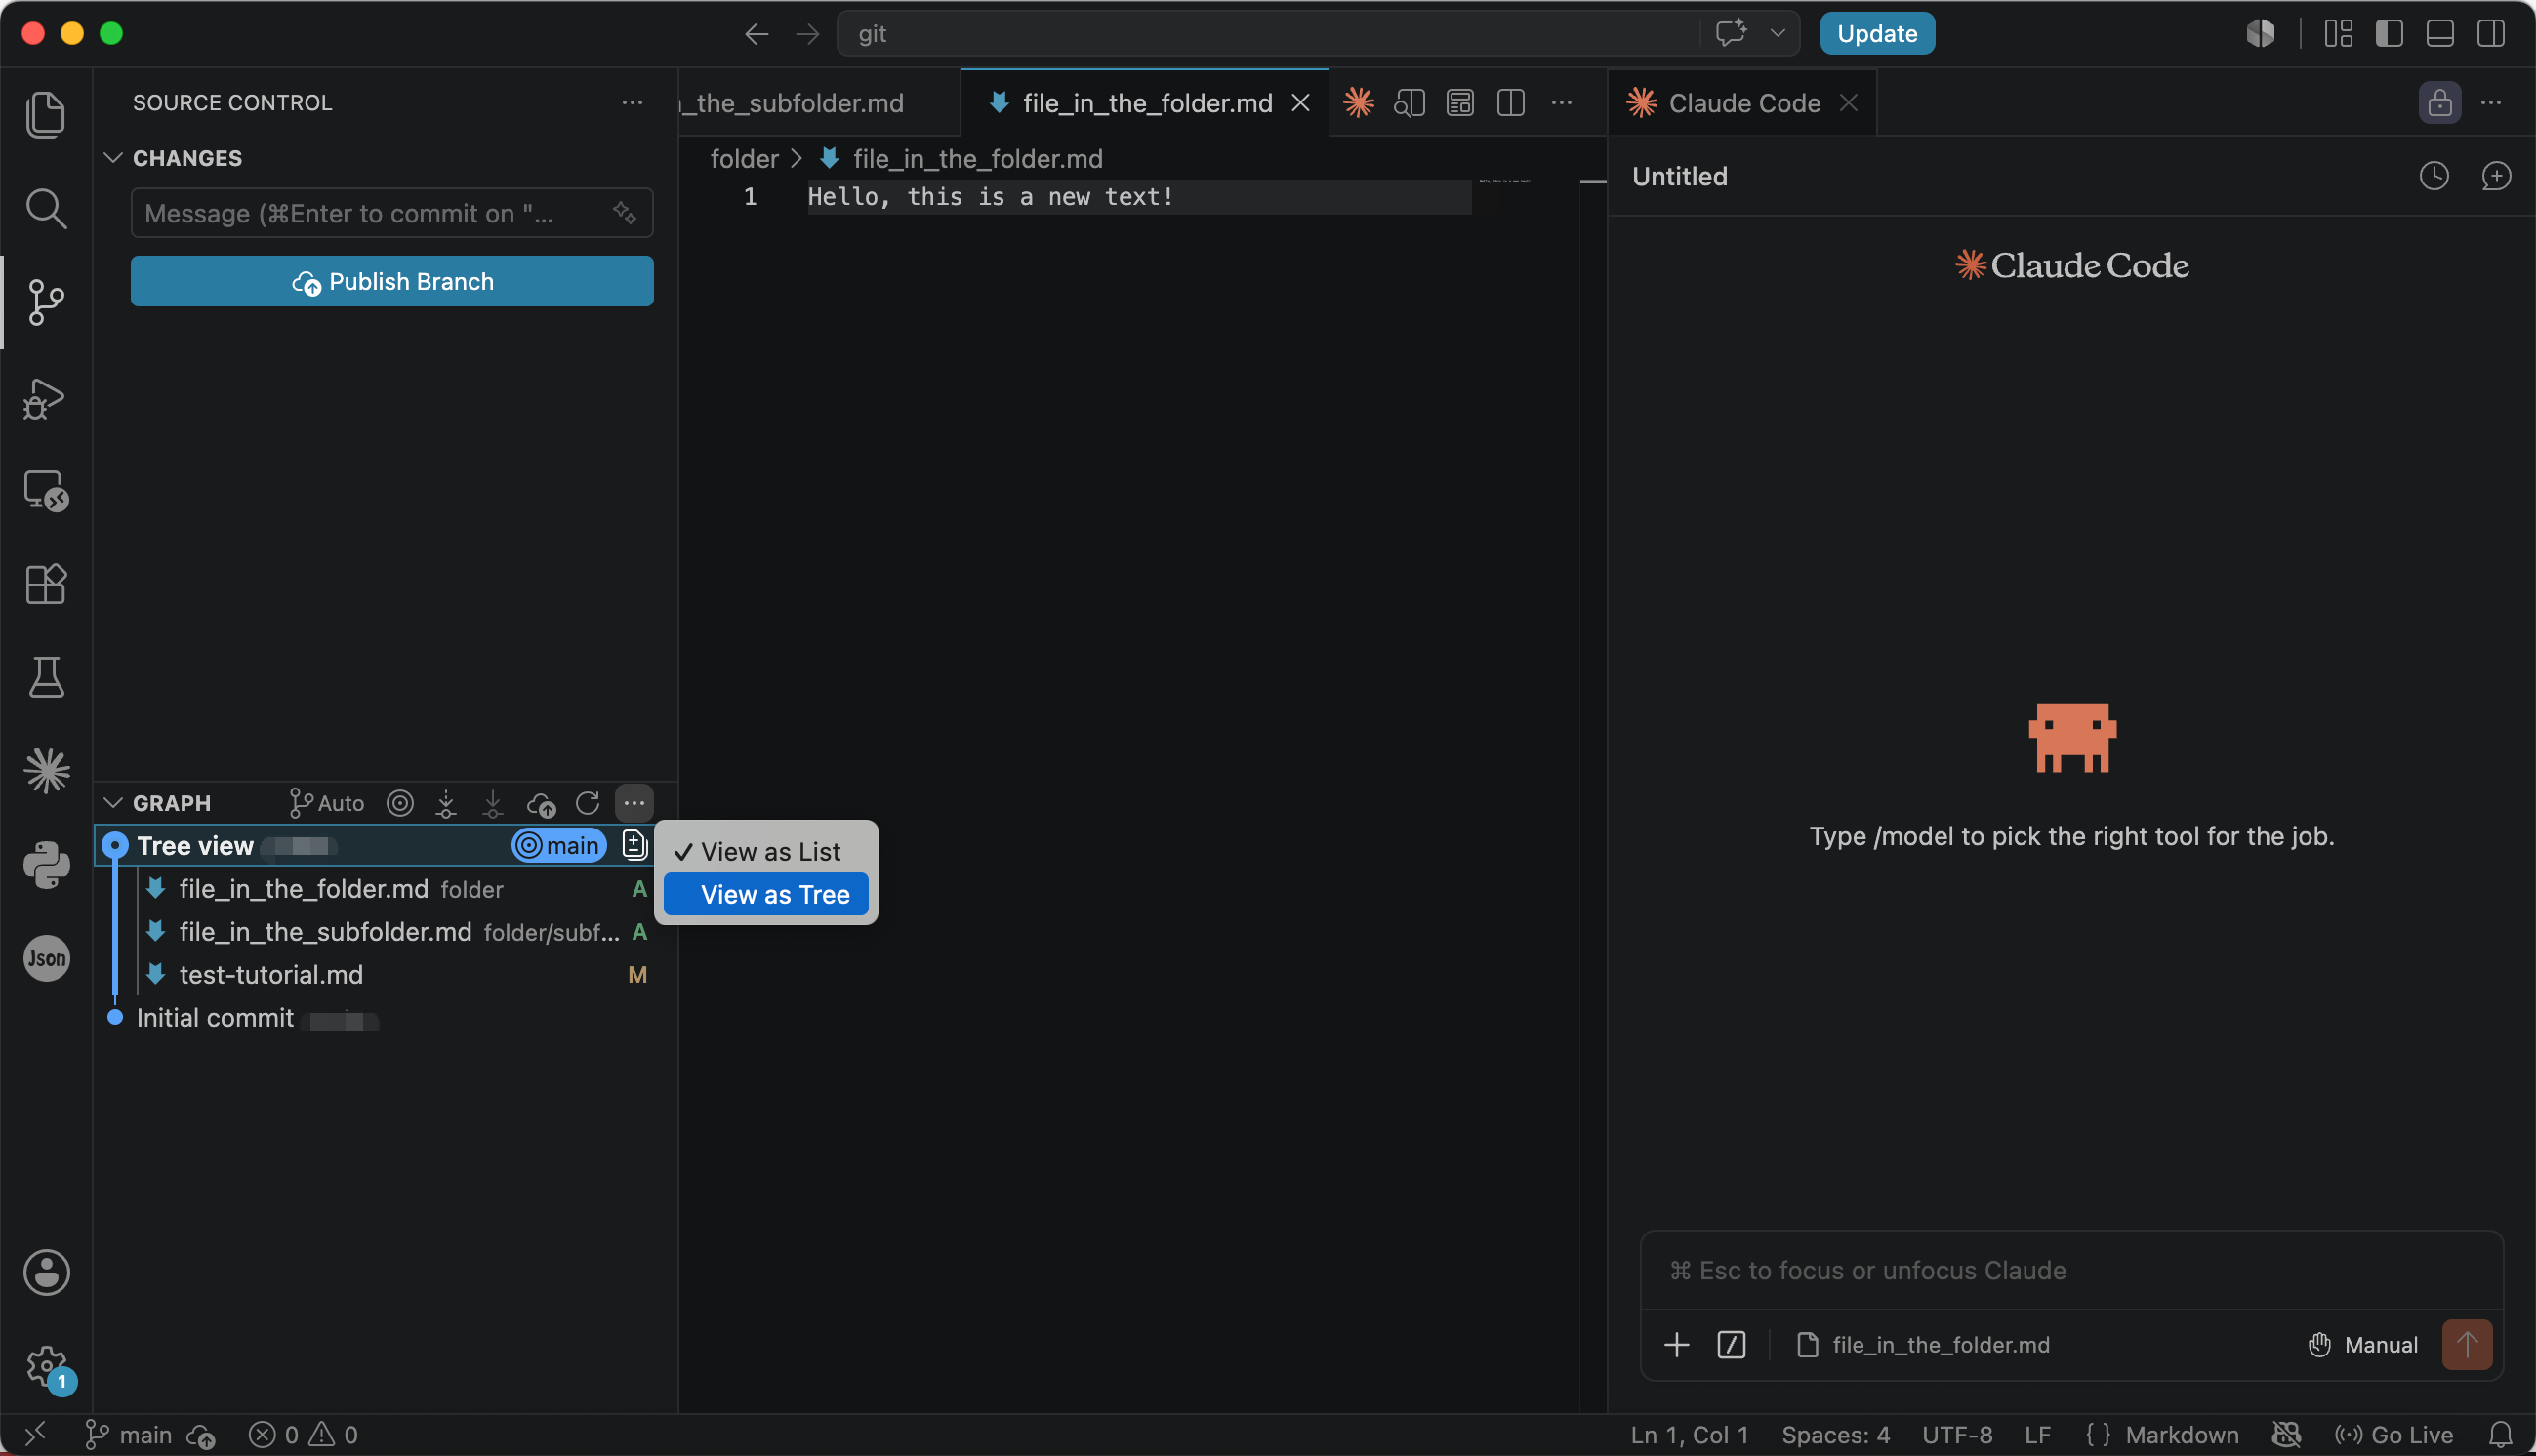
The commit history can also be displayed as a tree. Click ··· → View as Tree in the graph view to switch the commit history to a hierarchical tree layout.
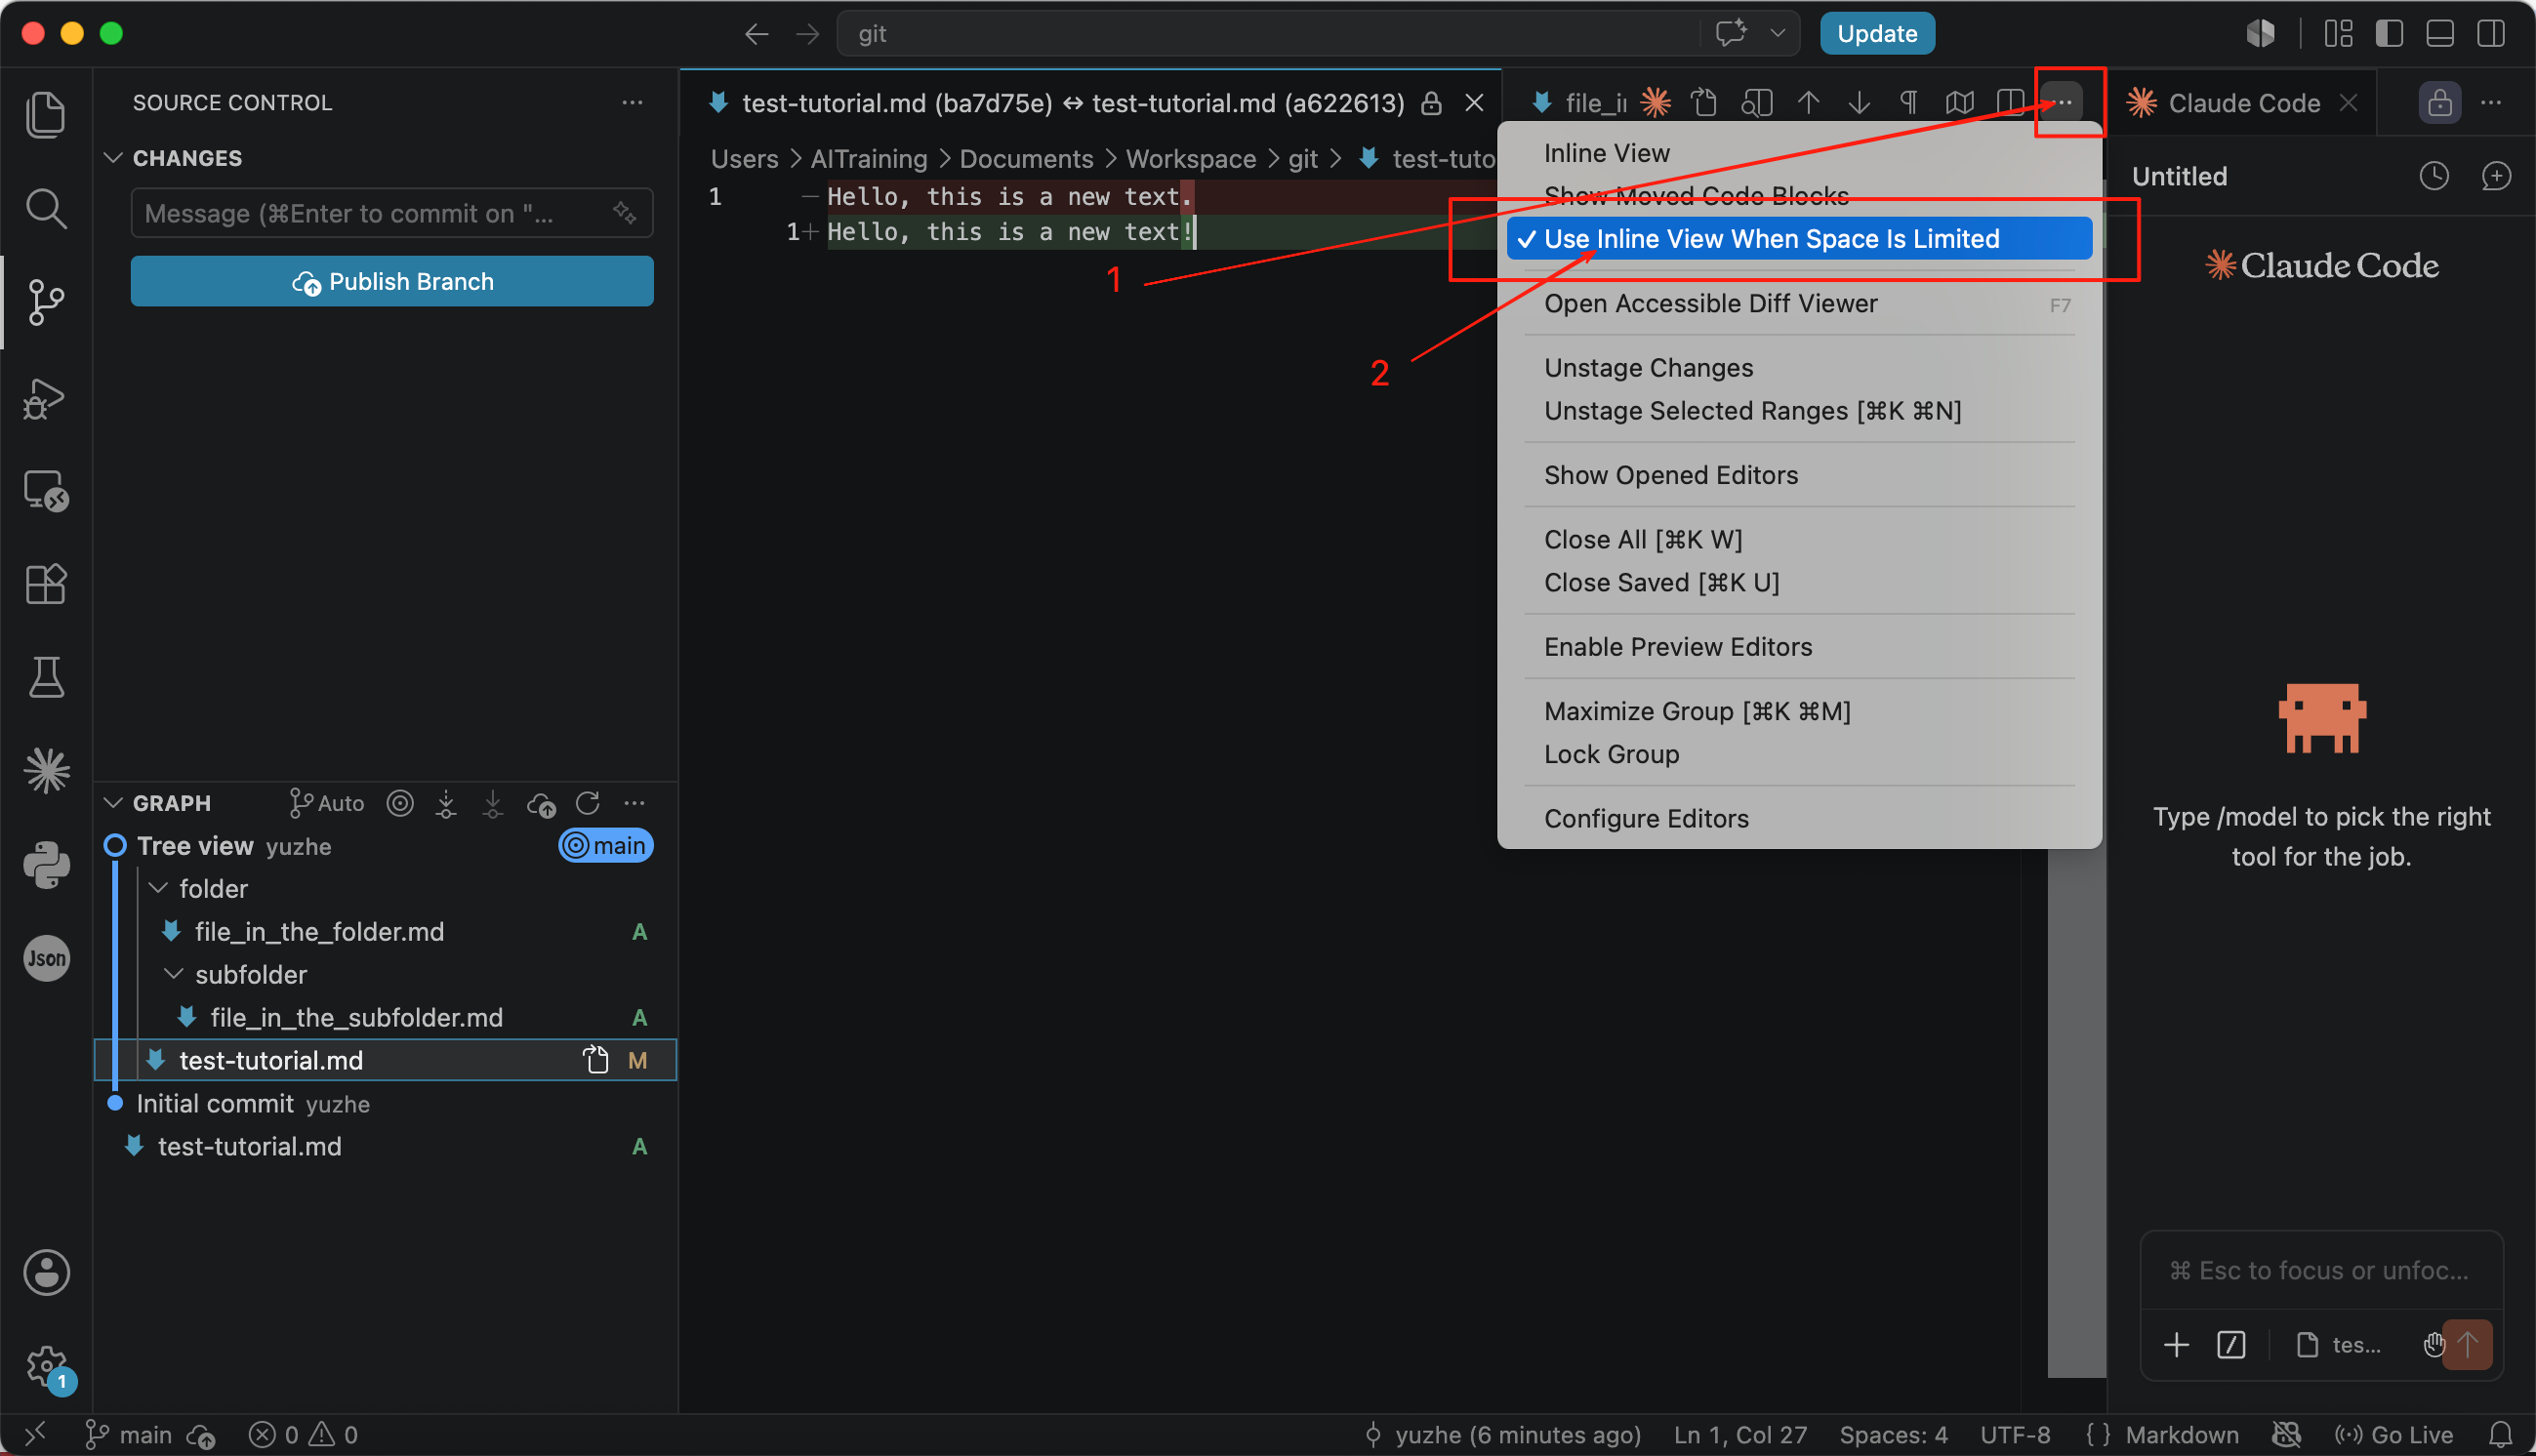
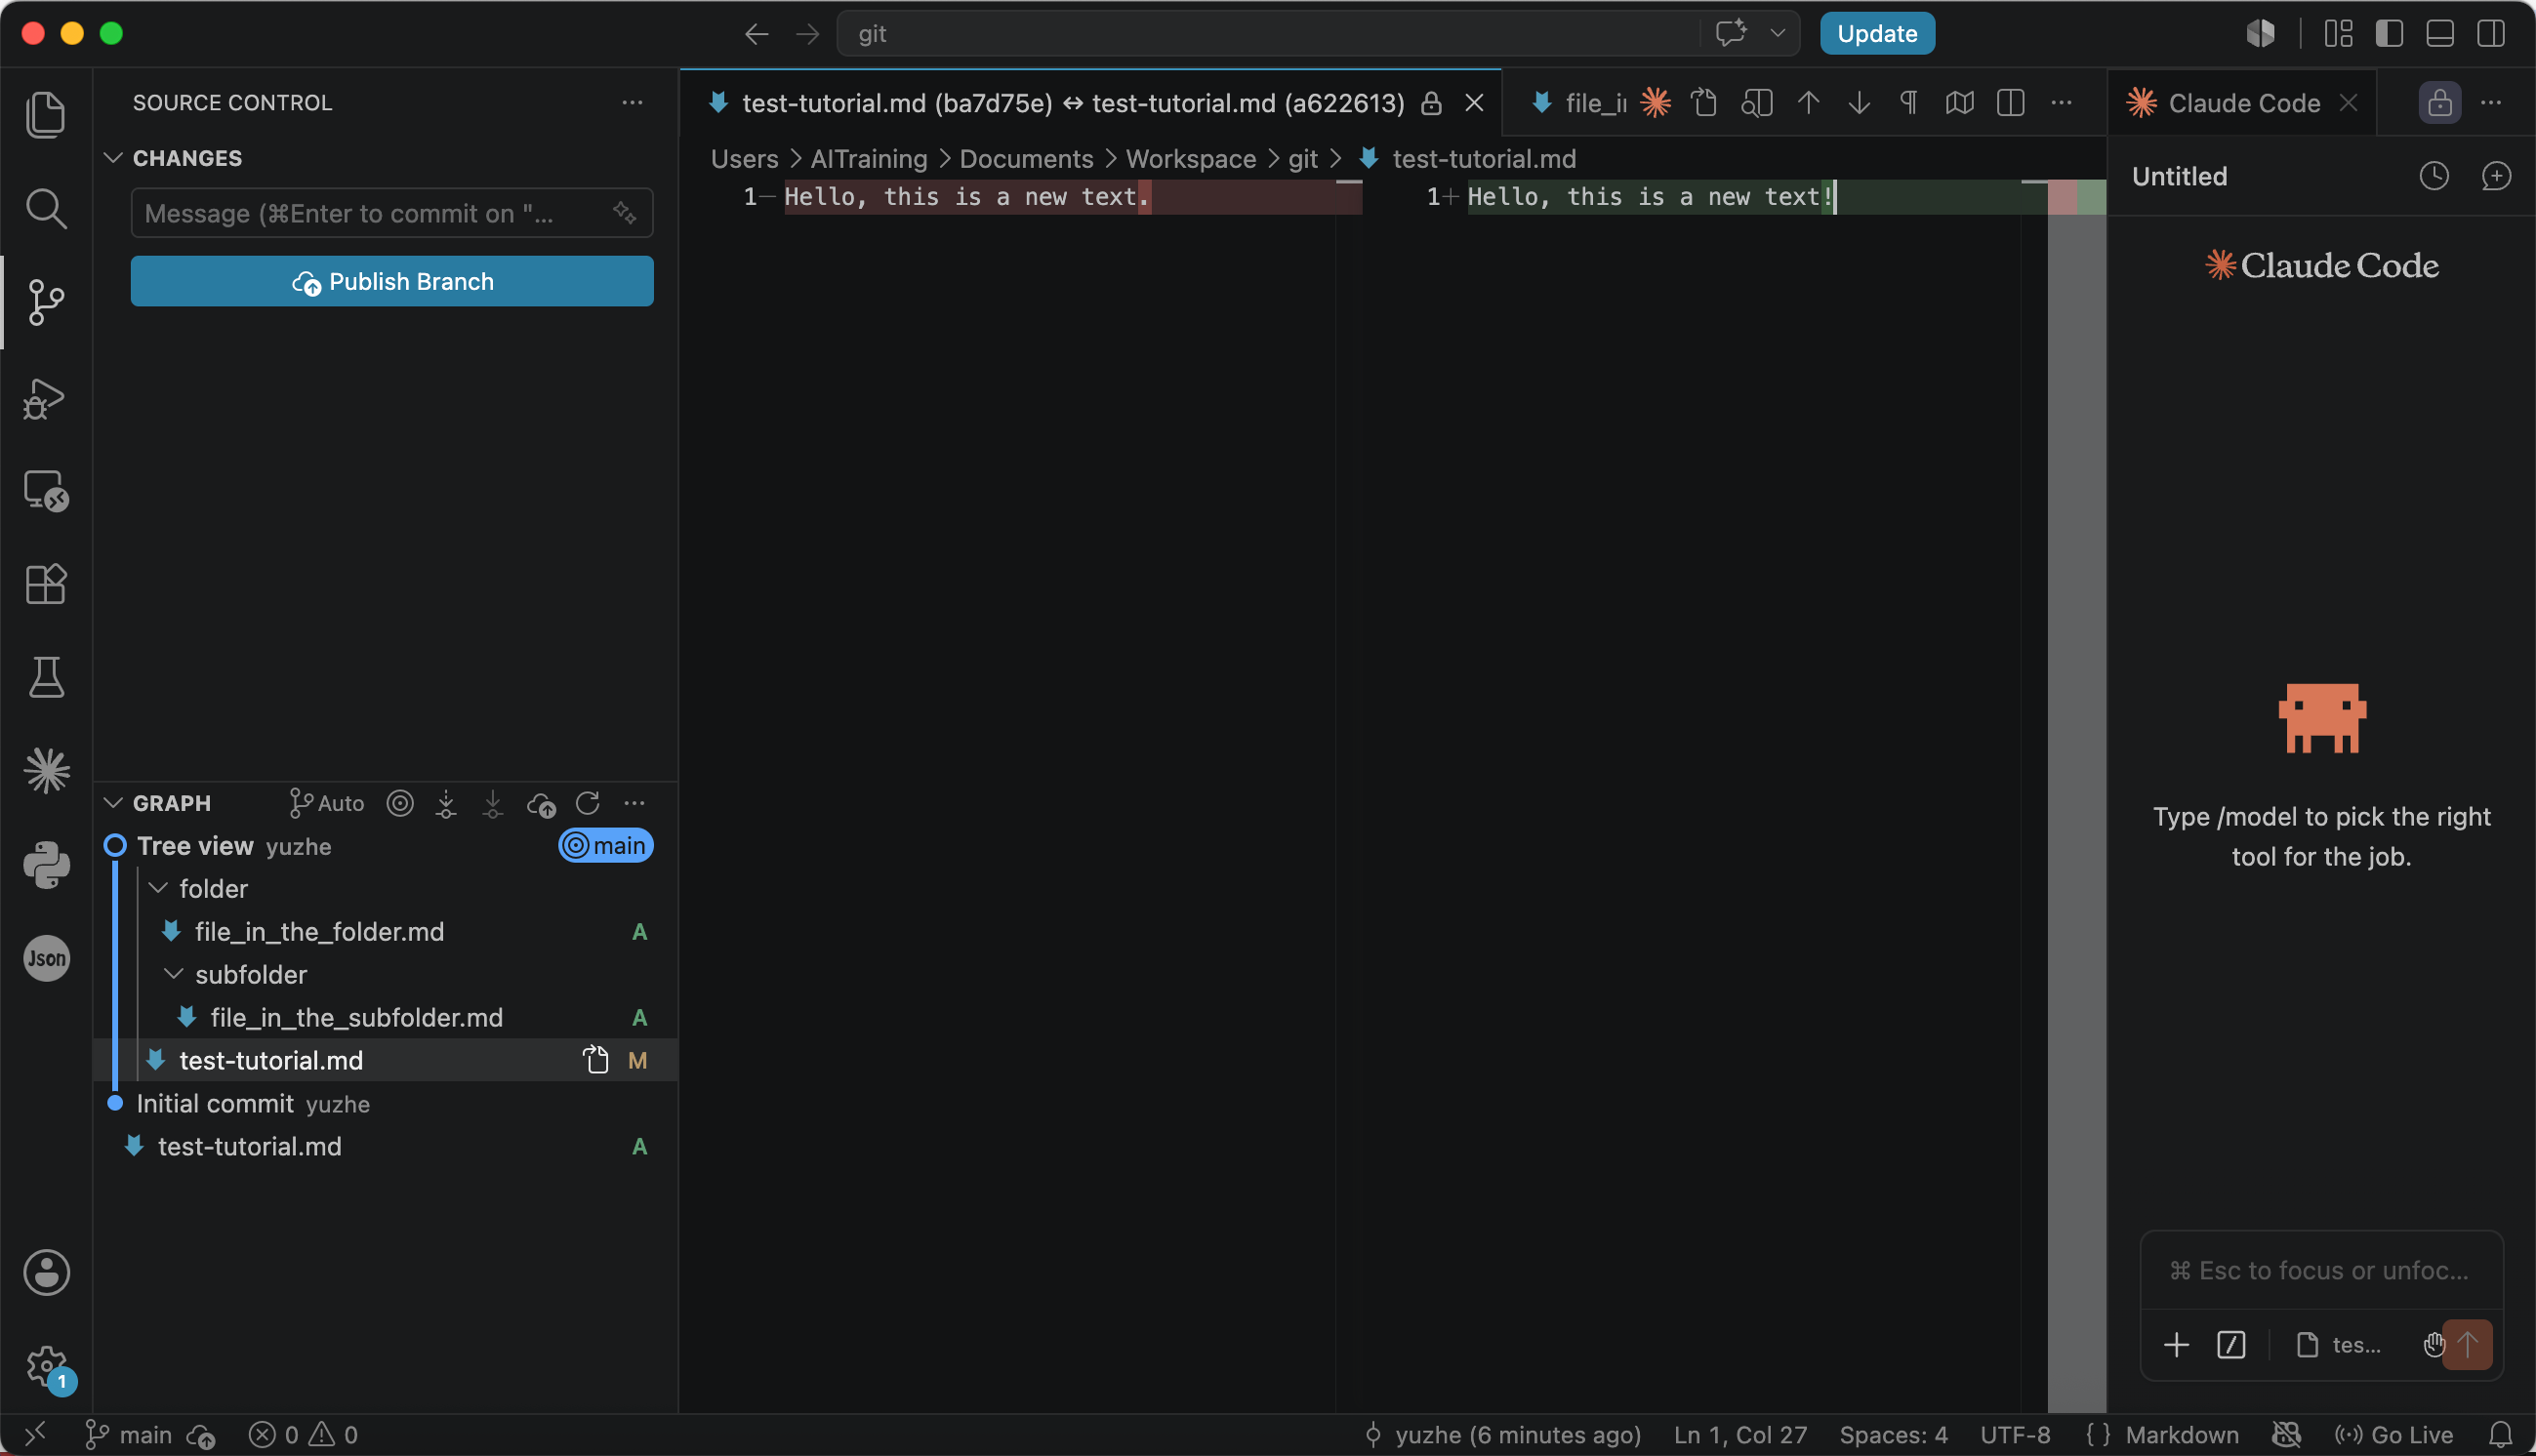
When comparing a file with its previous version, VS Code displays the differences in the inline view by default when the available editor space is limited. If you prefer the traditional side-by-side comparison, click ··· → Use Inline View When Space Is Limited to disable the automatic inline view. The changes will then be displayed in two editor panes whenever space permits.
Remote Repositories
Many platforms provide remote Git repository hosting services, such as GitHub, GitLab, and GitCode. In this section, we will introduce the two most widely used platforms: GitHub and GitLab.
Before connecting to either of these repositories, we will first introduce the most common Git authentication method: SSH keys.
Although the name may sound a little technical, the idea is actually quite simple. You can think of an SSH key as a special digital key generated by your local computer. After you register it with the remote repository, your computer can recognise itself automatically, allowing you to connect to the repository and use Git more conveniently without signing in every time.
Configure Git Identity (SSH)
Method 1: Get an SSH Key with Agent
Open your Agent tool and enter:
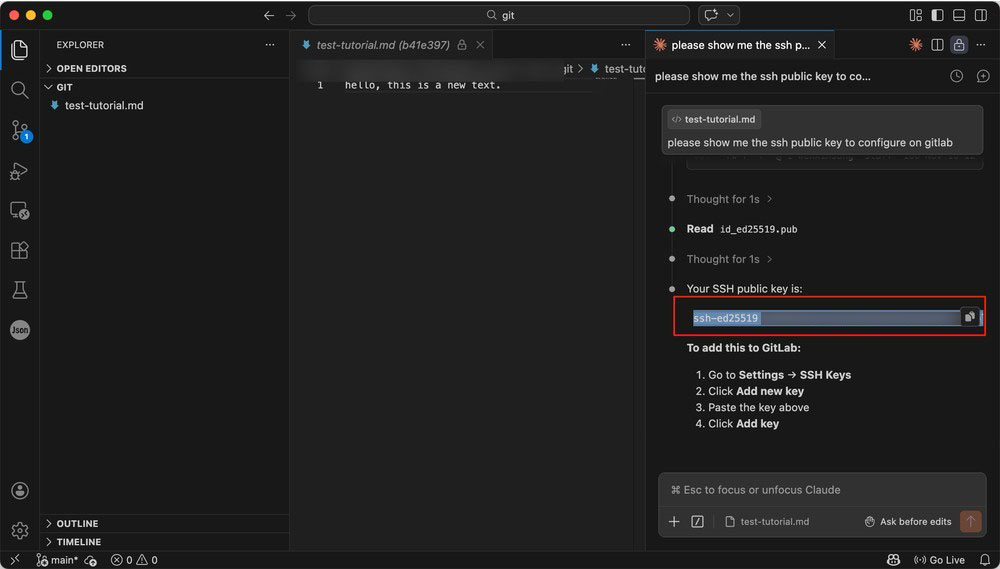
Please generate a SSH key for me and show me the public key to configure on gitlab.
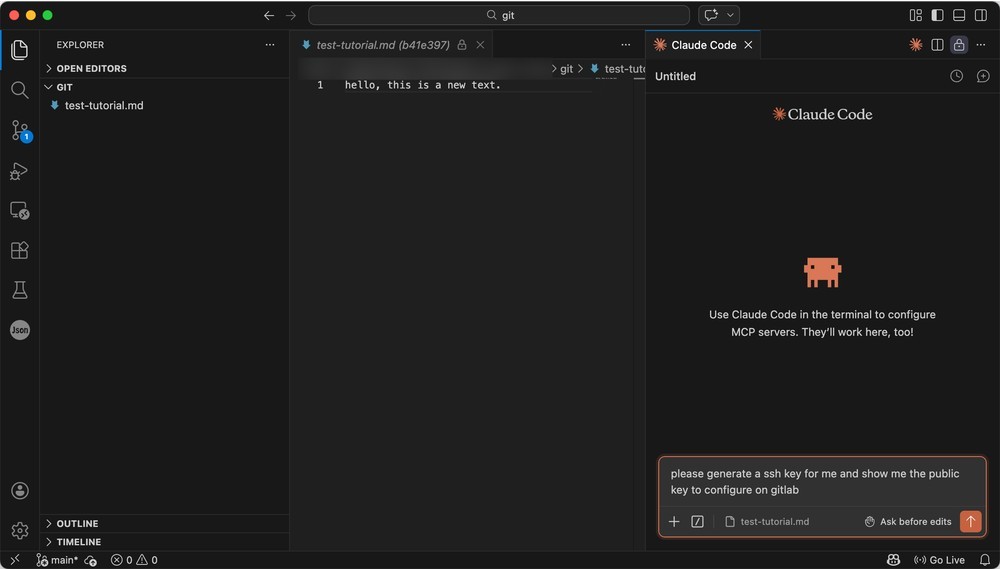
Once the task finishes, you’ll see the public key content ready to copy.
Method 2: Get an SSH Key with Terminal
Exposing your SSH key to an agent may pose security risks. This section explains how to generate and use an SSH key without relying on the agent.
Open Terminal and run the following commands. Replace ‘[email protected]’ with your email (keep the quotes).
ssh-keygen -t ed25519 -C '[email protected]'
cat ~/.ssh/id_ed25519.pub

If prompted with ‘Enter file in which to save the key…’, just press Enter.
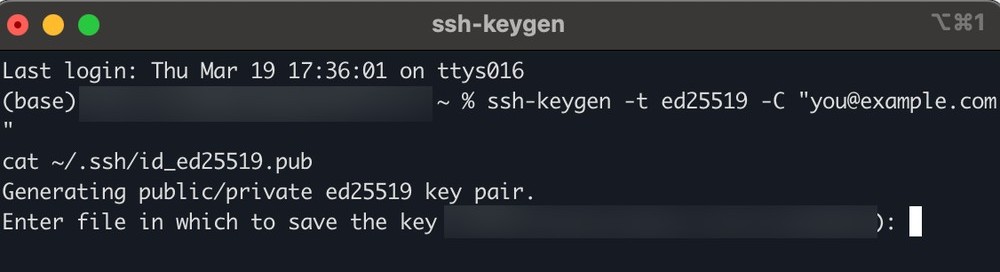
Then you’ll see one line starting with ‘ssh-ed25519’ – that’s your public key.

GitHub
Now we can connect to a remote repository using the SSH key we generated earlier. GitHub is currently the world’s largest code hosting platform and is widely used for open-source software development. It hosts countless popular and influential projects. Before proceeding, you’ll need to create a GitHub account if you don’t already have one.
Create a GitHub Account
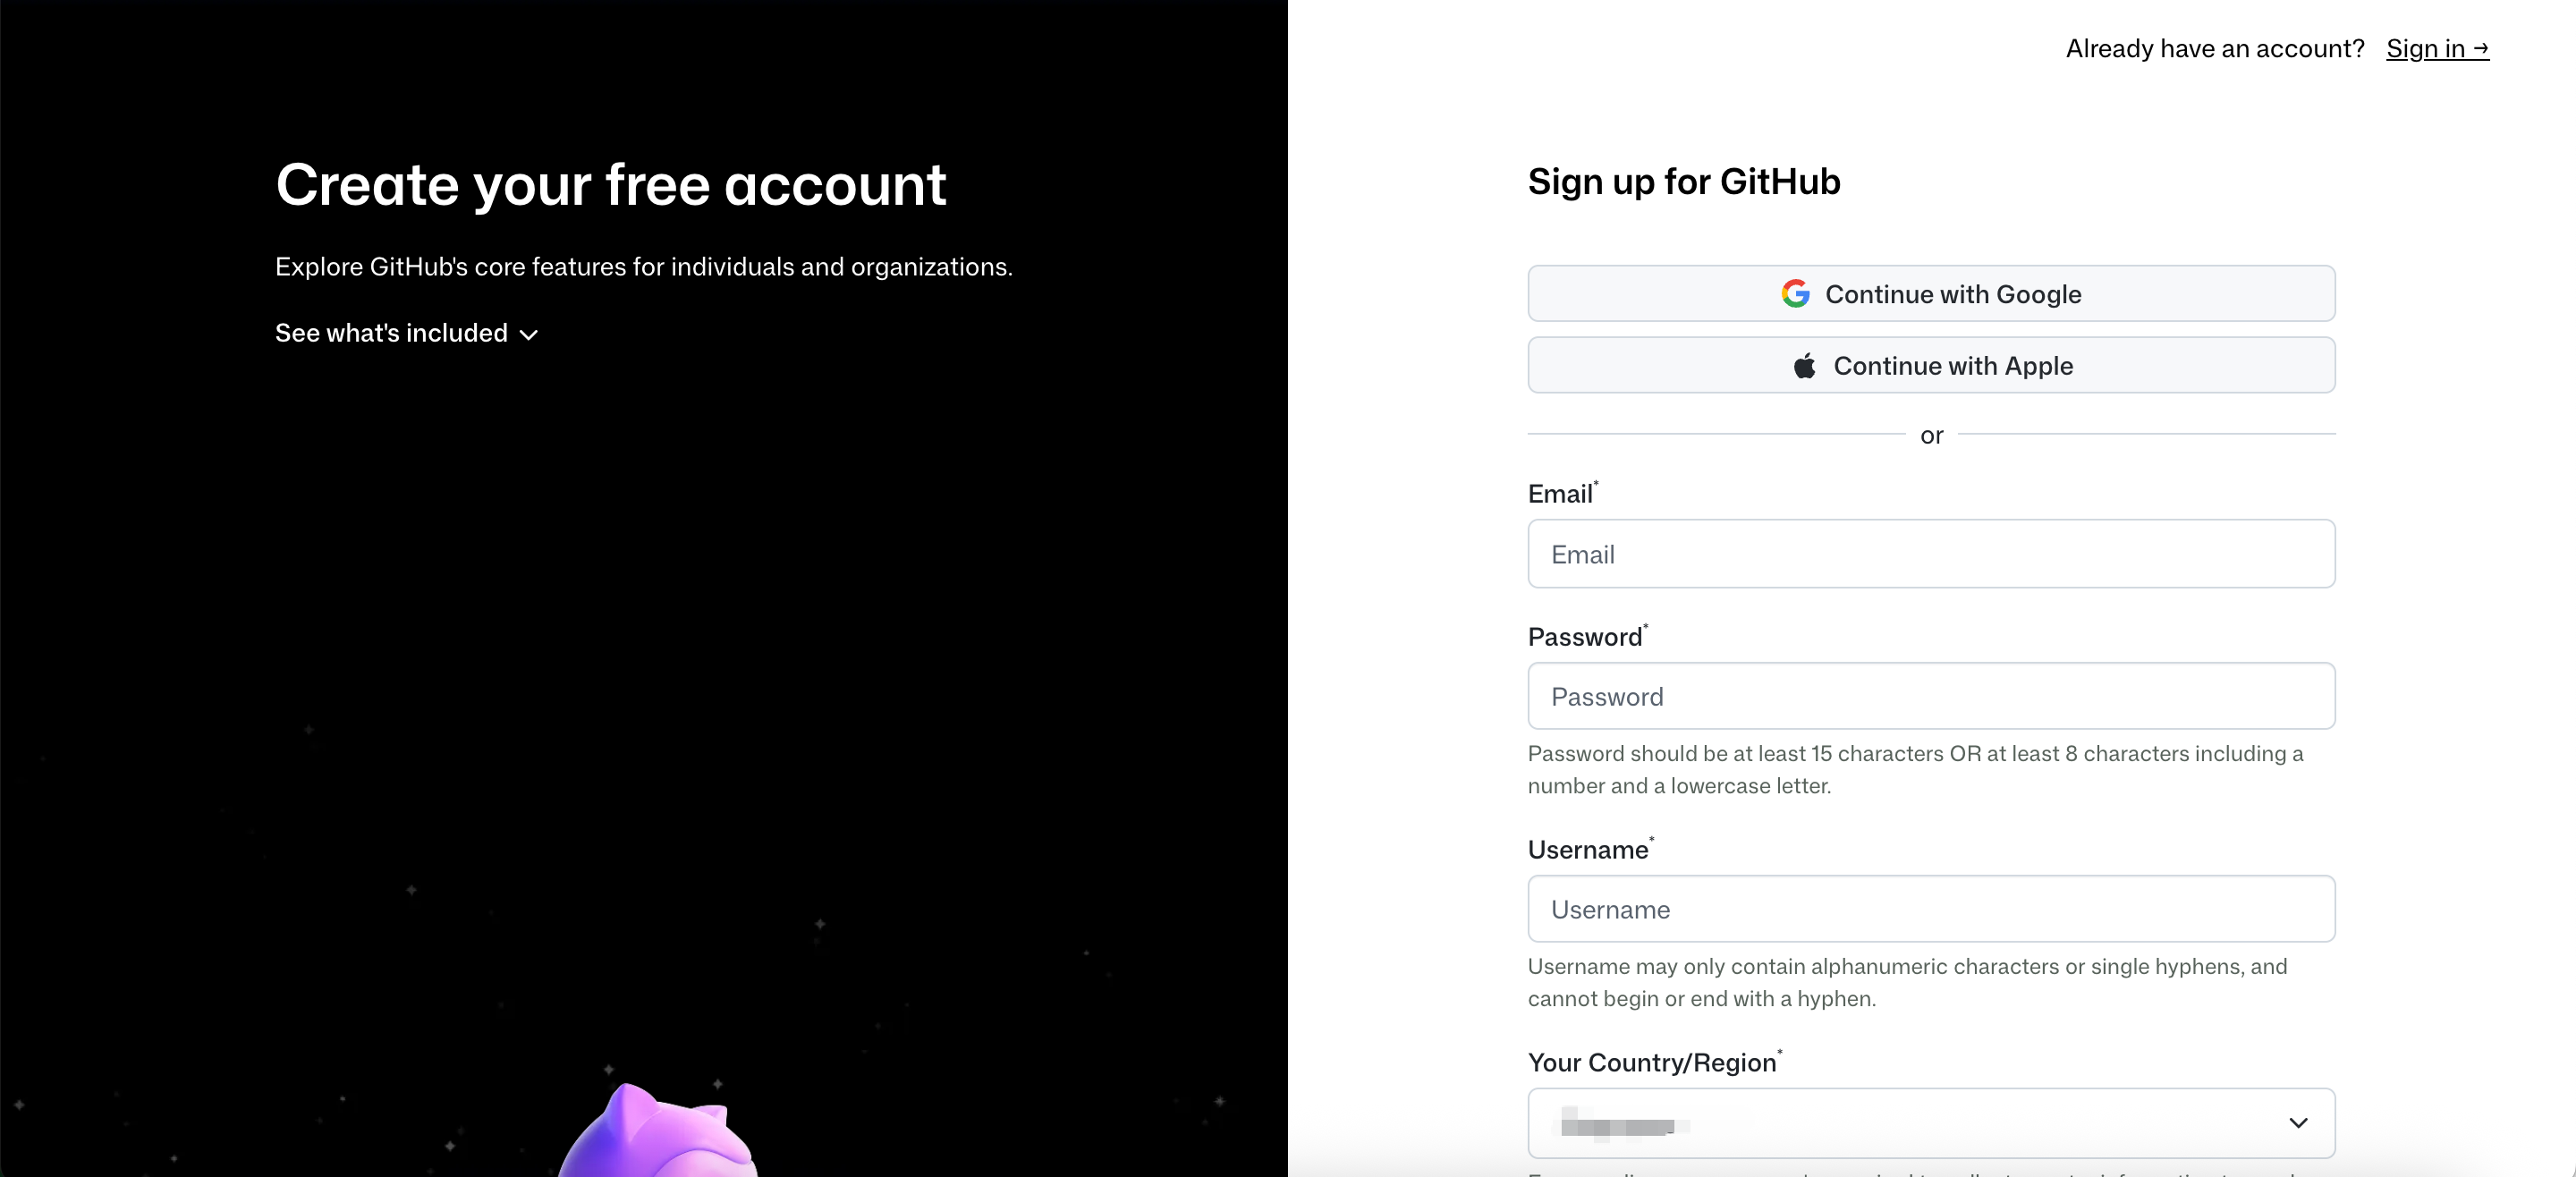
Open https://github.com/signup?source=login to create a GitHub account. You can sign up using a Google or Apple account, or simply register with any other email address by completing the registration form.
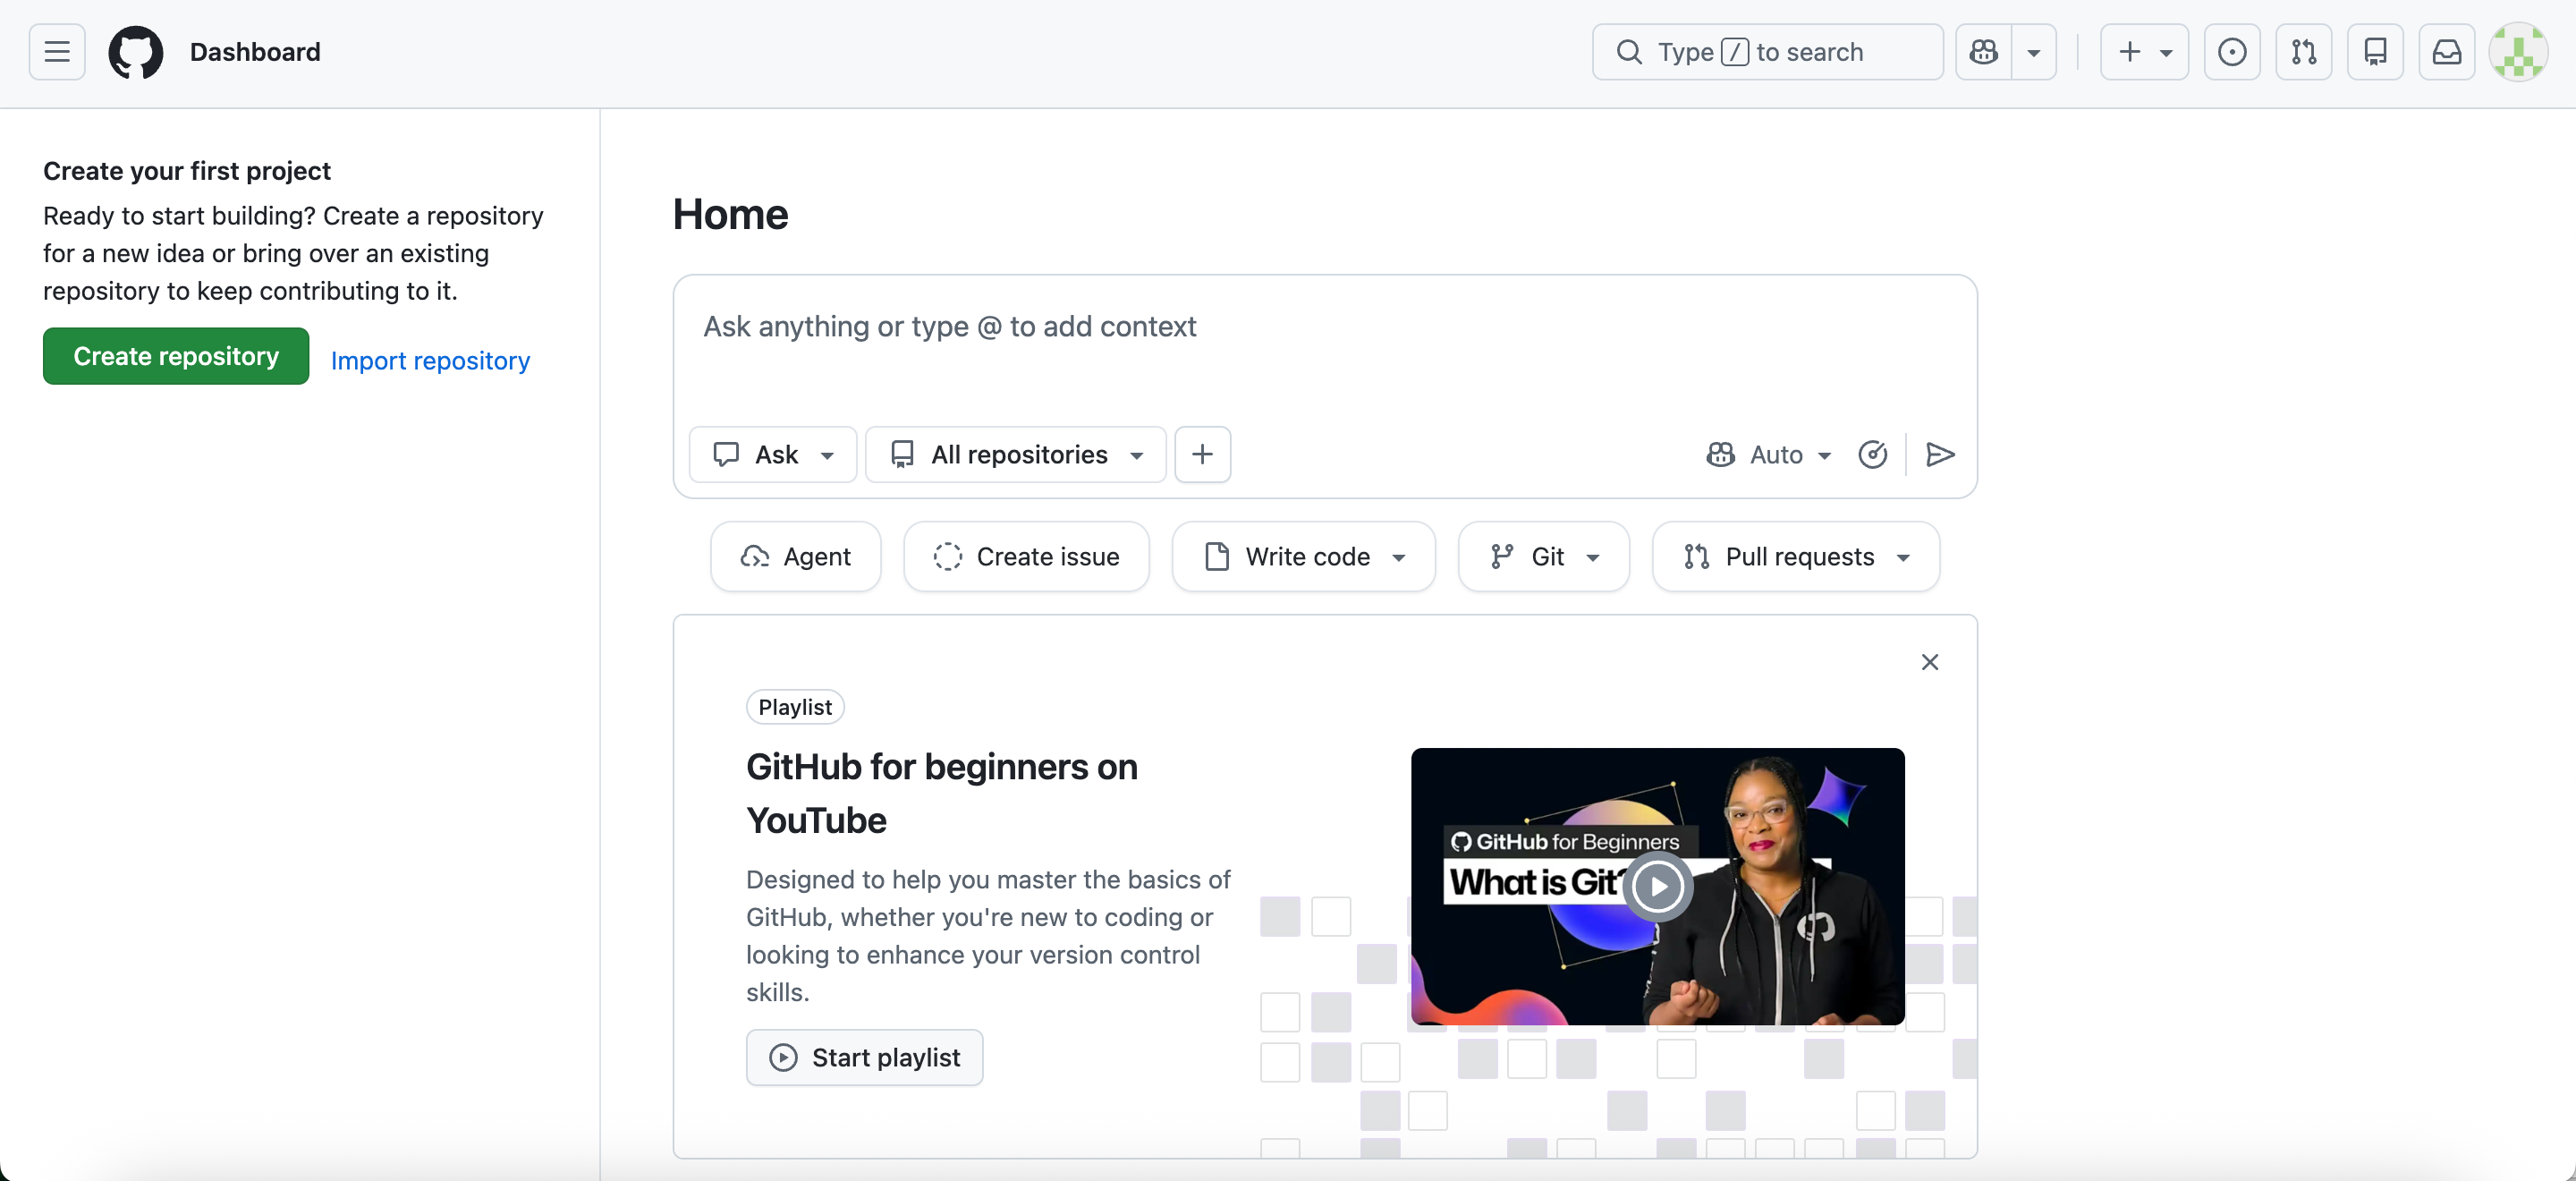
After signing up and logging in, you will be taken to your GitHub dashboard.
Add Your SSH Public Key to GitHub
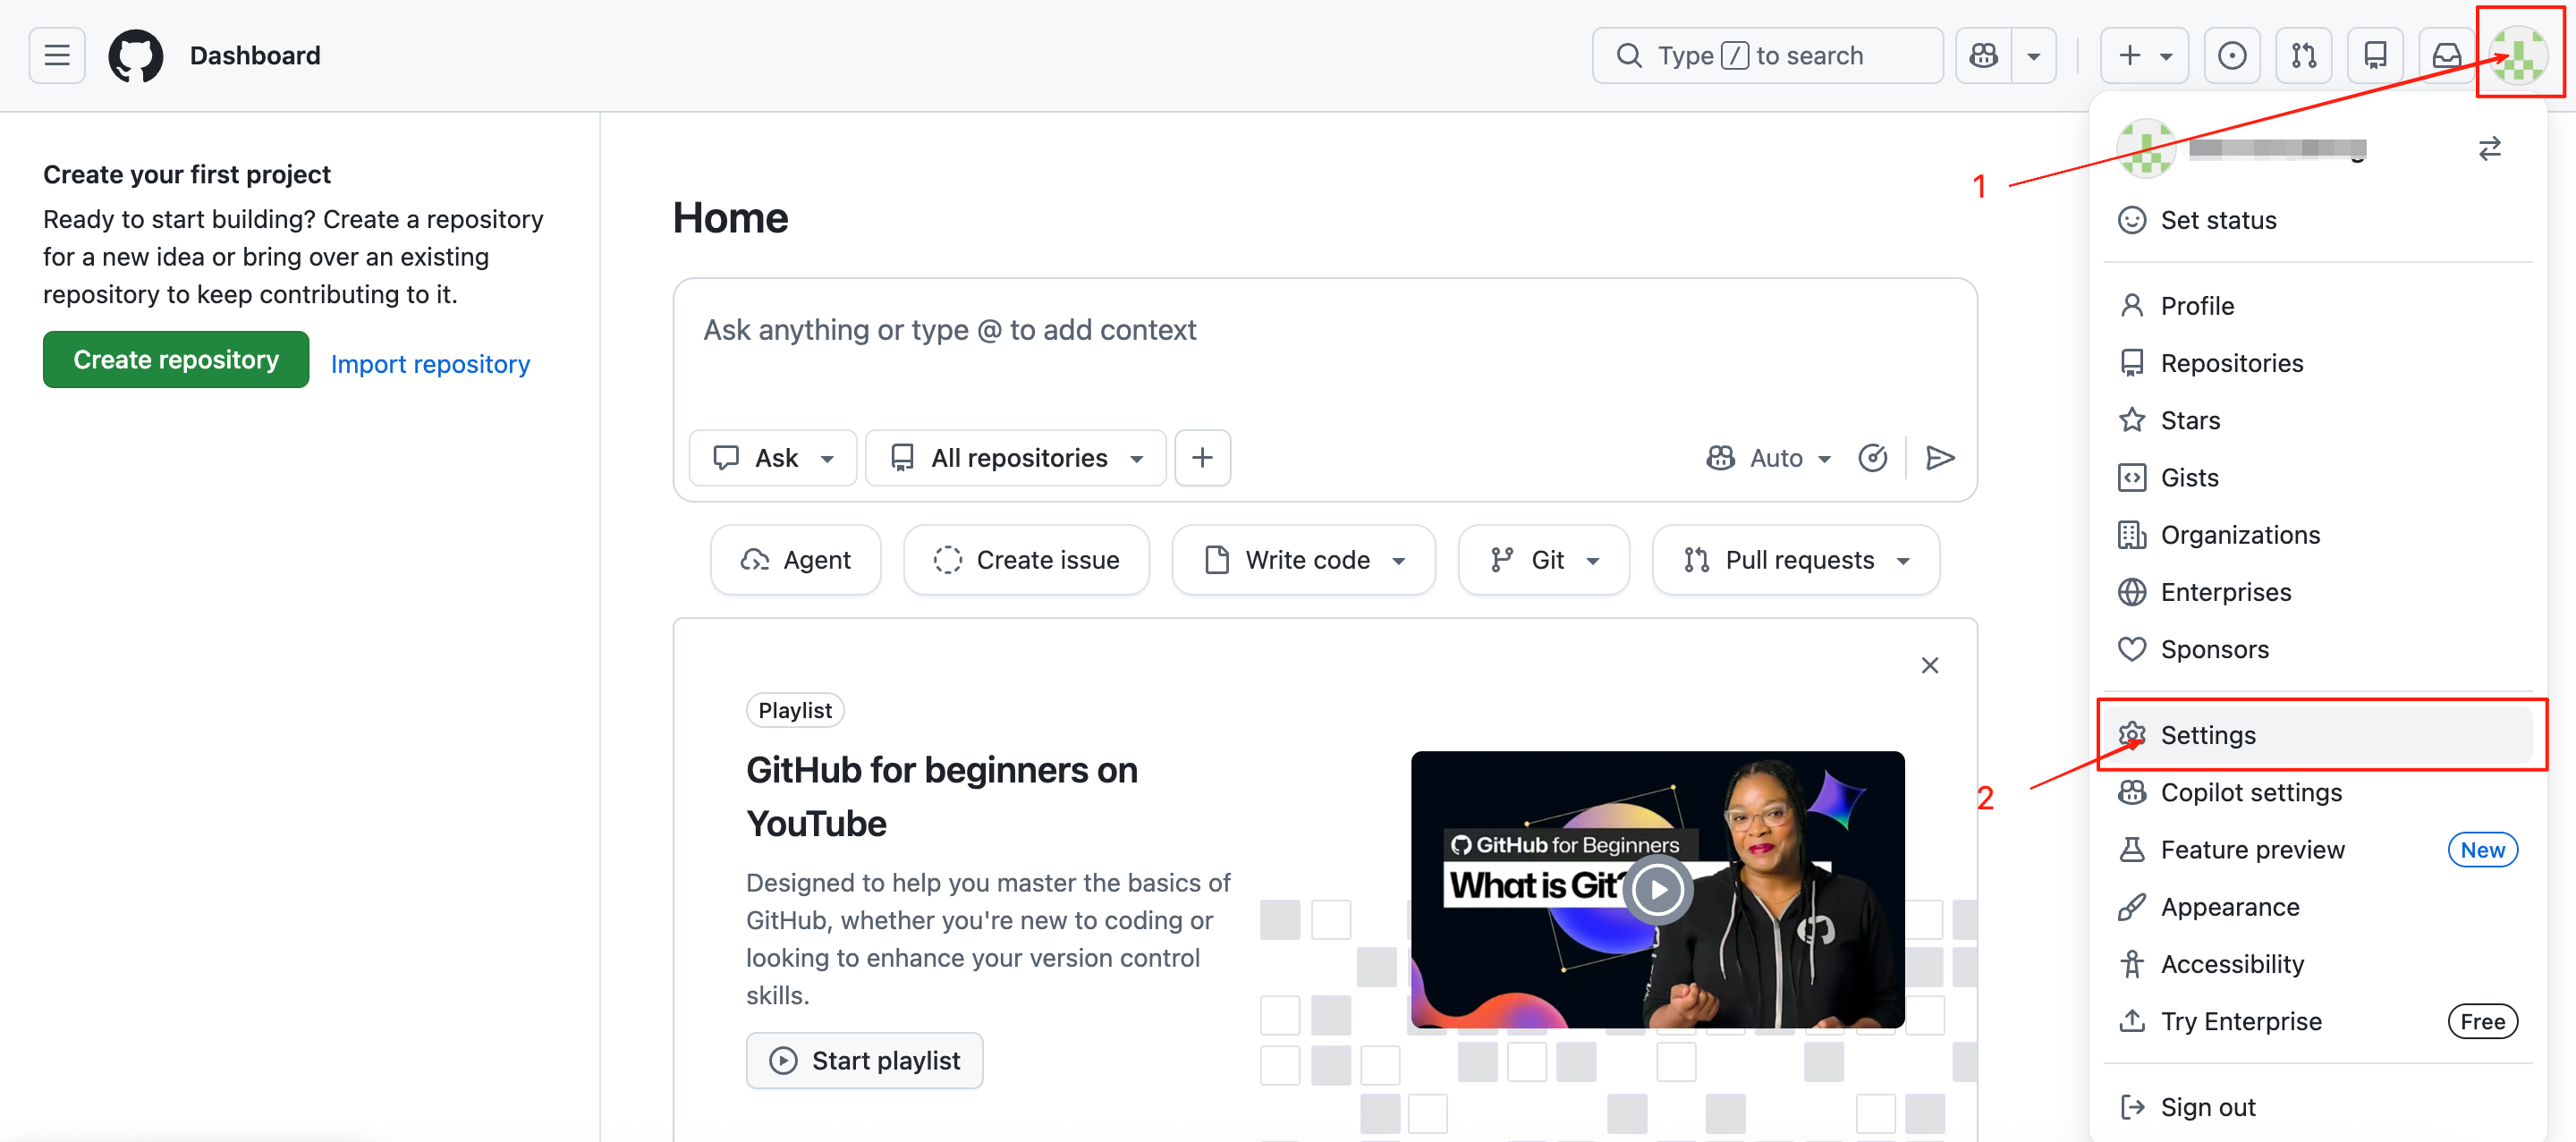
Click your profile avatar in the upper-right corner and select Settings.
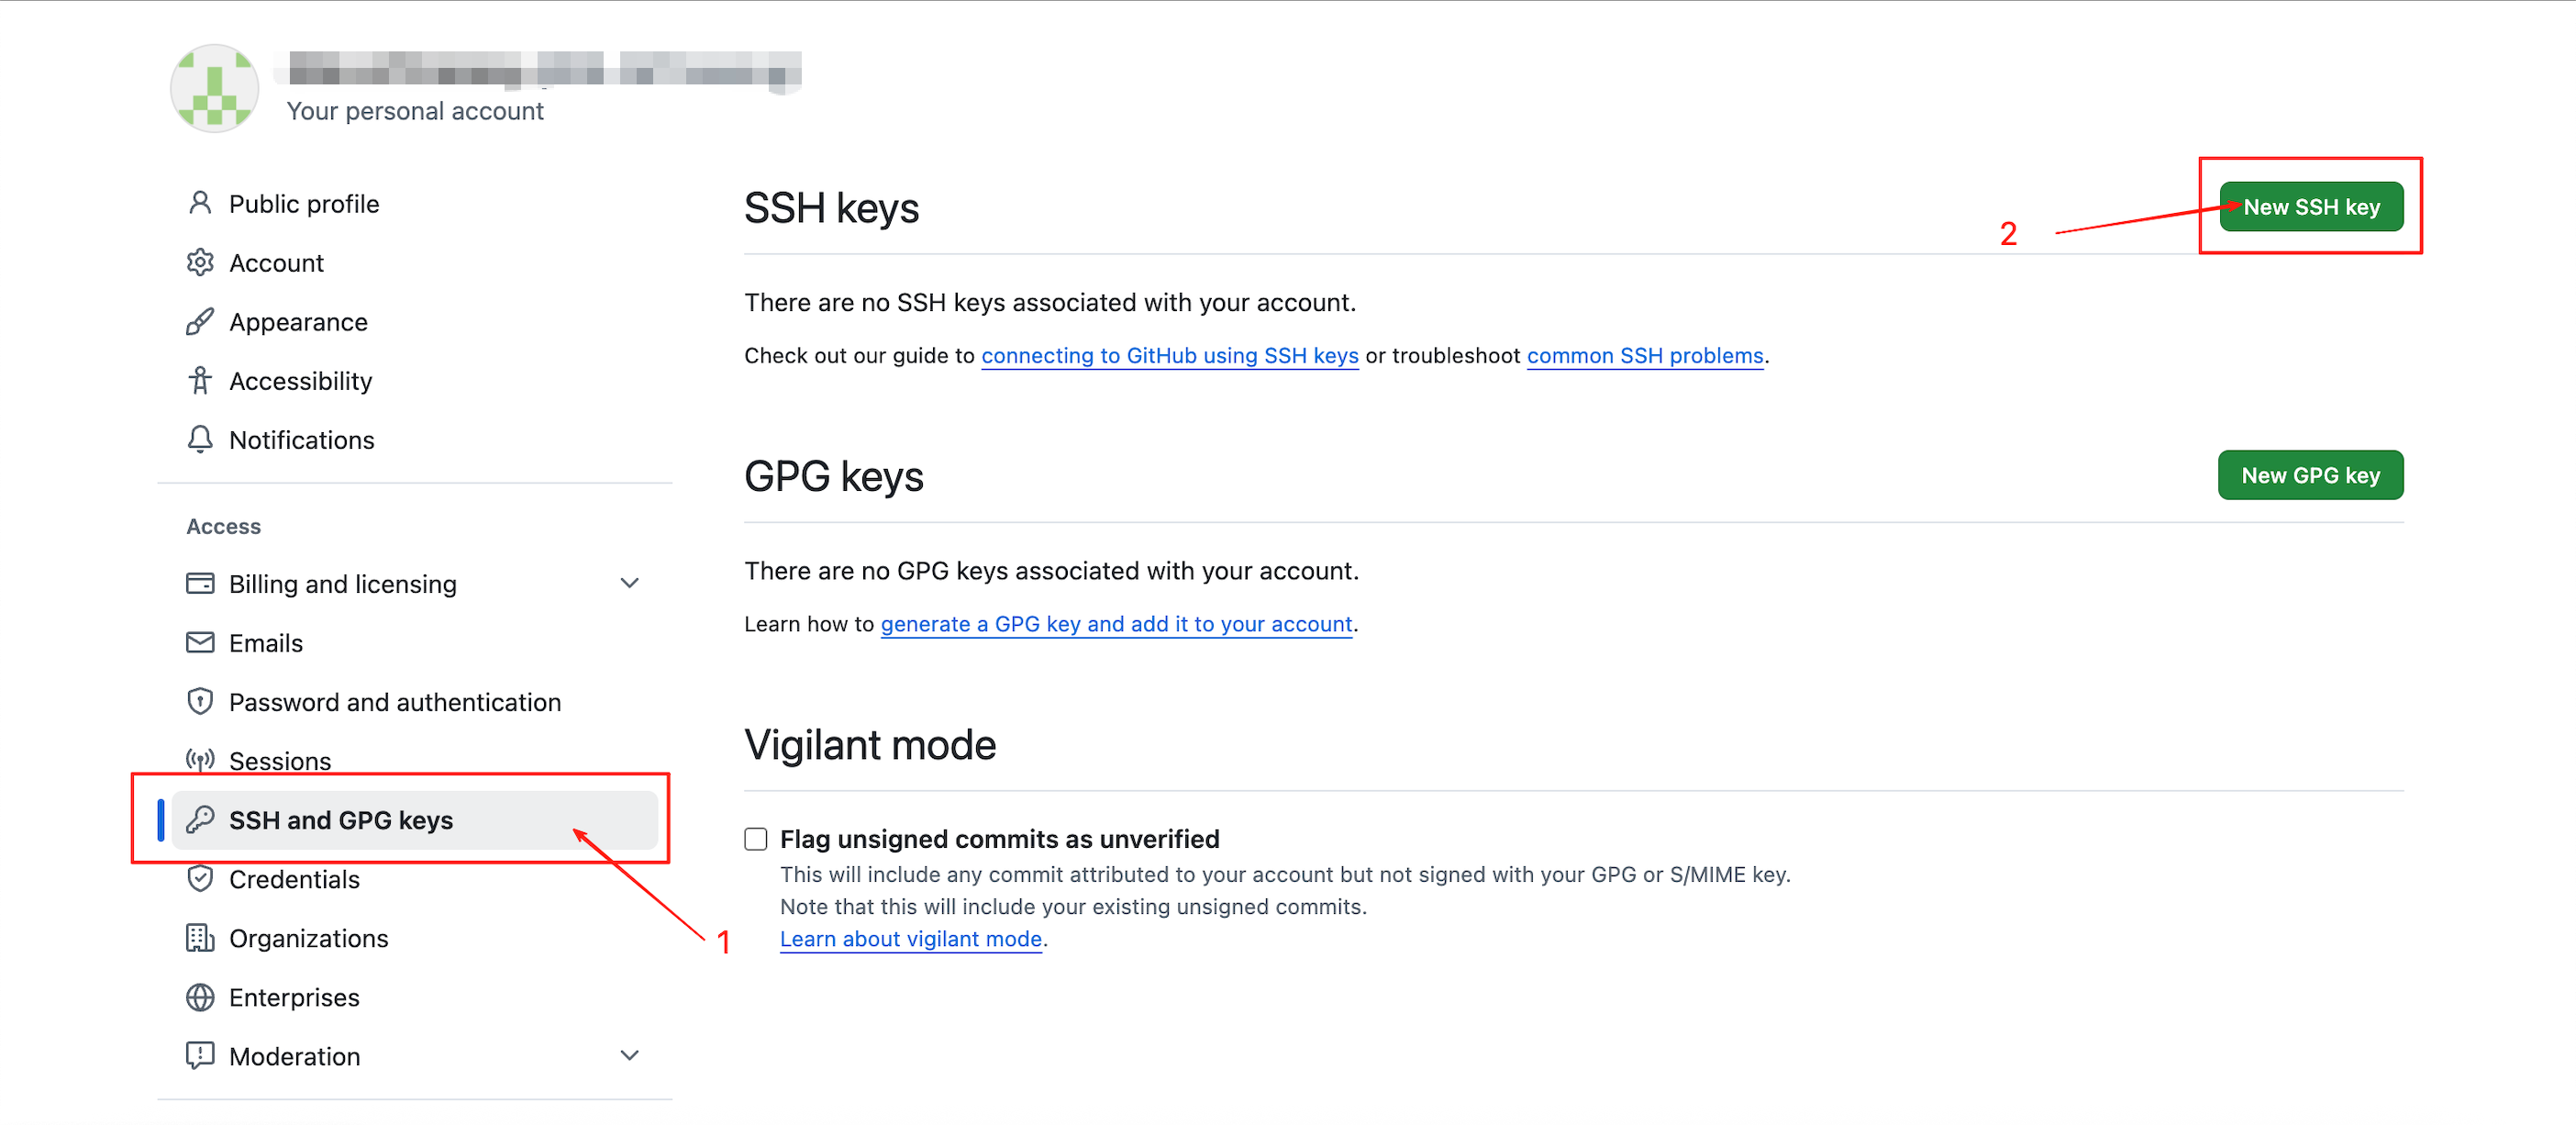
In the left navigation panel, open SSH and GPG keys, then click New SSH key.
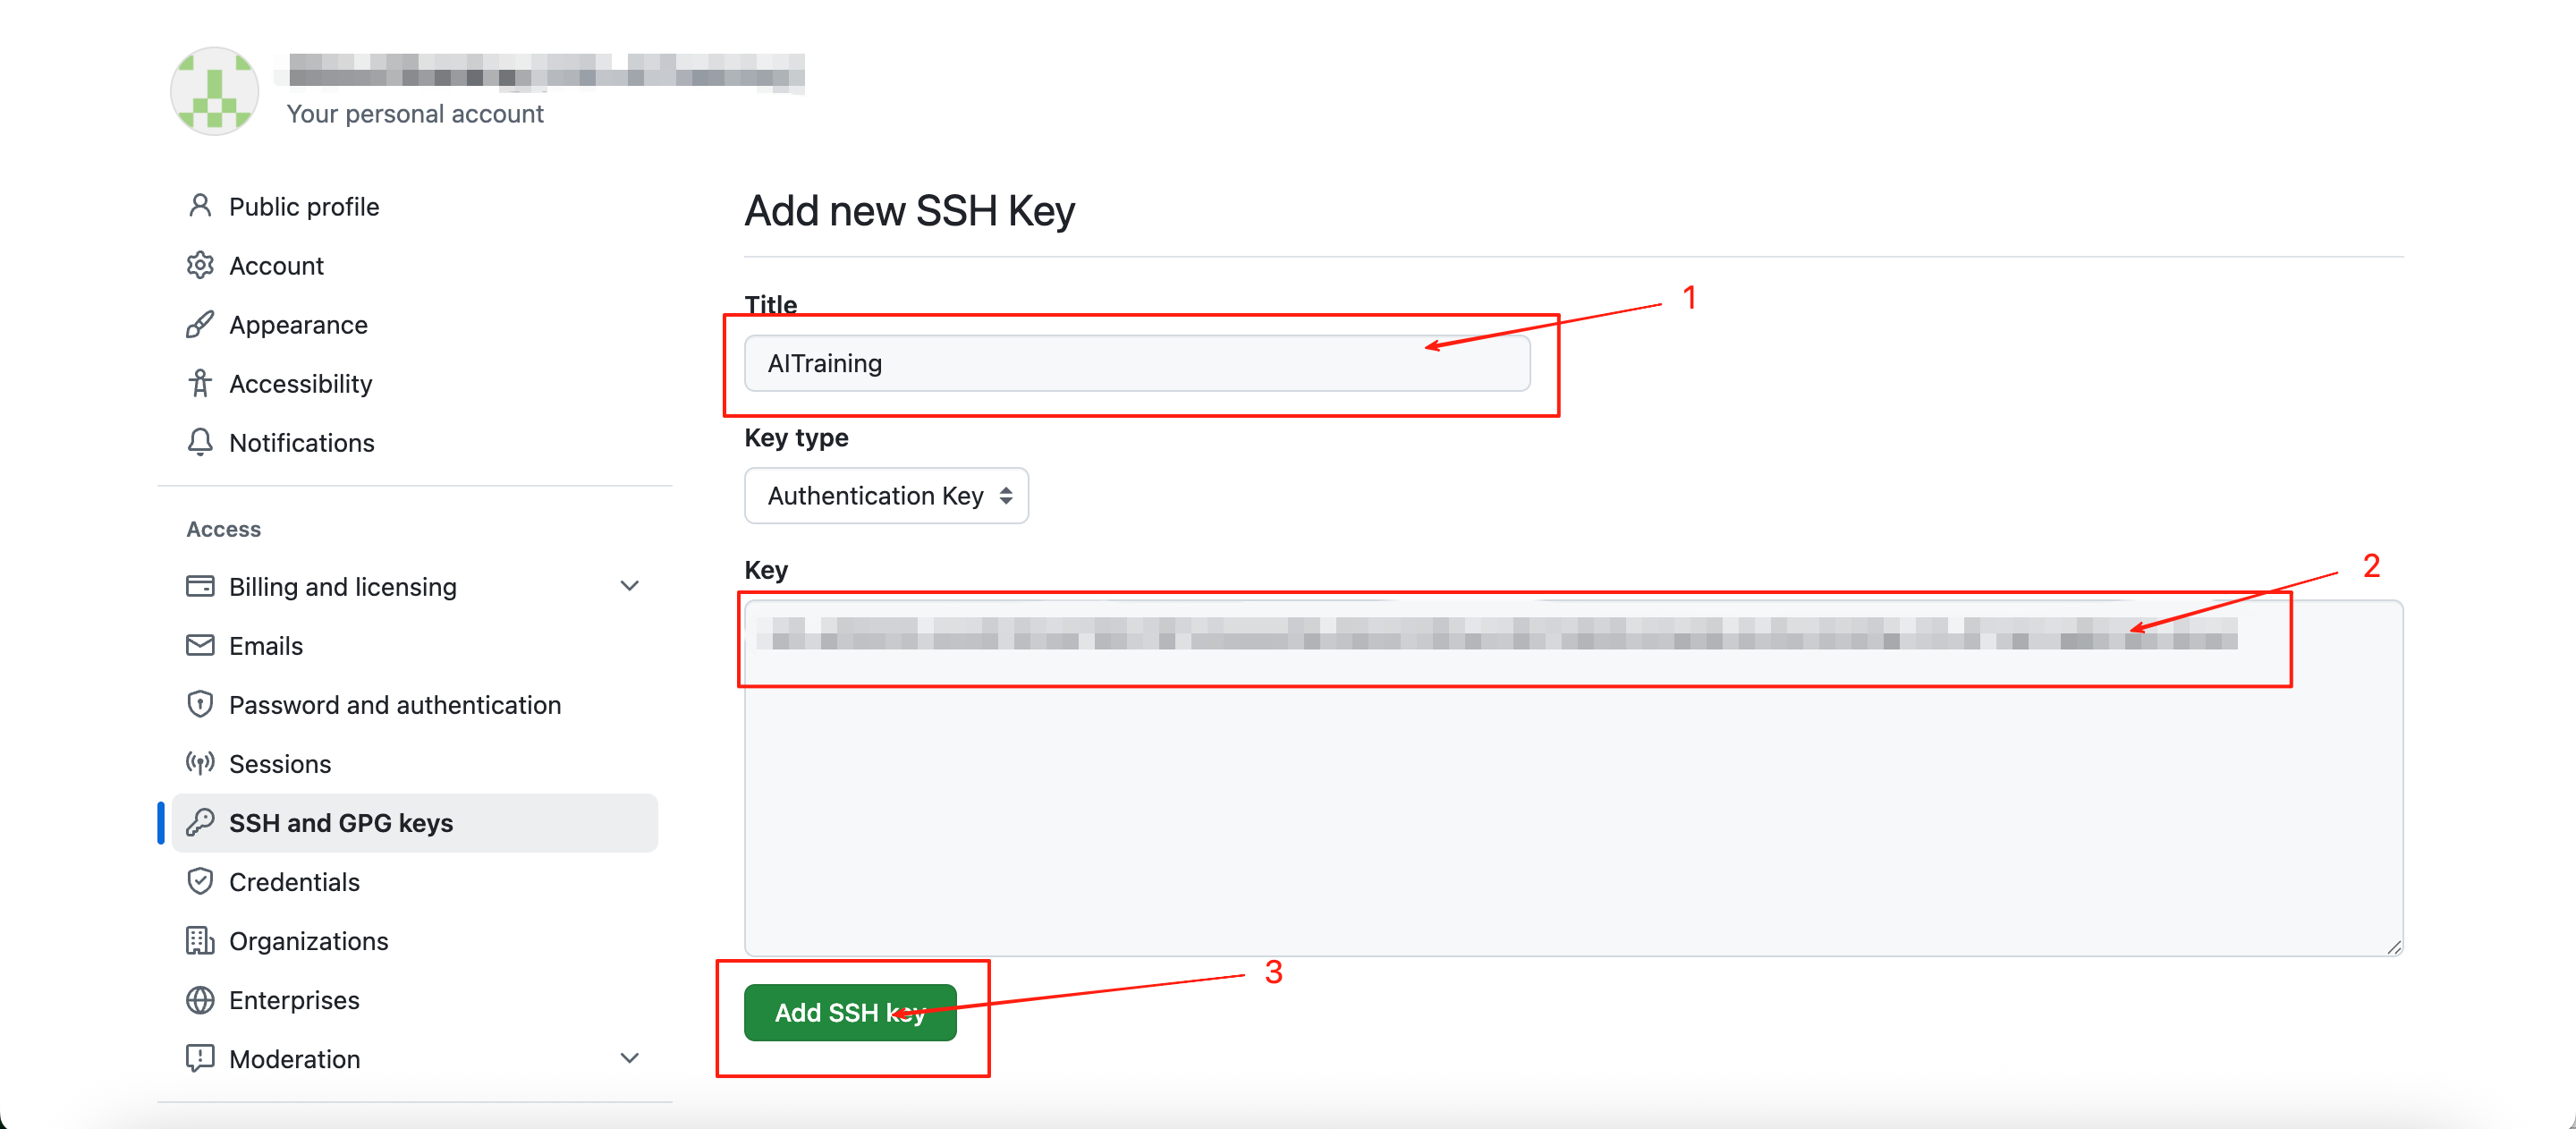
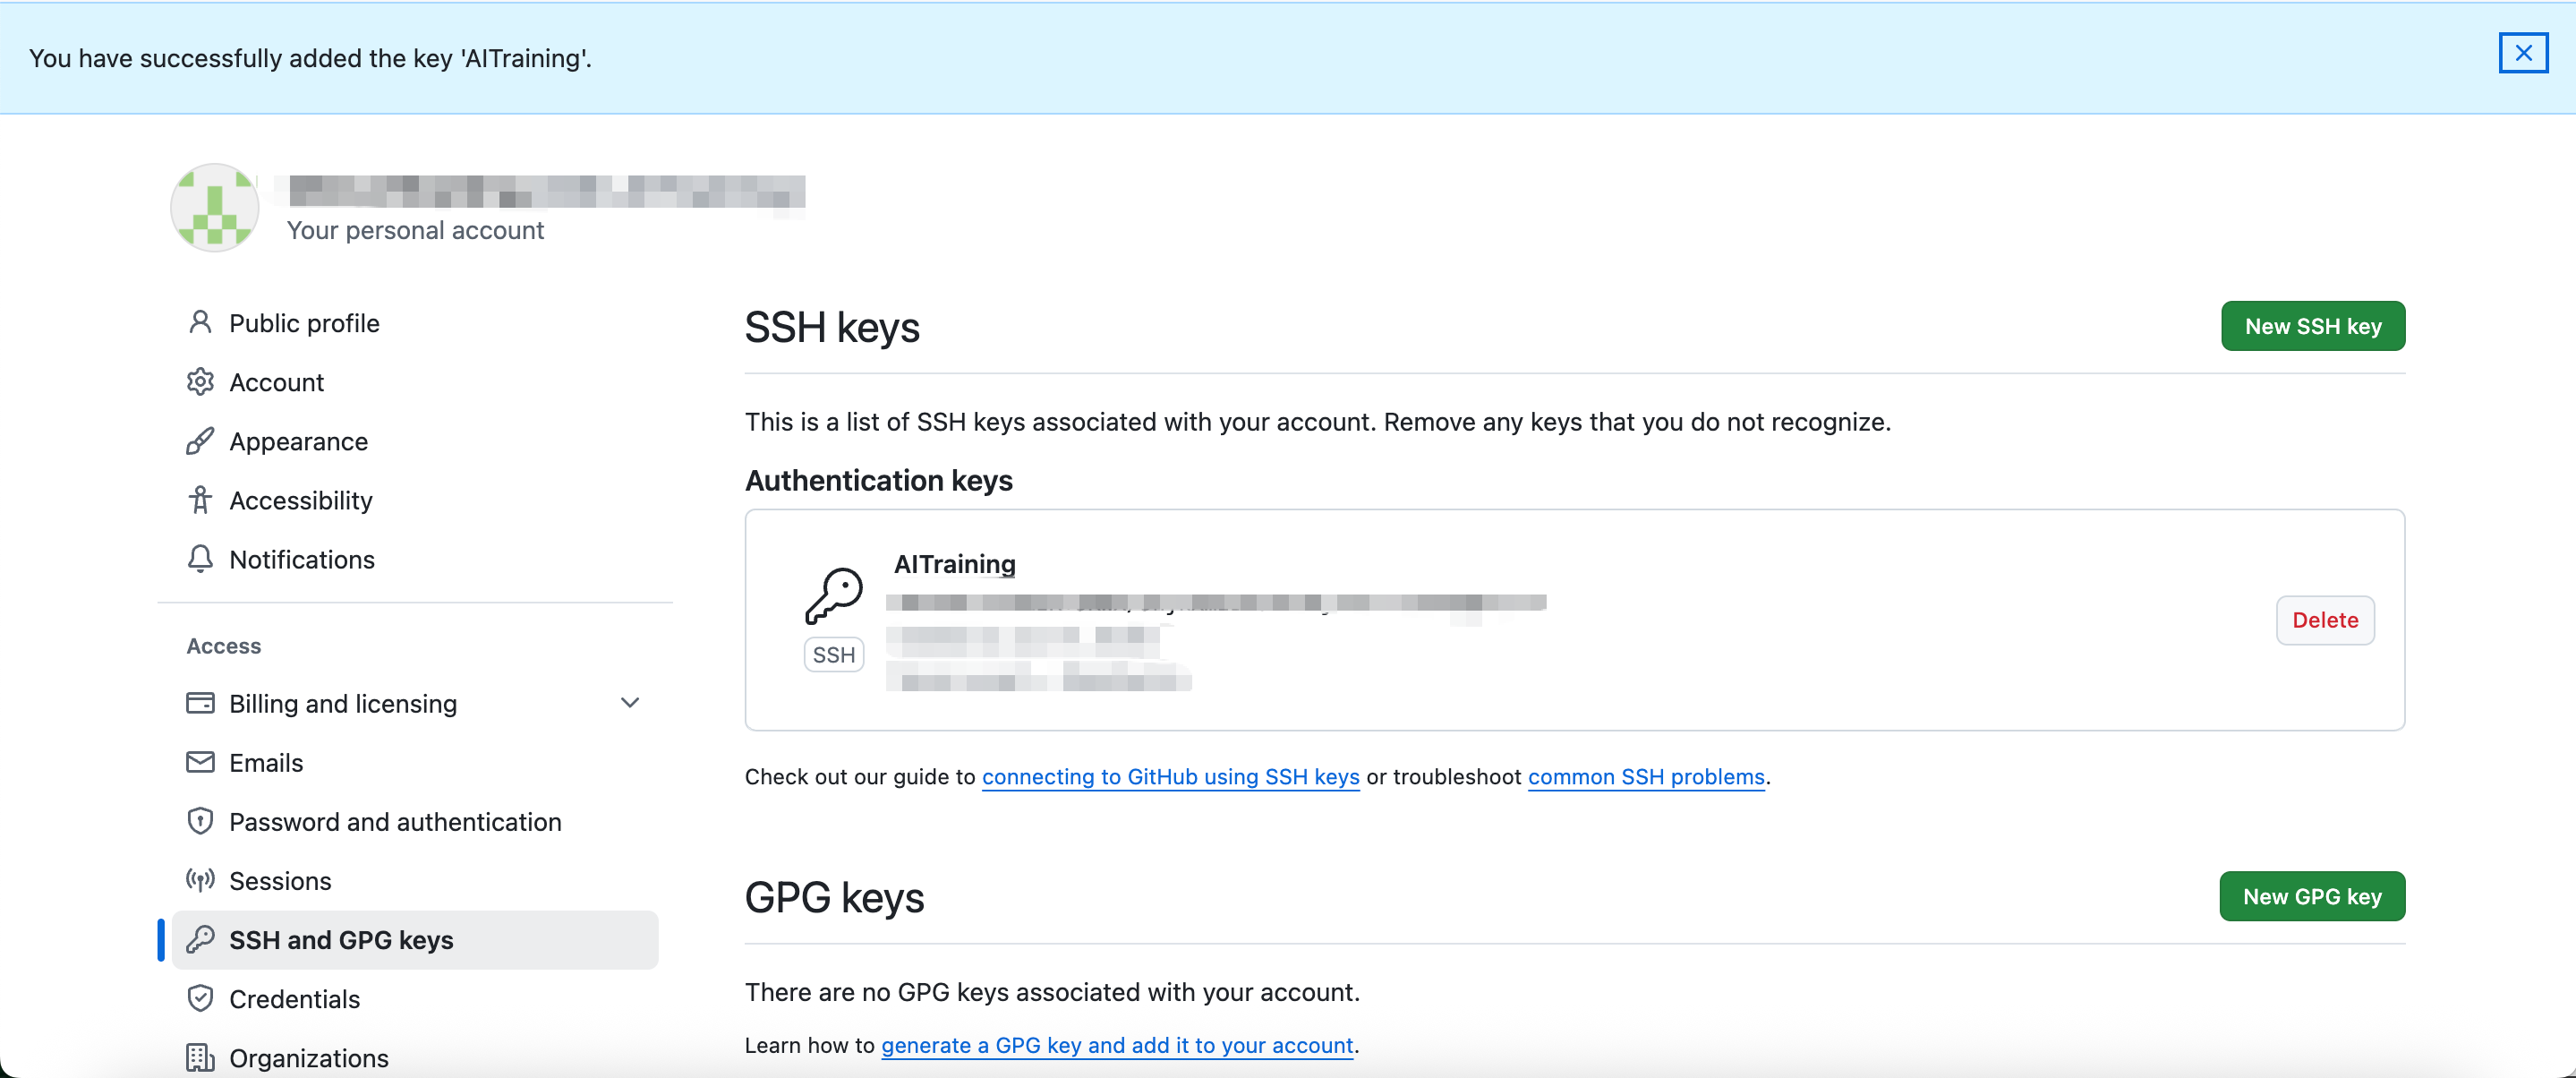
Enter a descriptive title for the key, paste your SSH public key into the Key field, and save it by clicking Add SSH key.
Create a New Remote Repository
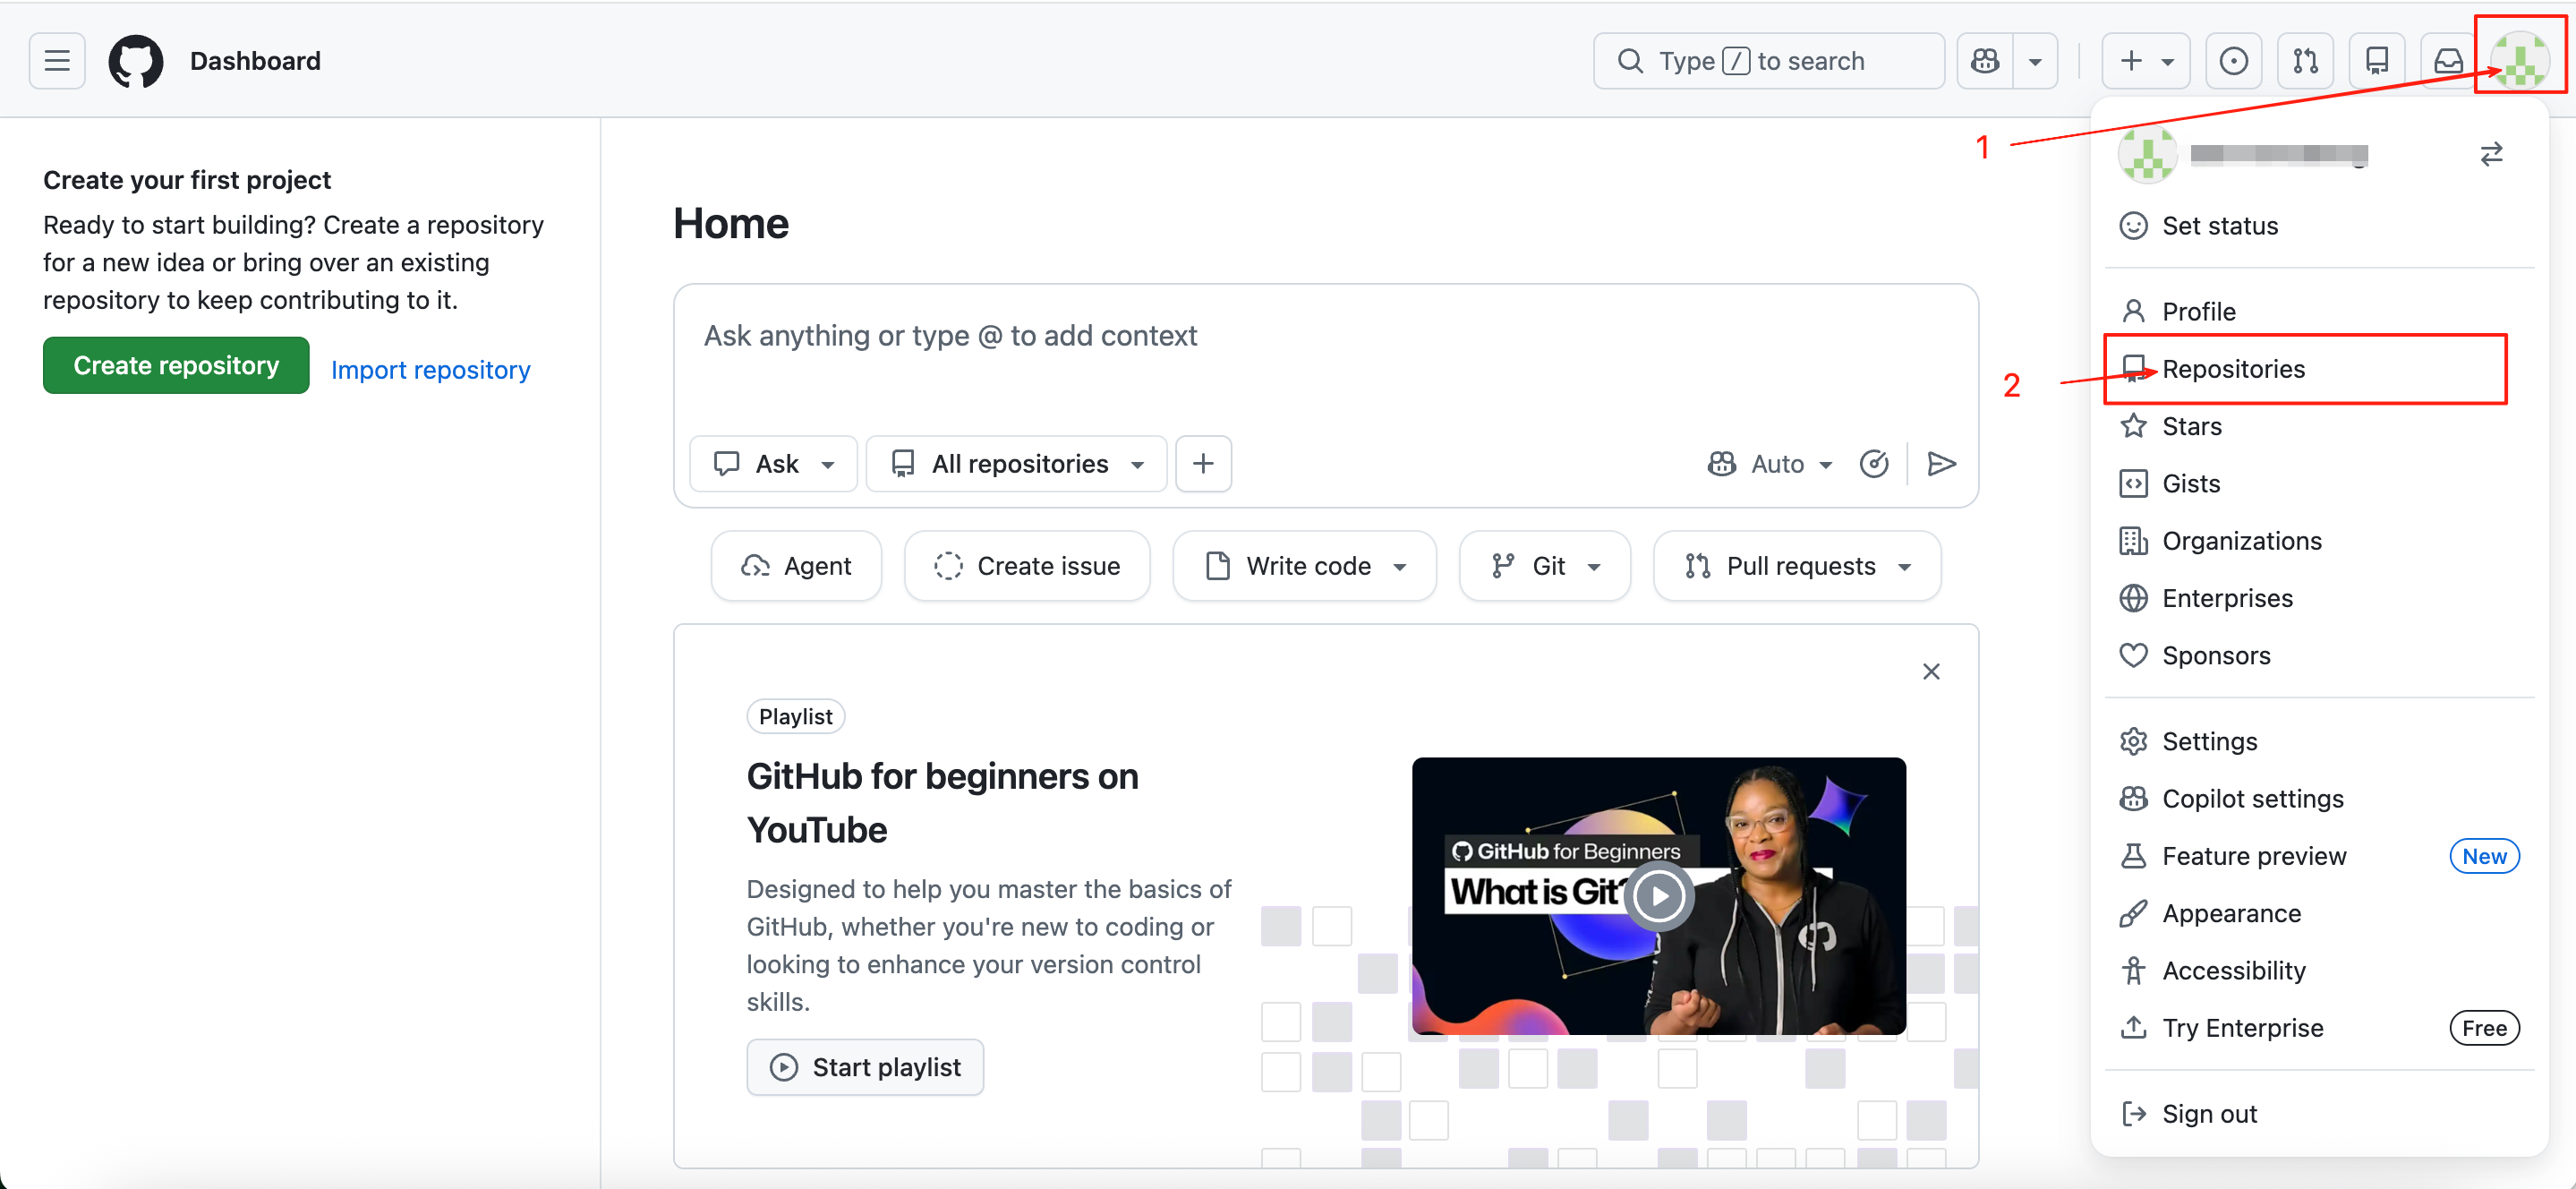
Click your profile avatar and navigate to Repositories.
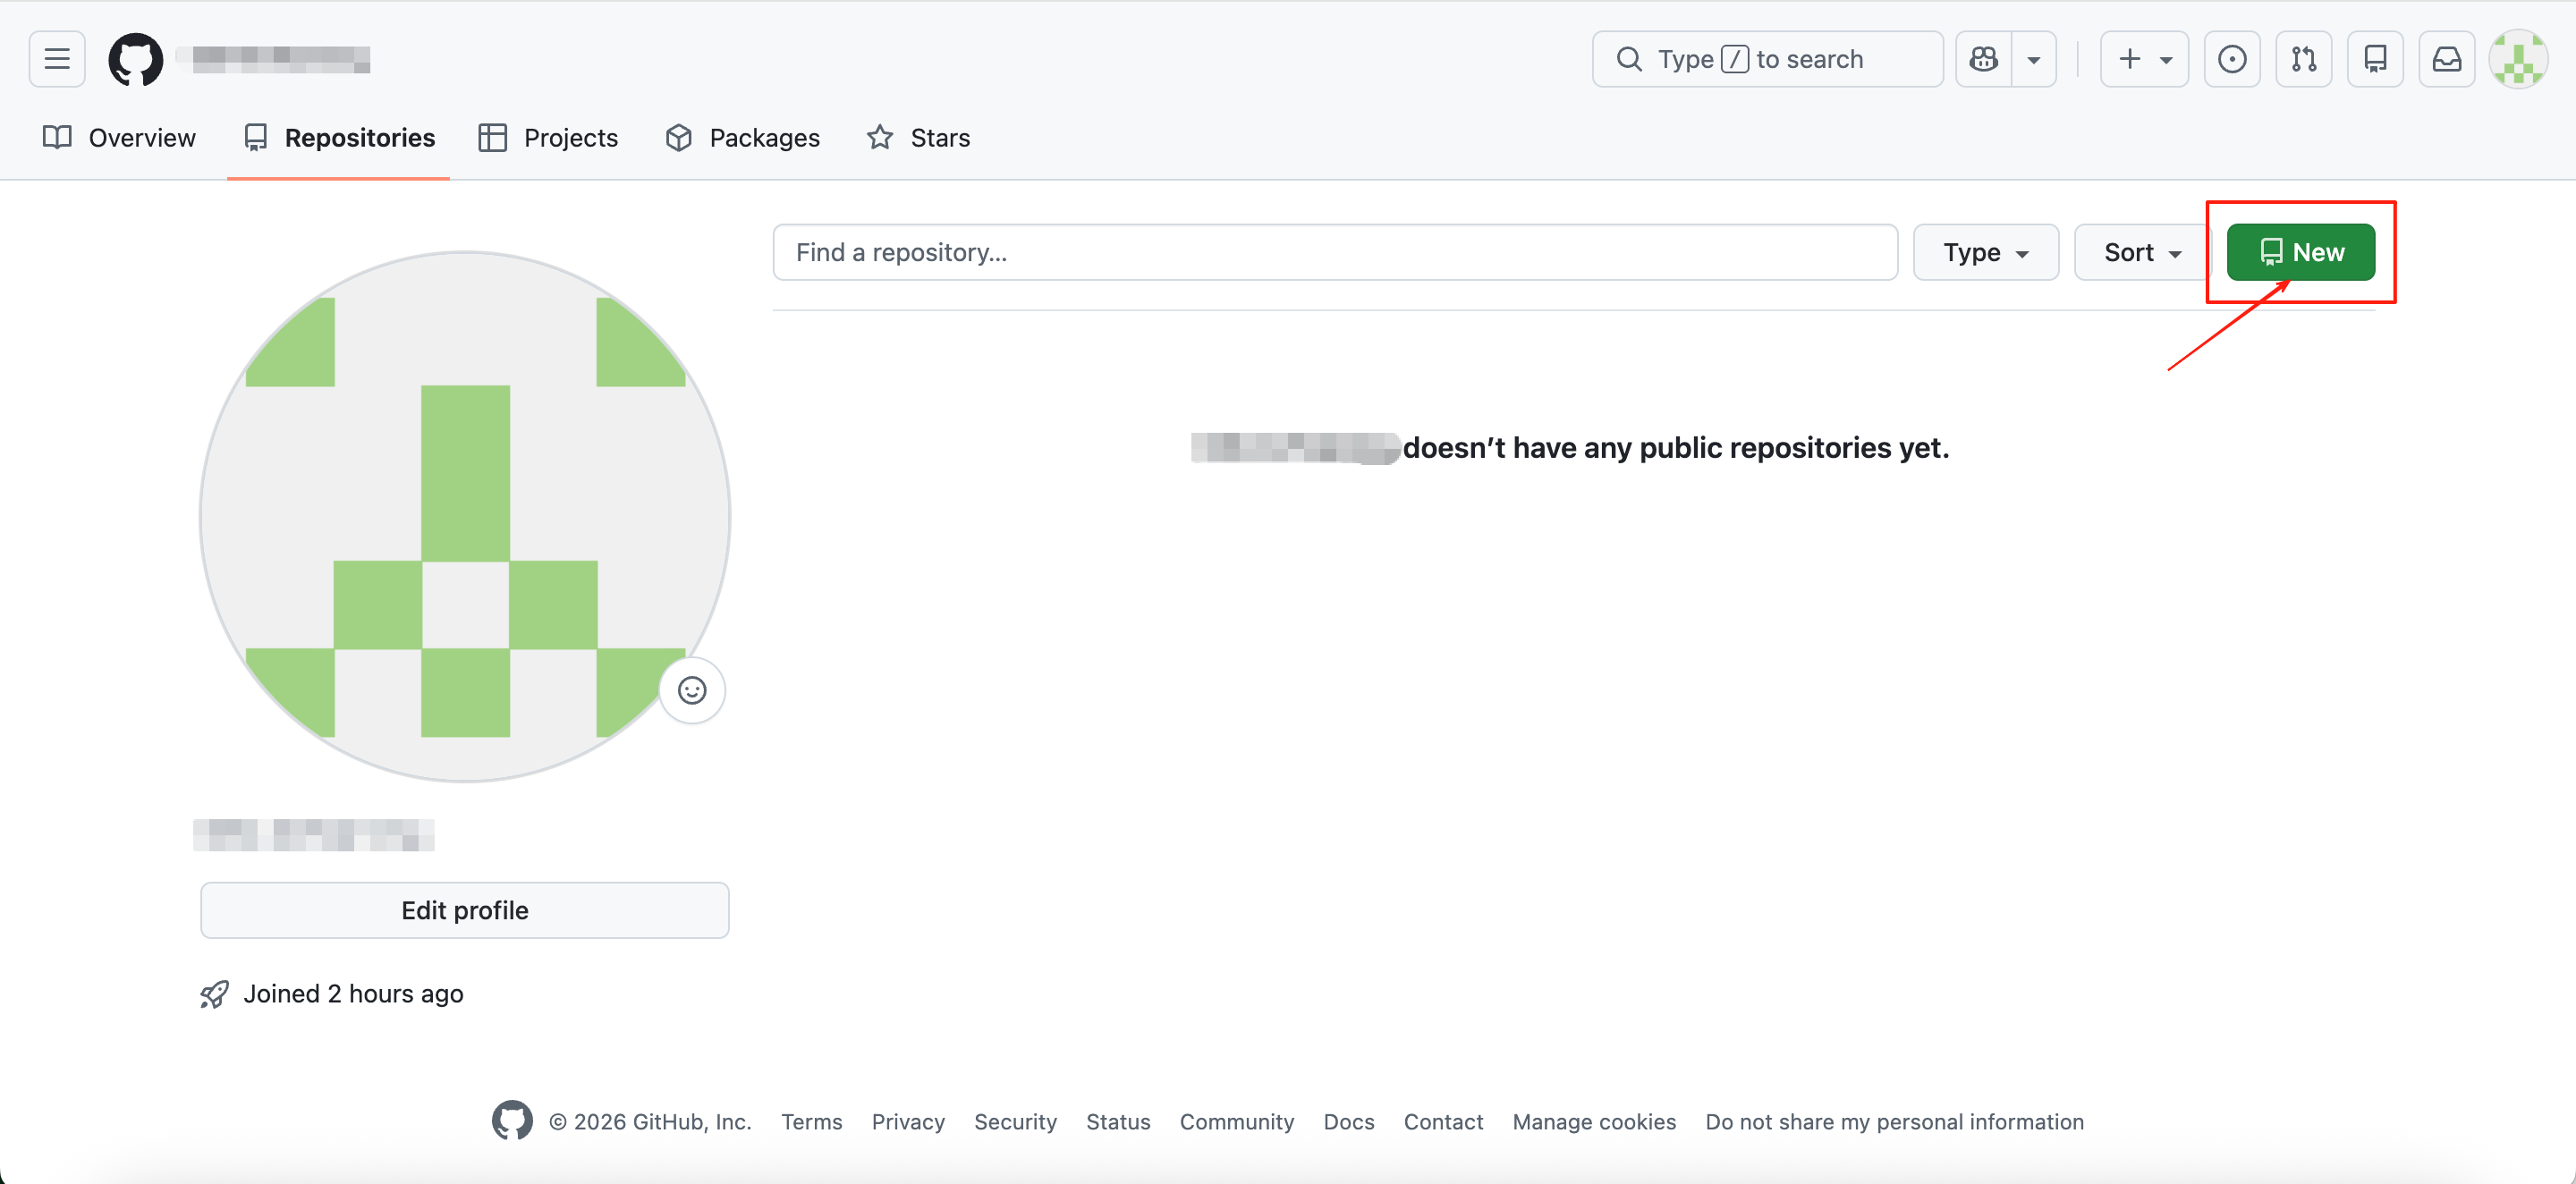
Click New to create a new repository.
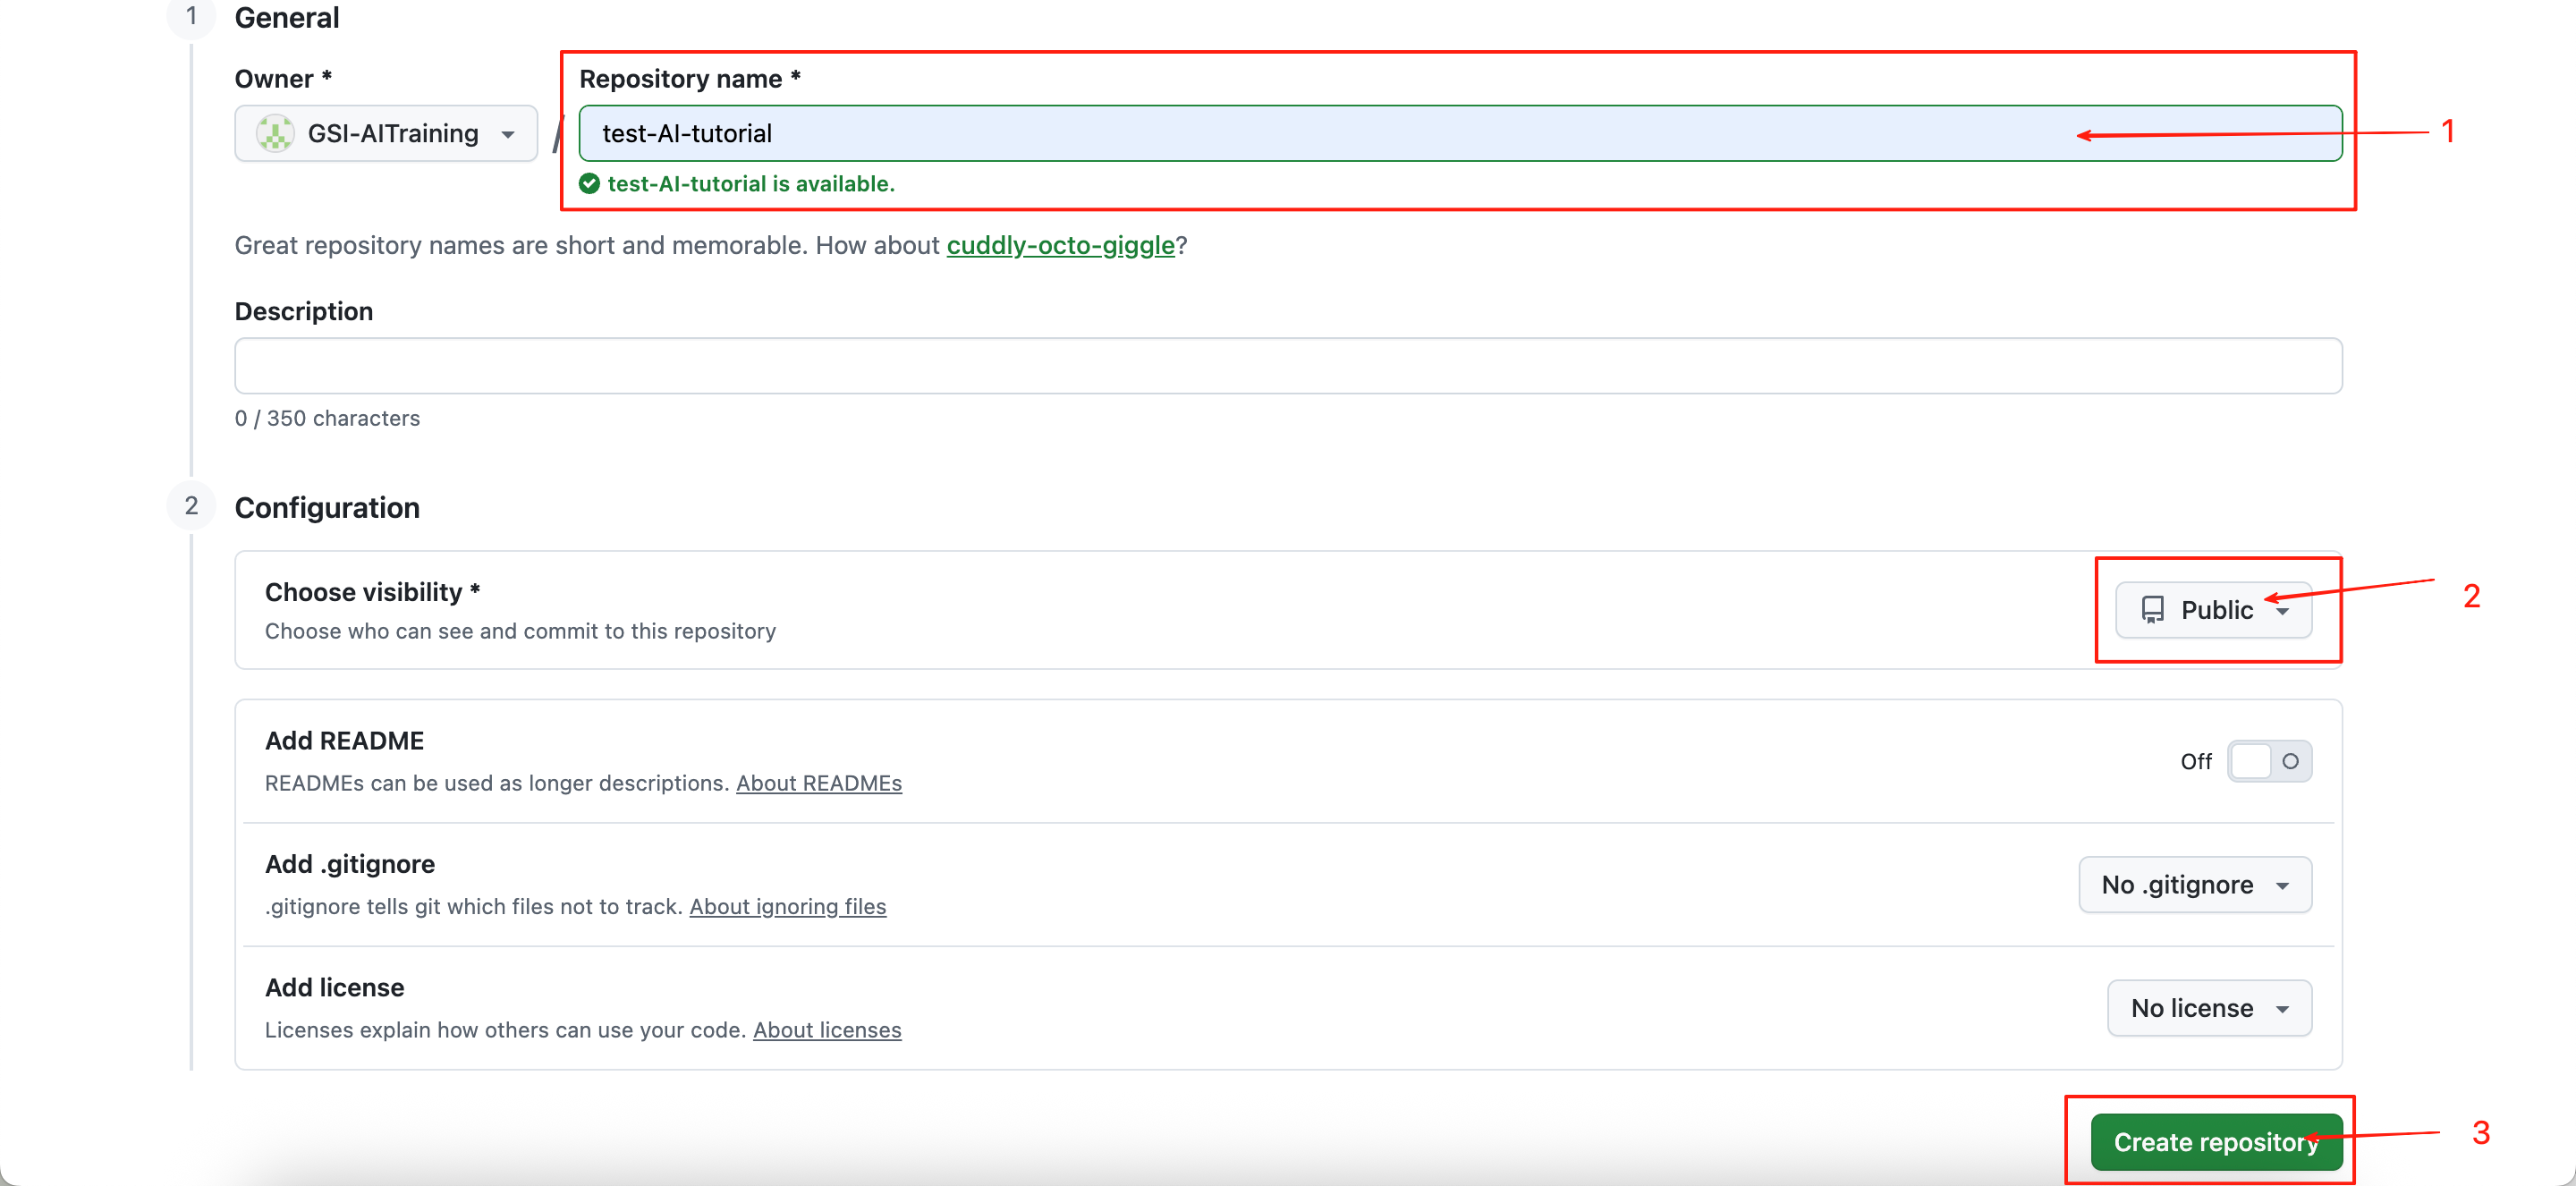
Enter a repository name, choose its visibility, and then click Create repository. A Public repository can be viewed by anyone, while a Private repository is accessible only to you and collaborators you explicitly invite.
Connect a Local Repository to a Remote Repository
There are two common ways to connect to a remote Git repository:
- SSH: the repository URL begins with ‘git@’. This method requires you to configure an SSH key on your machine. Once set up, you can authenticate securely and perform operations such as ‘push’, ‘pull’, and ‘fetch’ without entering your credentials each time. It is the method most commonly recommended for regular management.
- HTTPS: the repository URL begins with ‘https://’. This method does not require an SSH key and is generally easier to set up. But some environments or workflows may have authentication restrictions.
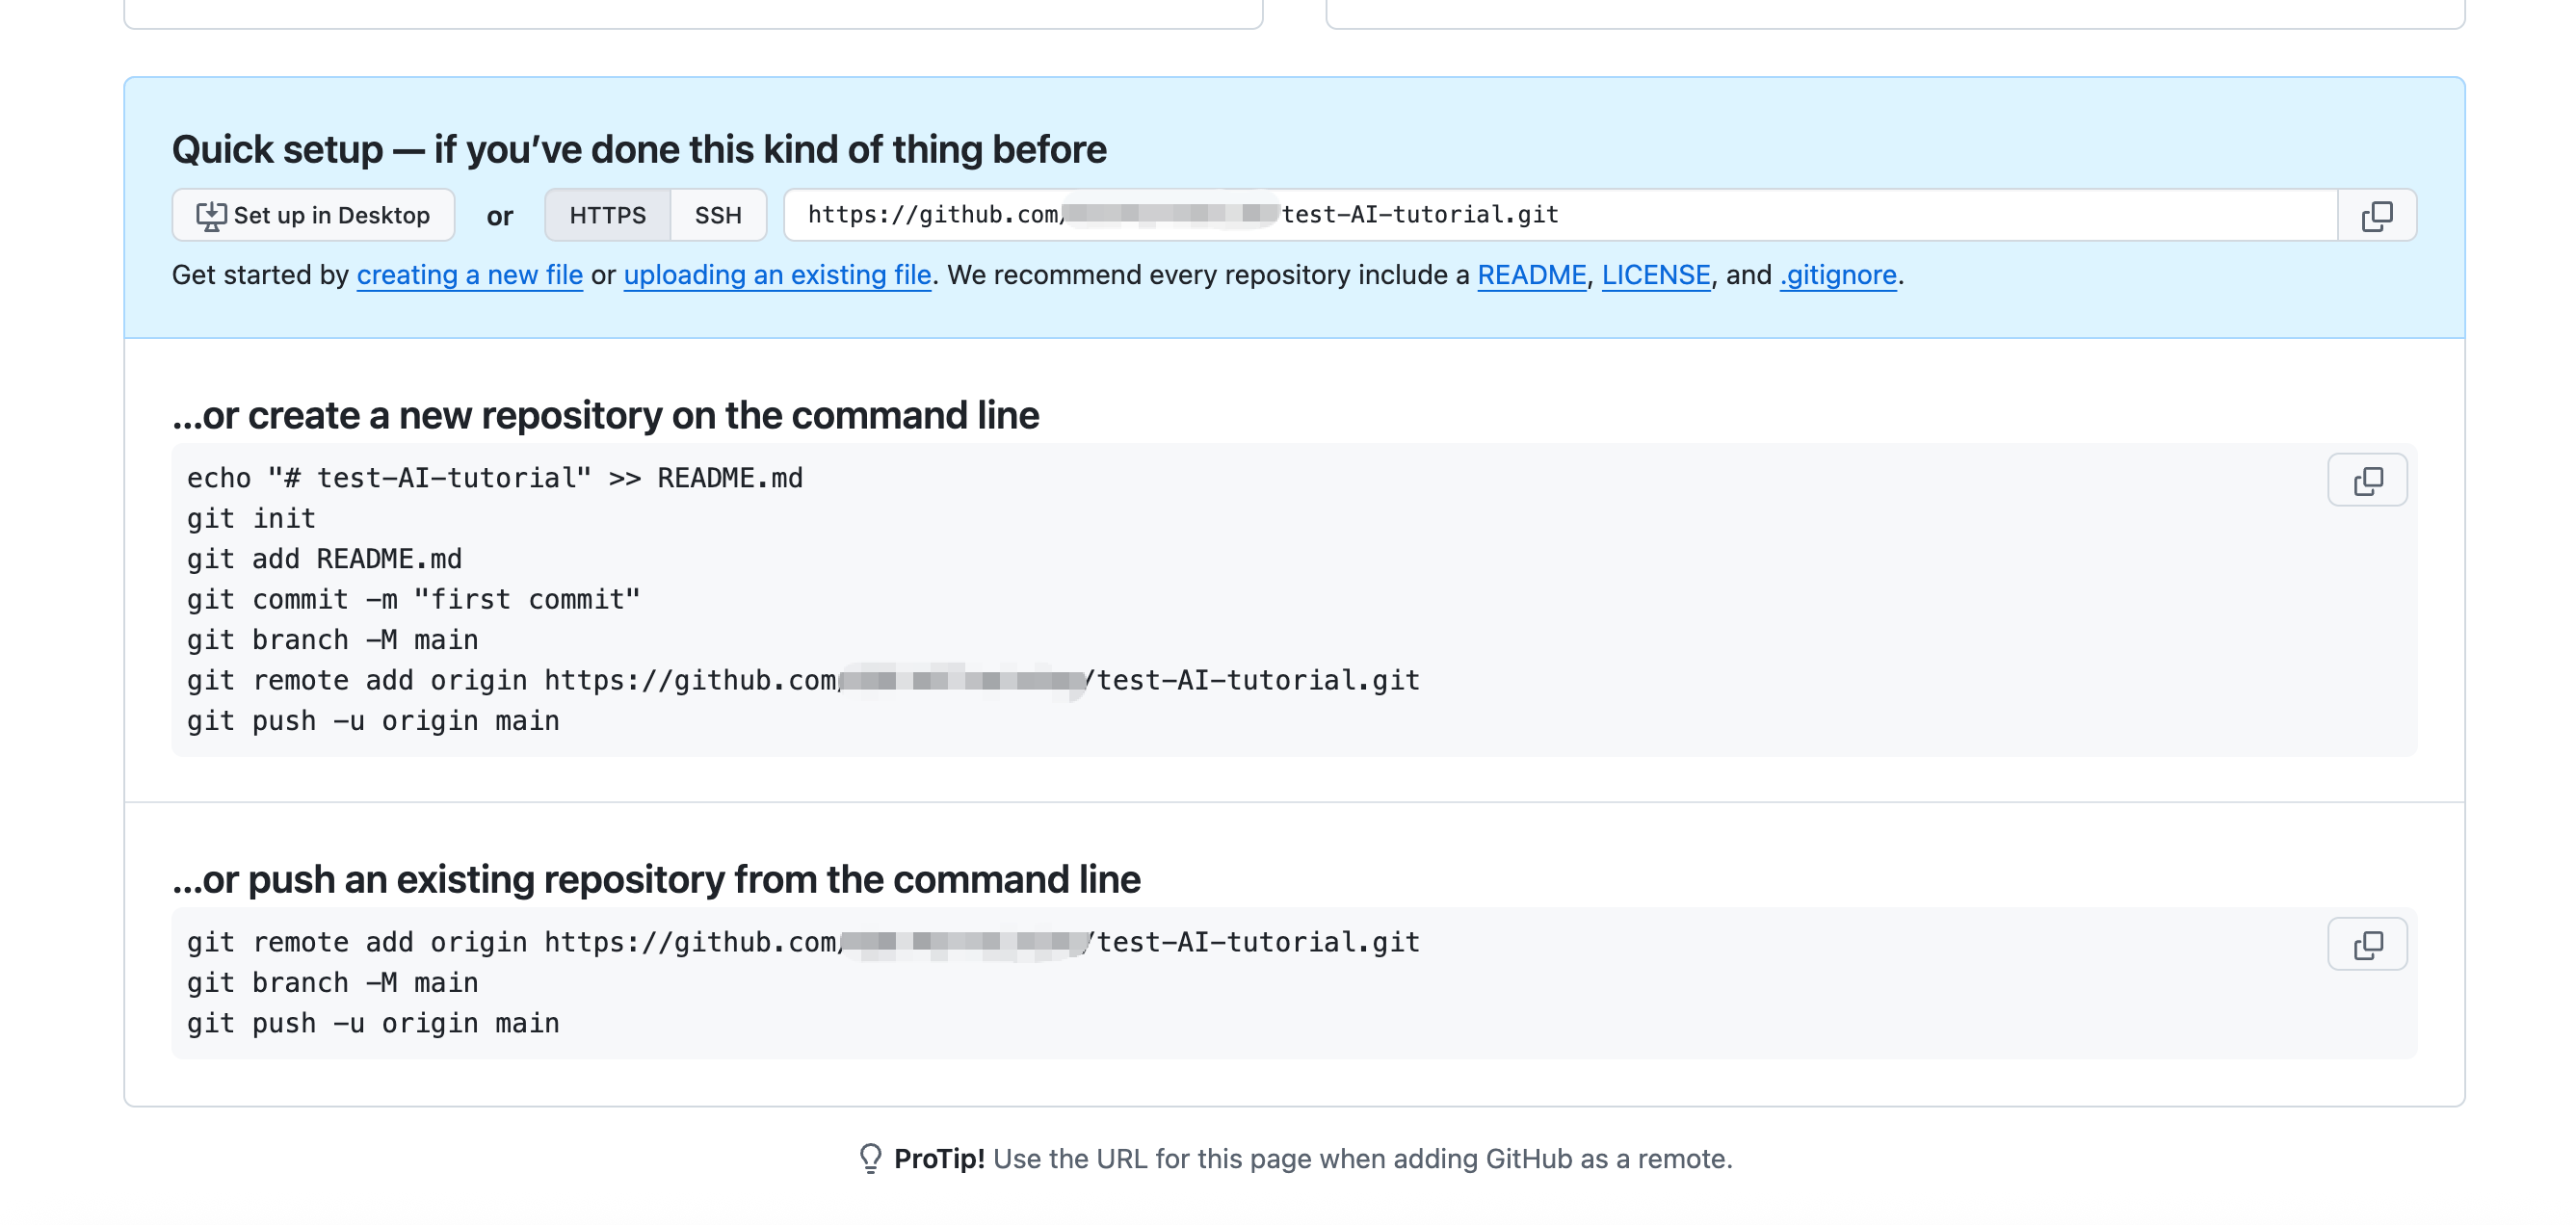
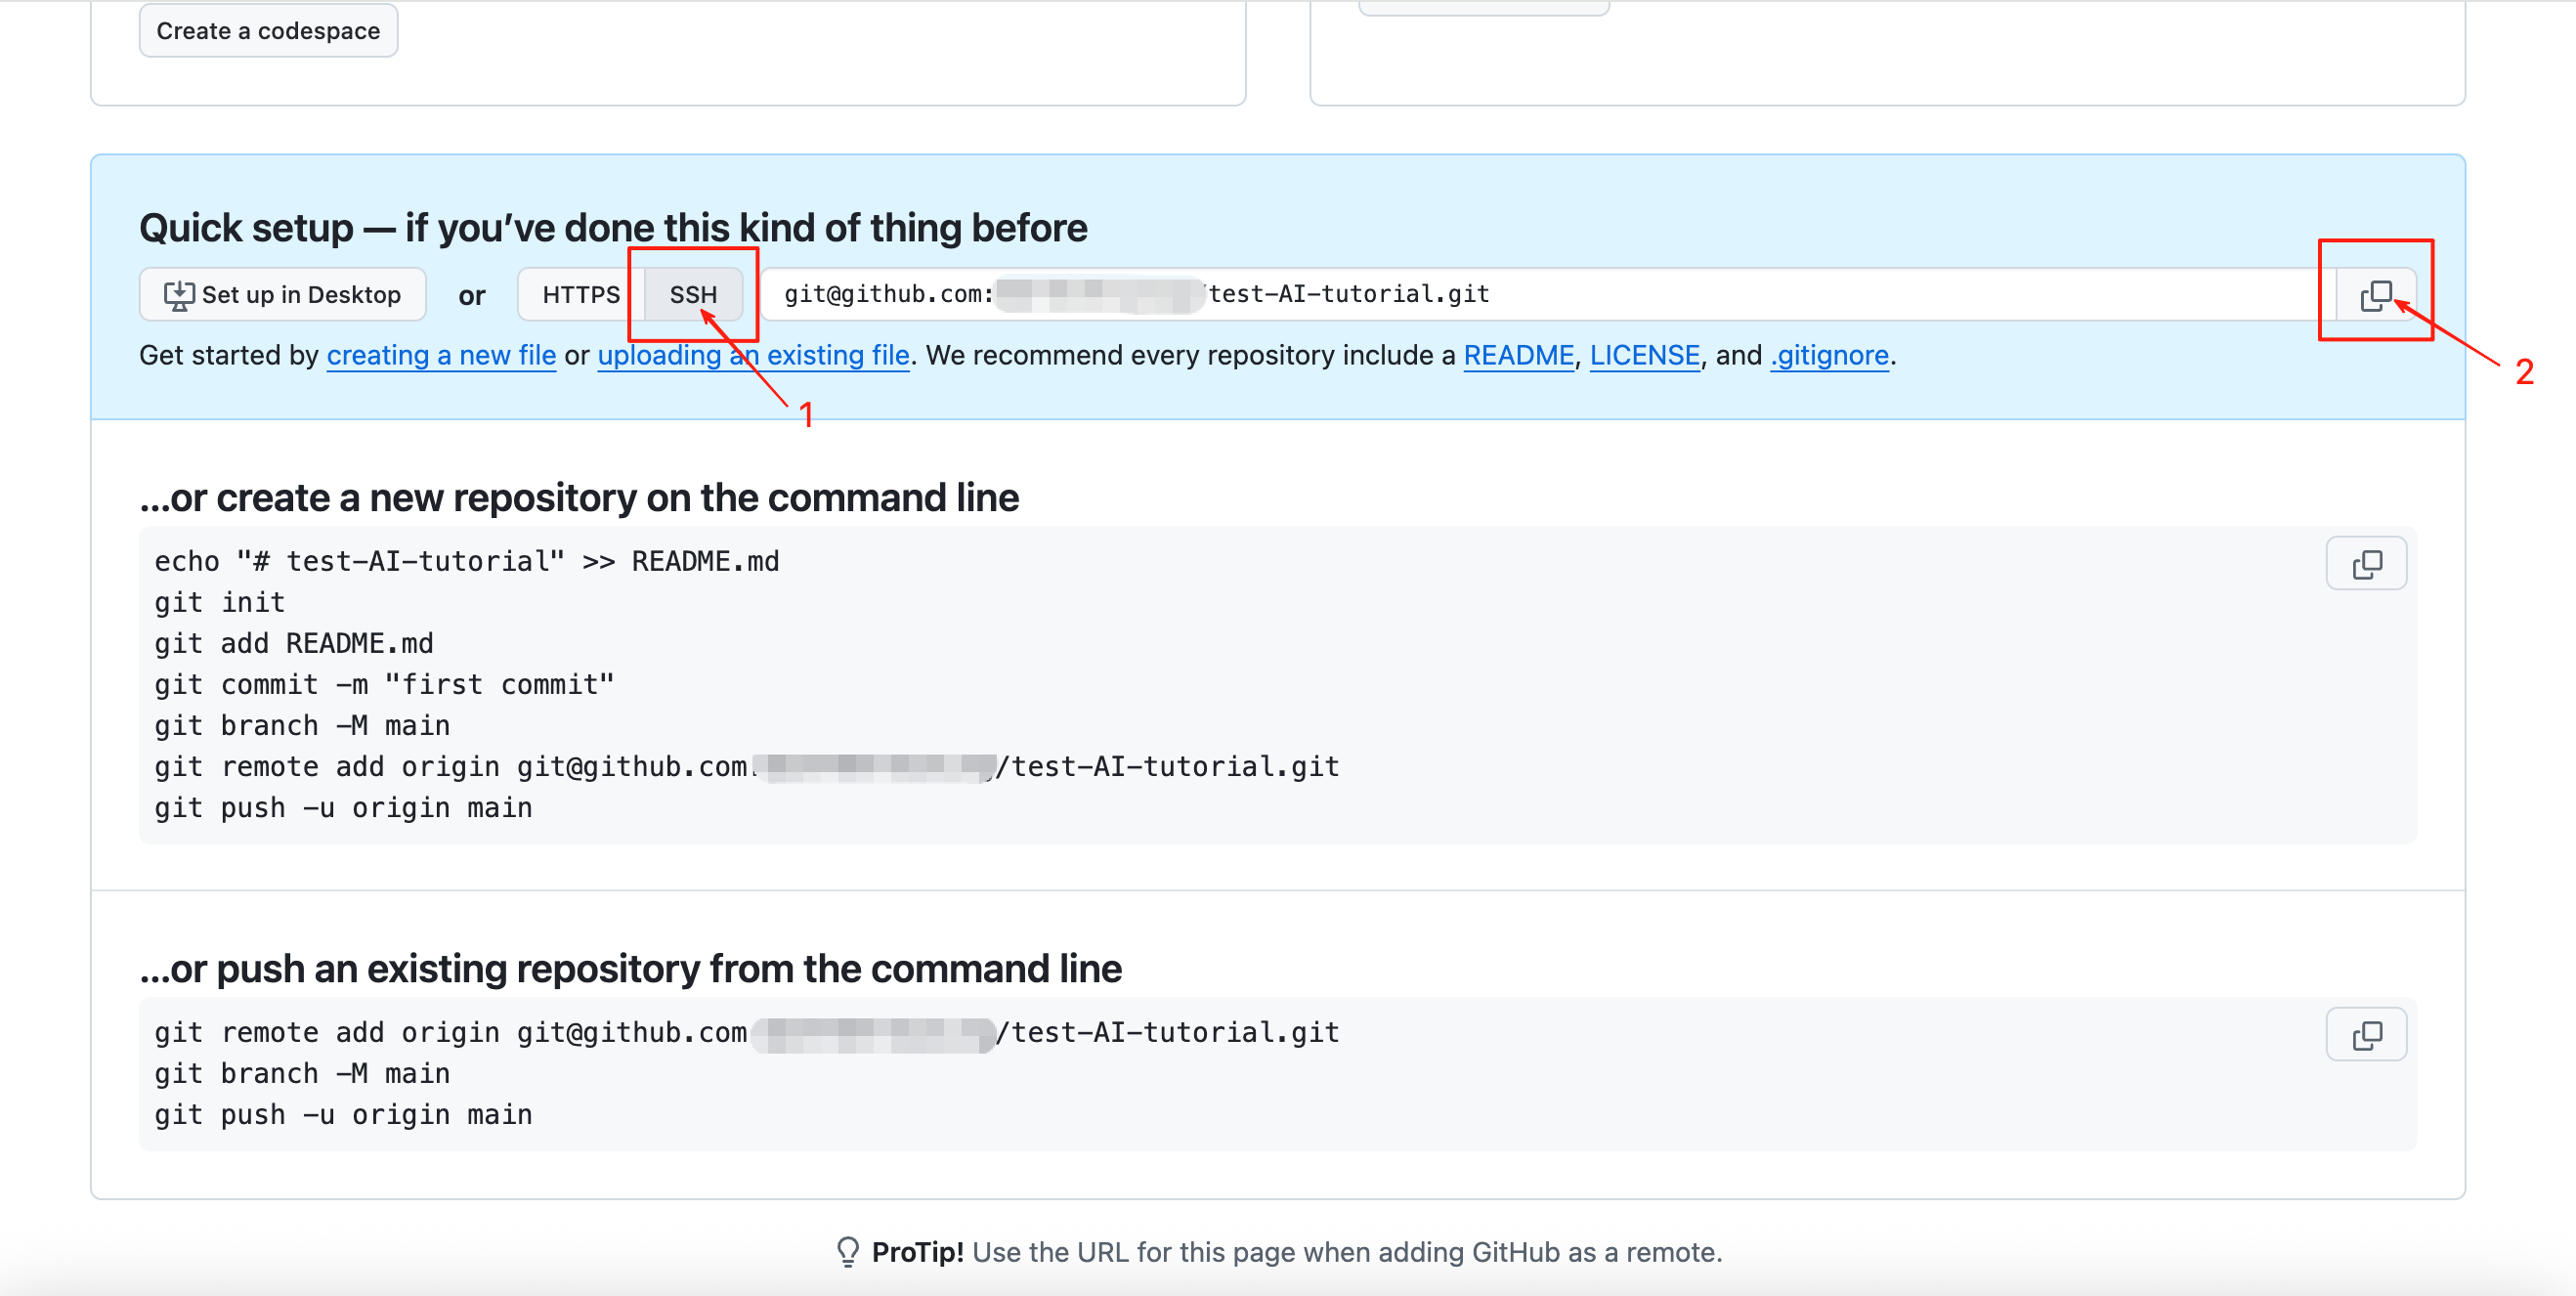
In this example, we will use SSH to connect to a remote repository. On the repository page, click SSH, and copy the repository URL.
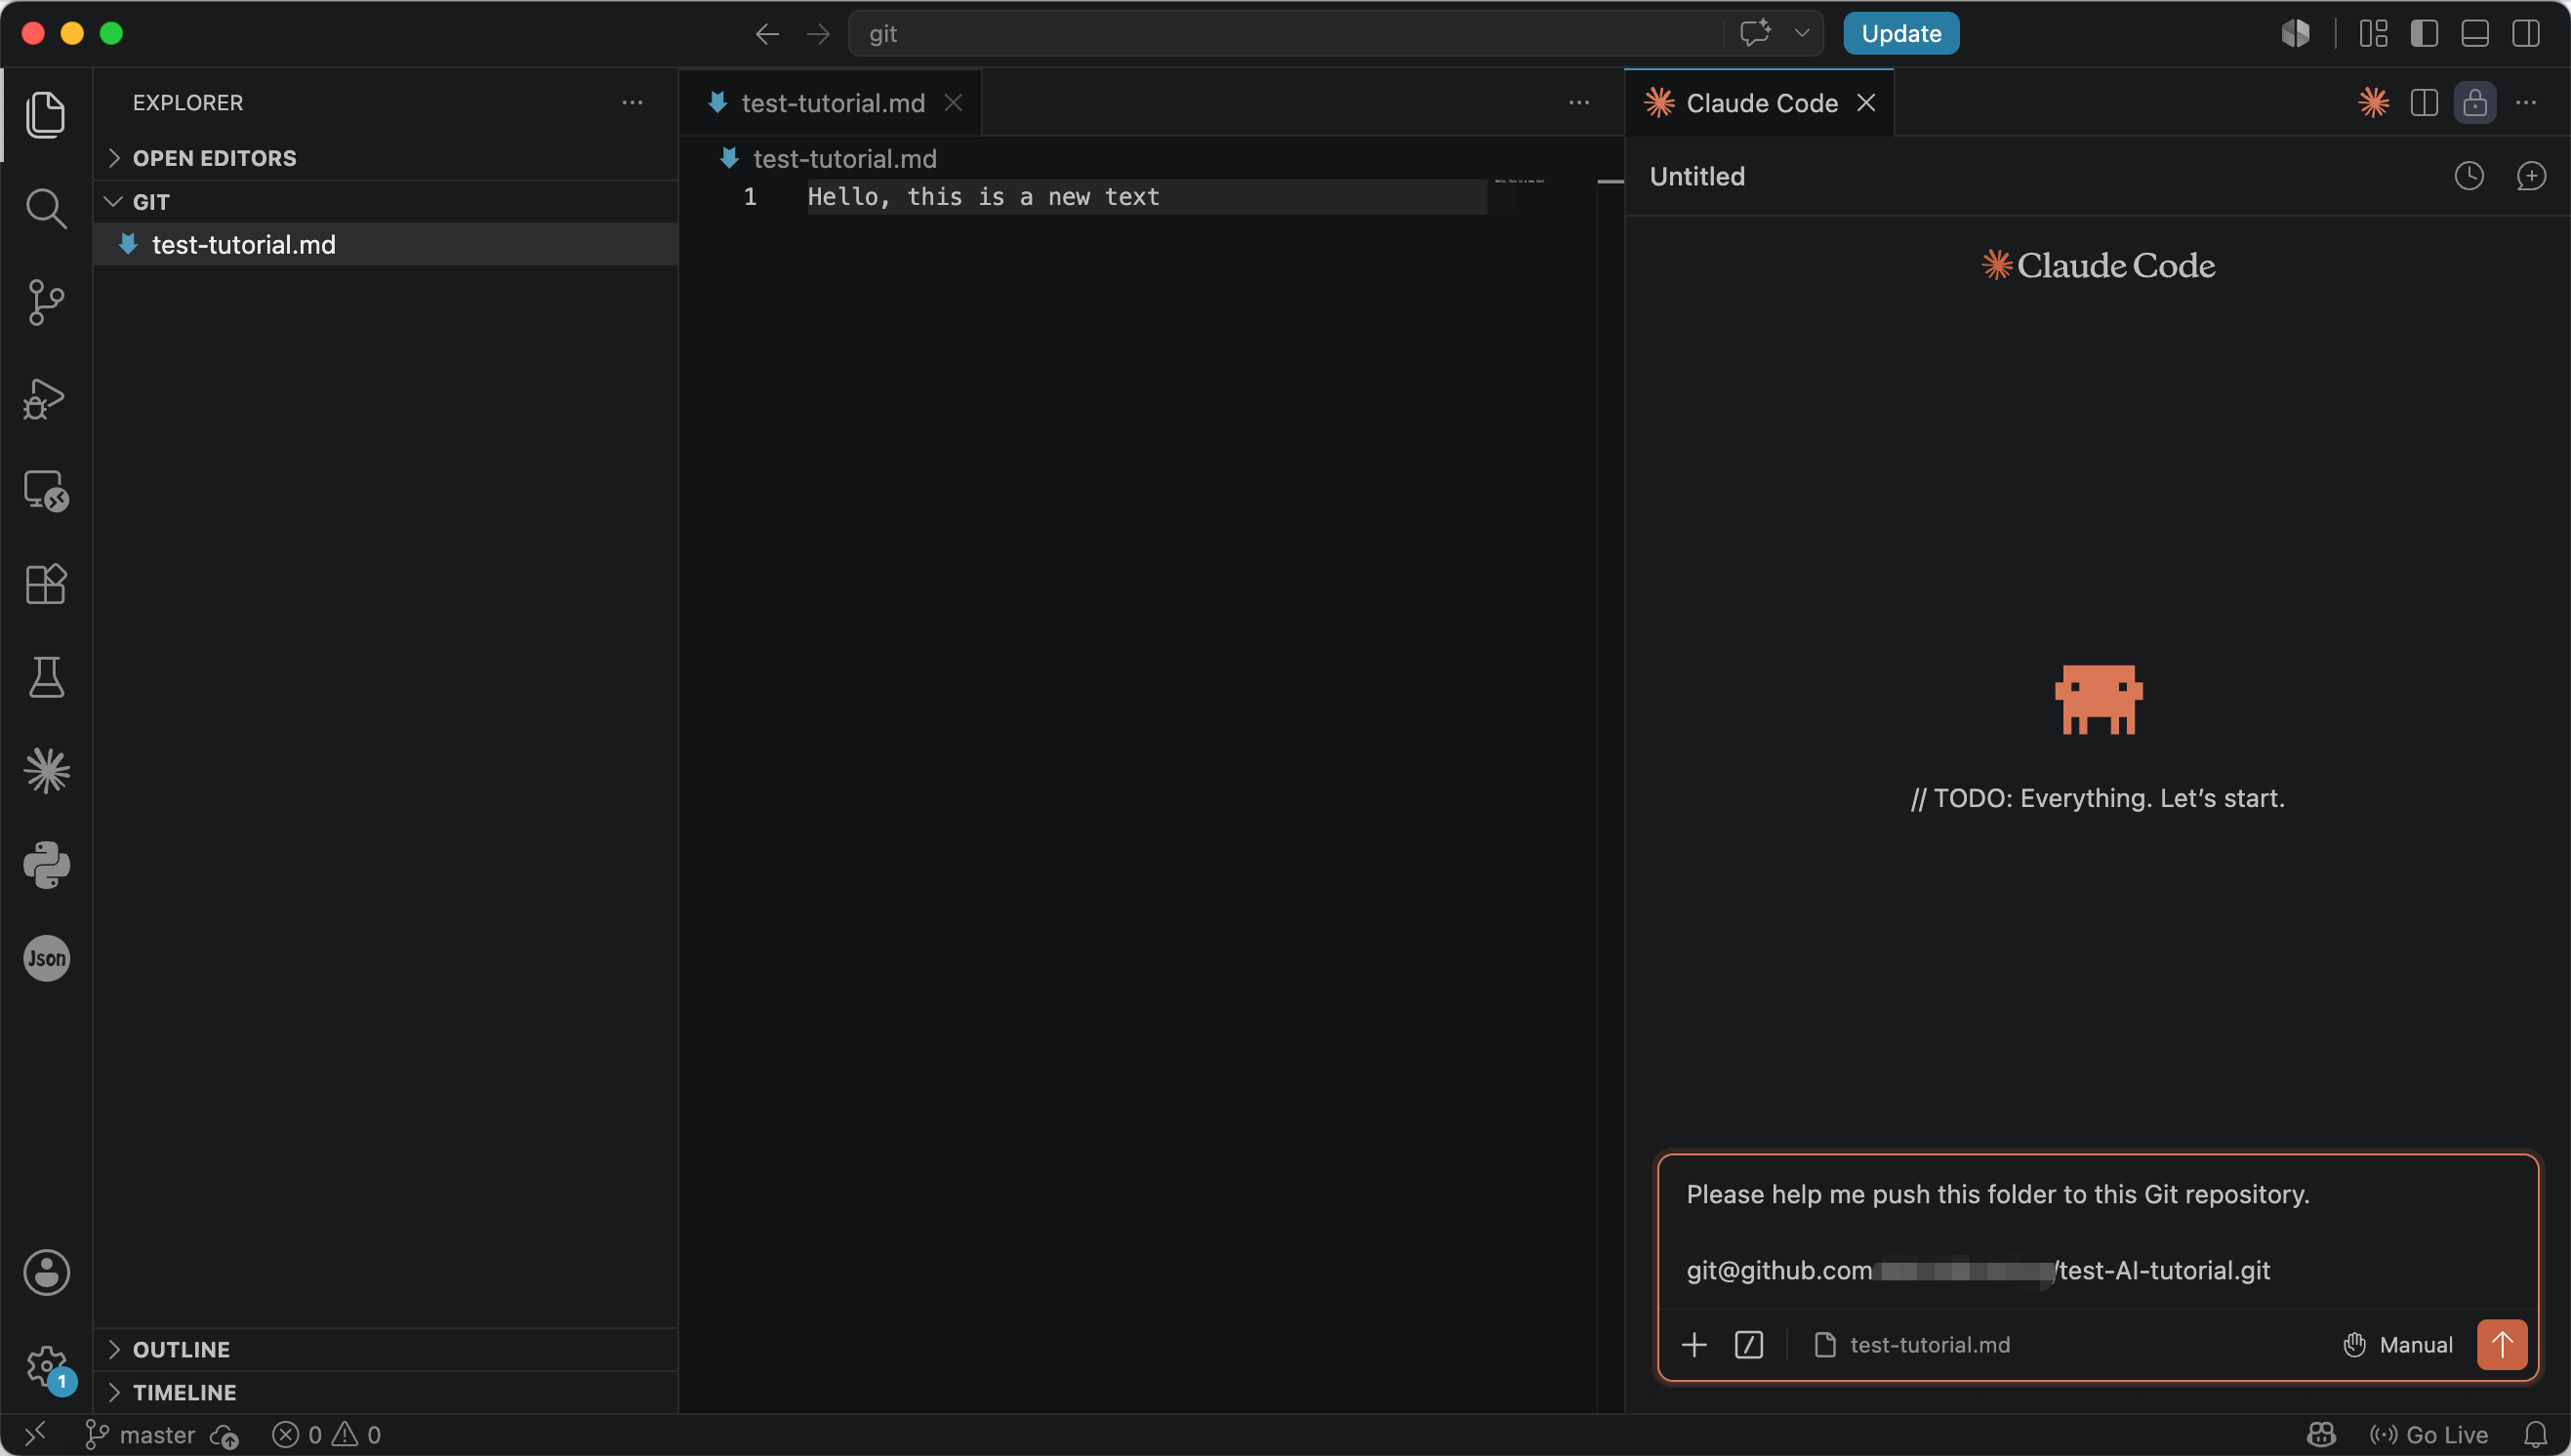
Open Agent and enter the following, then paste the copied SSH URL into the chat and wait for the task to finish:
Please help me push this folder to this Git repository.
Connect to an Existing Git Repository
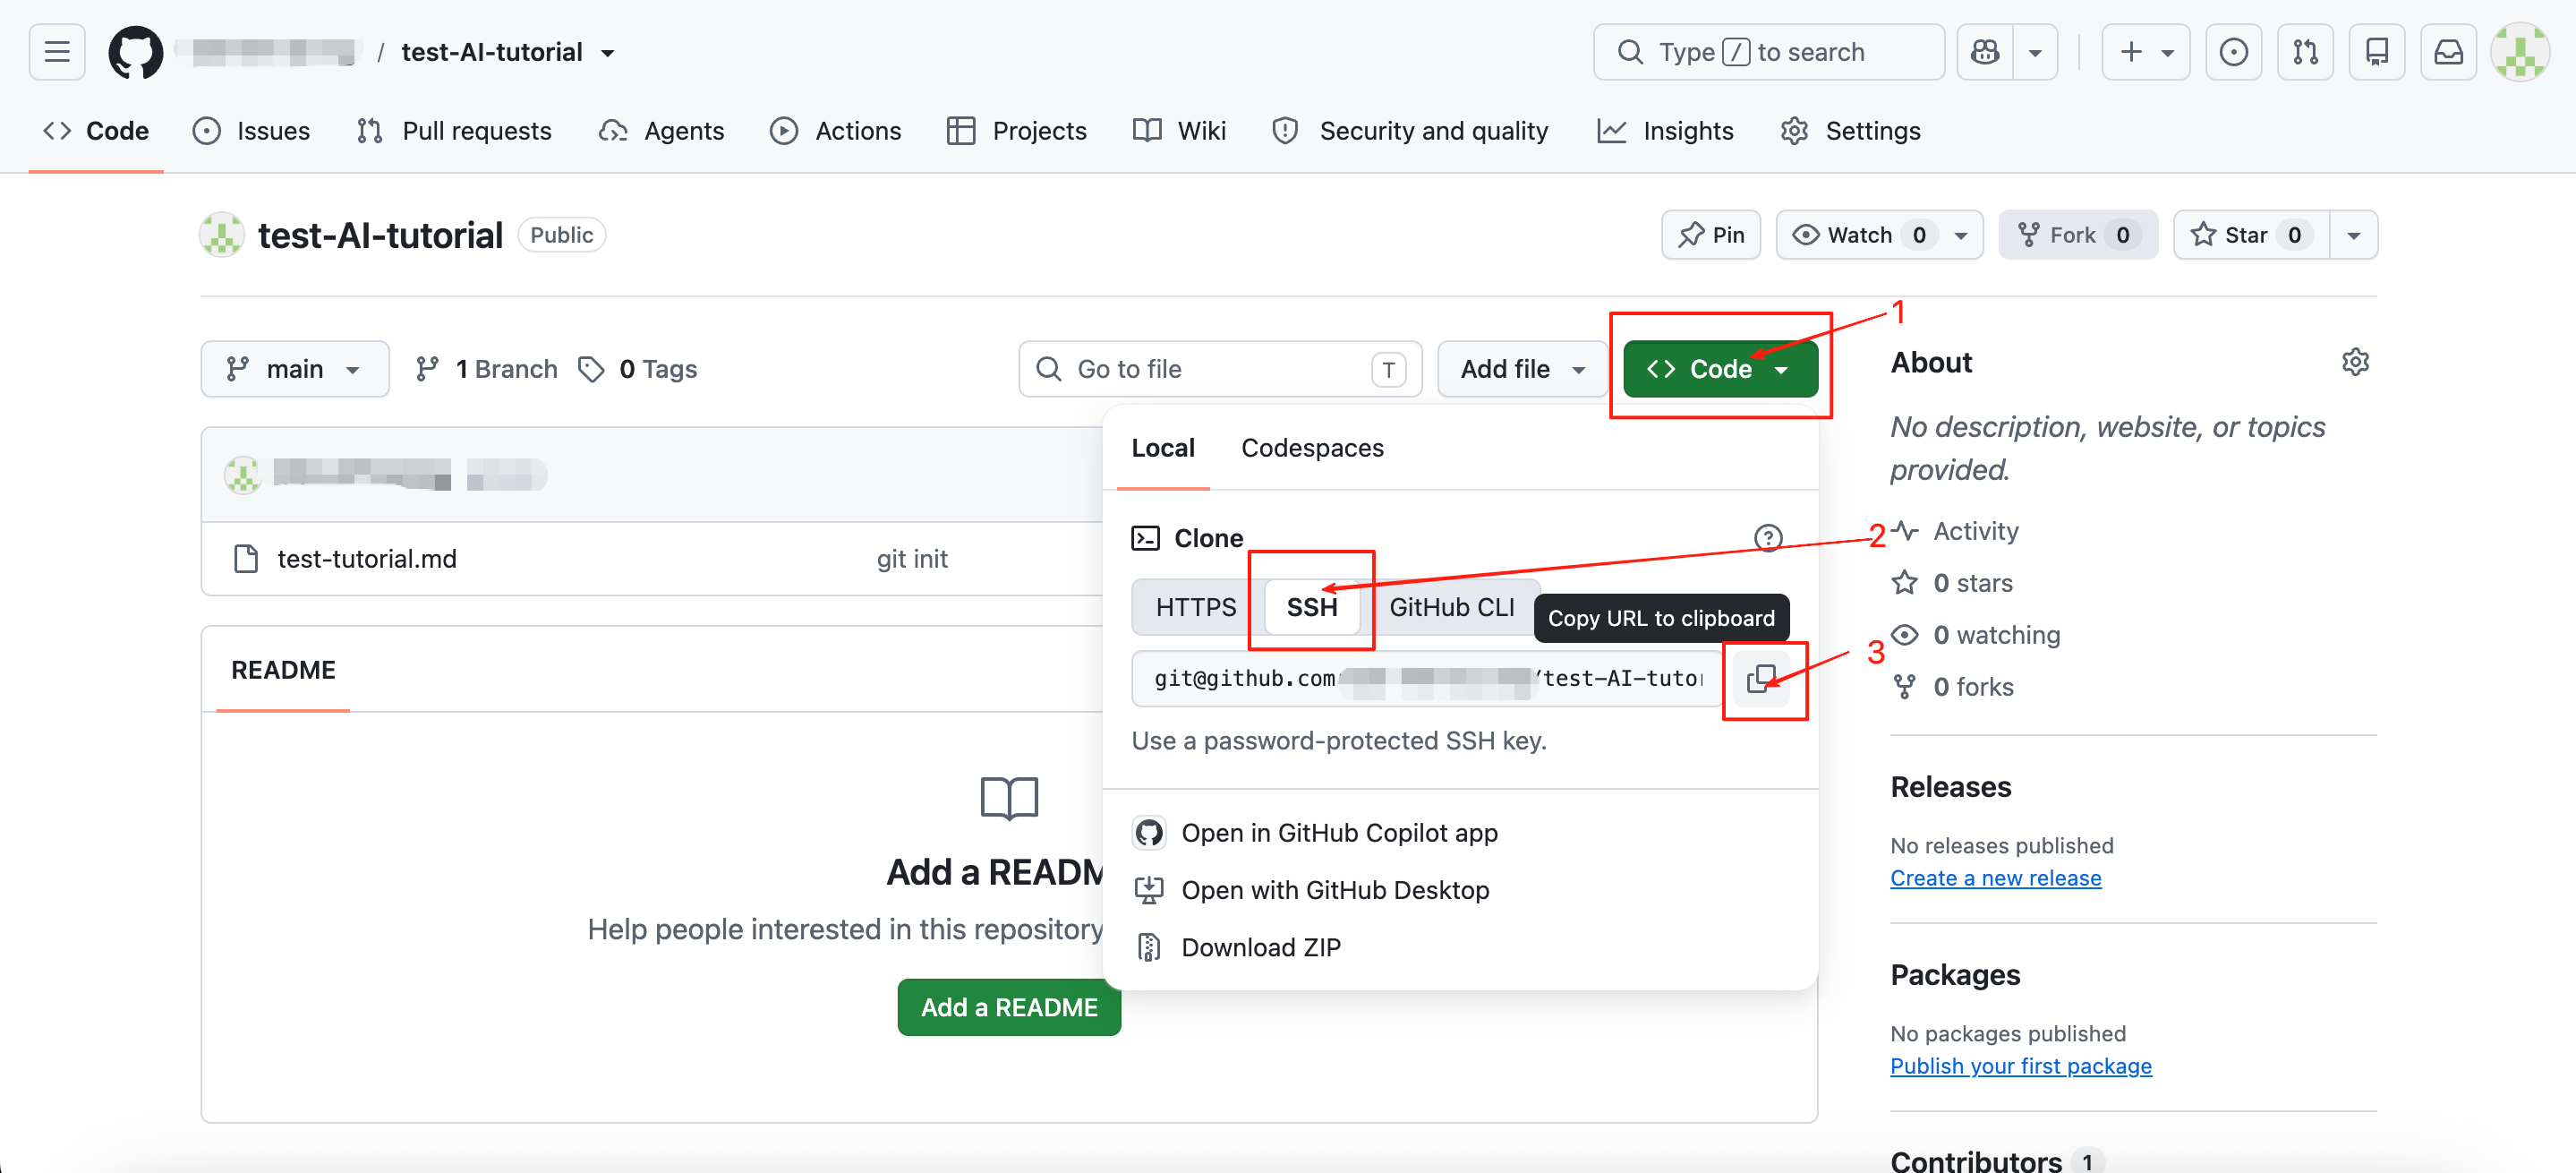
On the repository page, click SSH, and copy the repository URL.
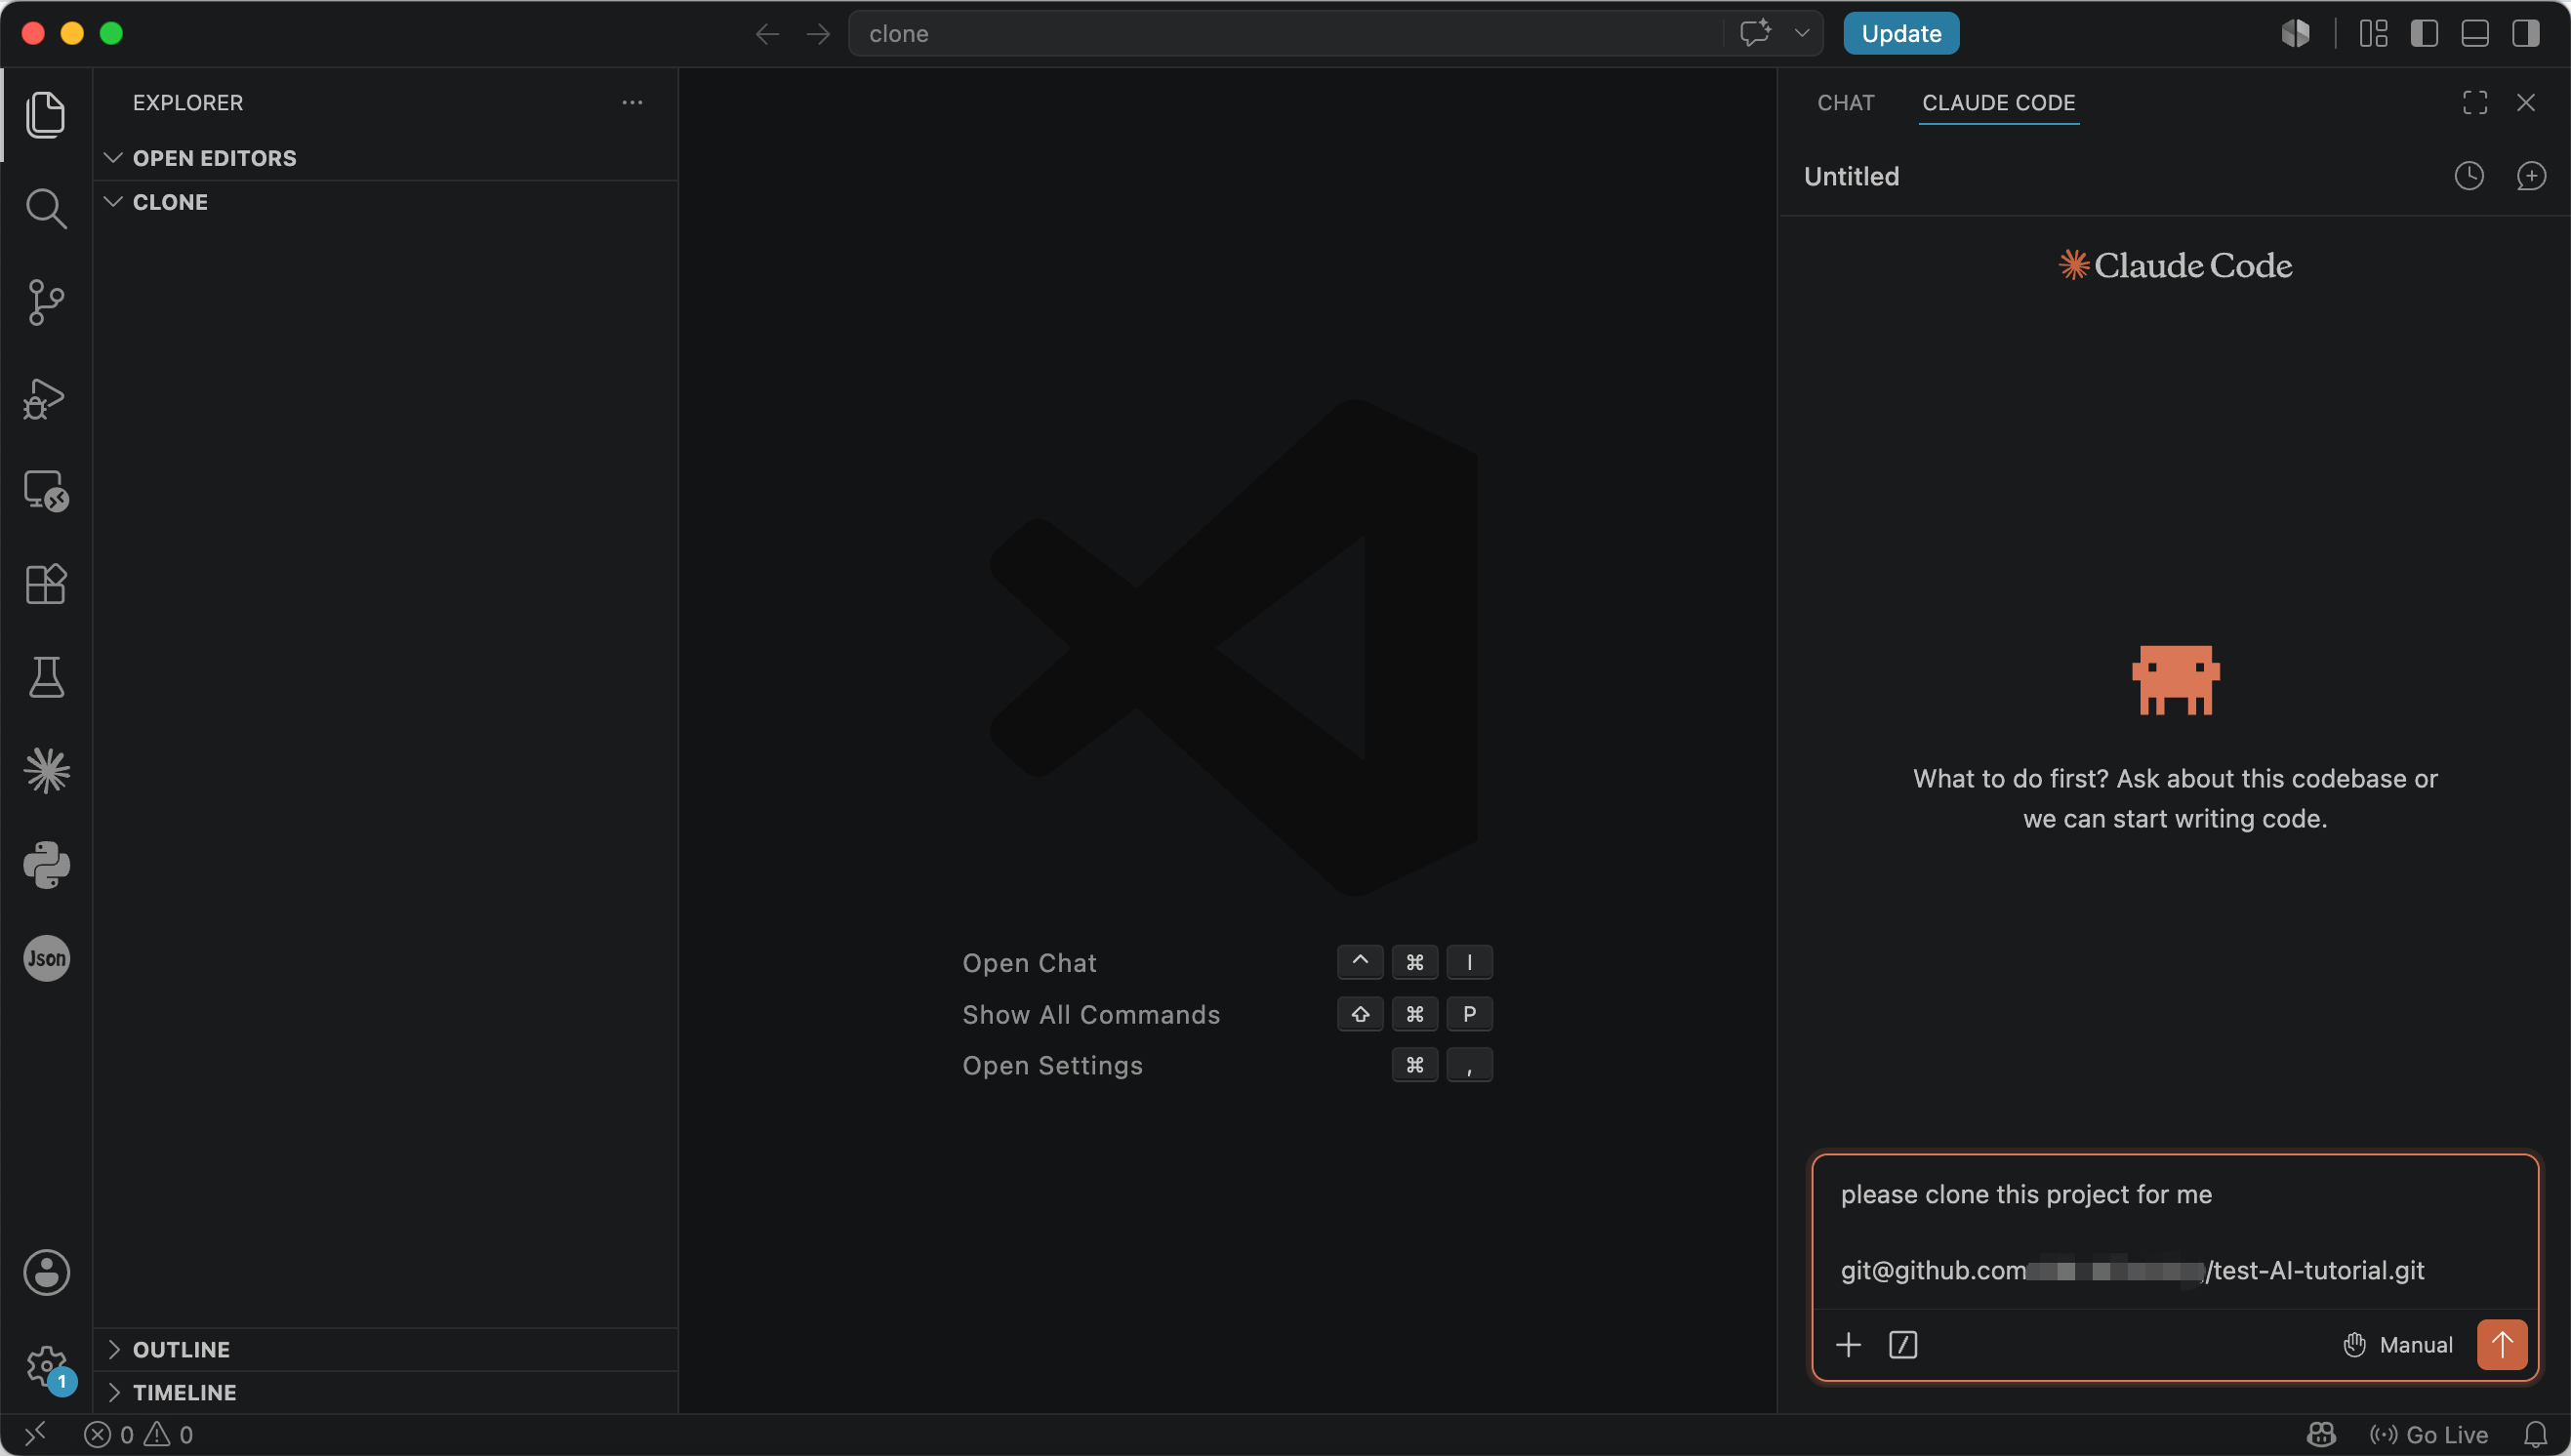
Choose a local working directory and open Agent. Enter the following, then paste the copied SSH URL into the chat:
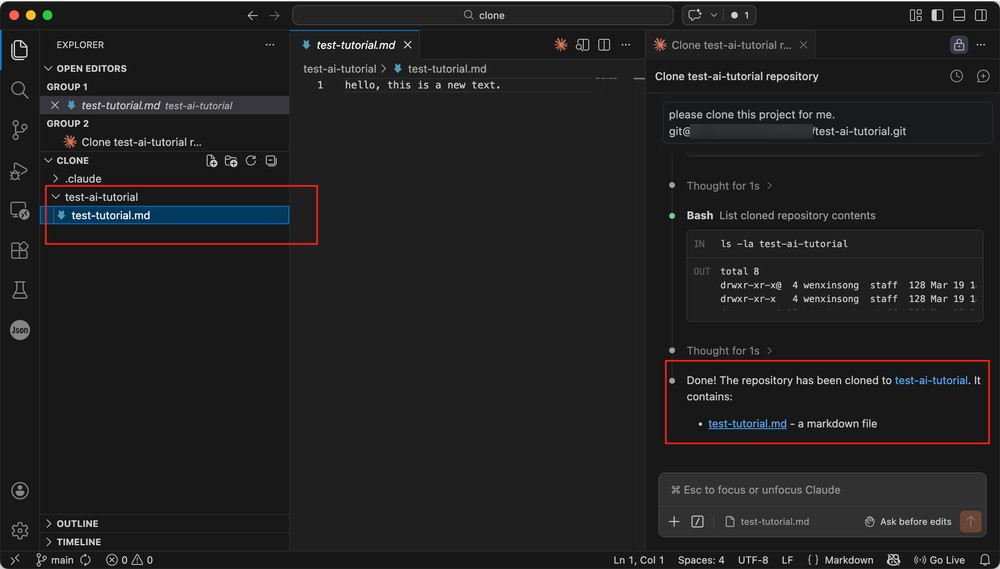
Please clone this project for me.
Once the task is complete, the repository will be cloned to your local machine.
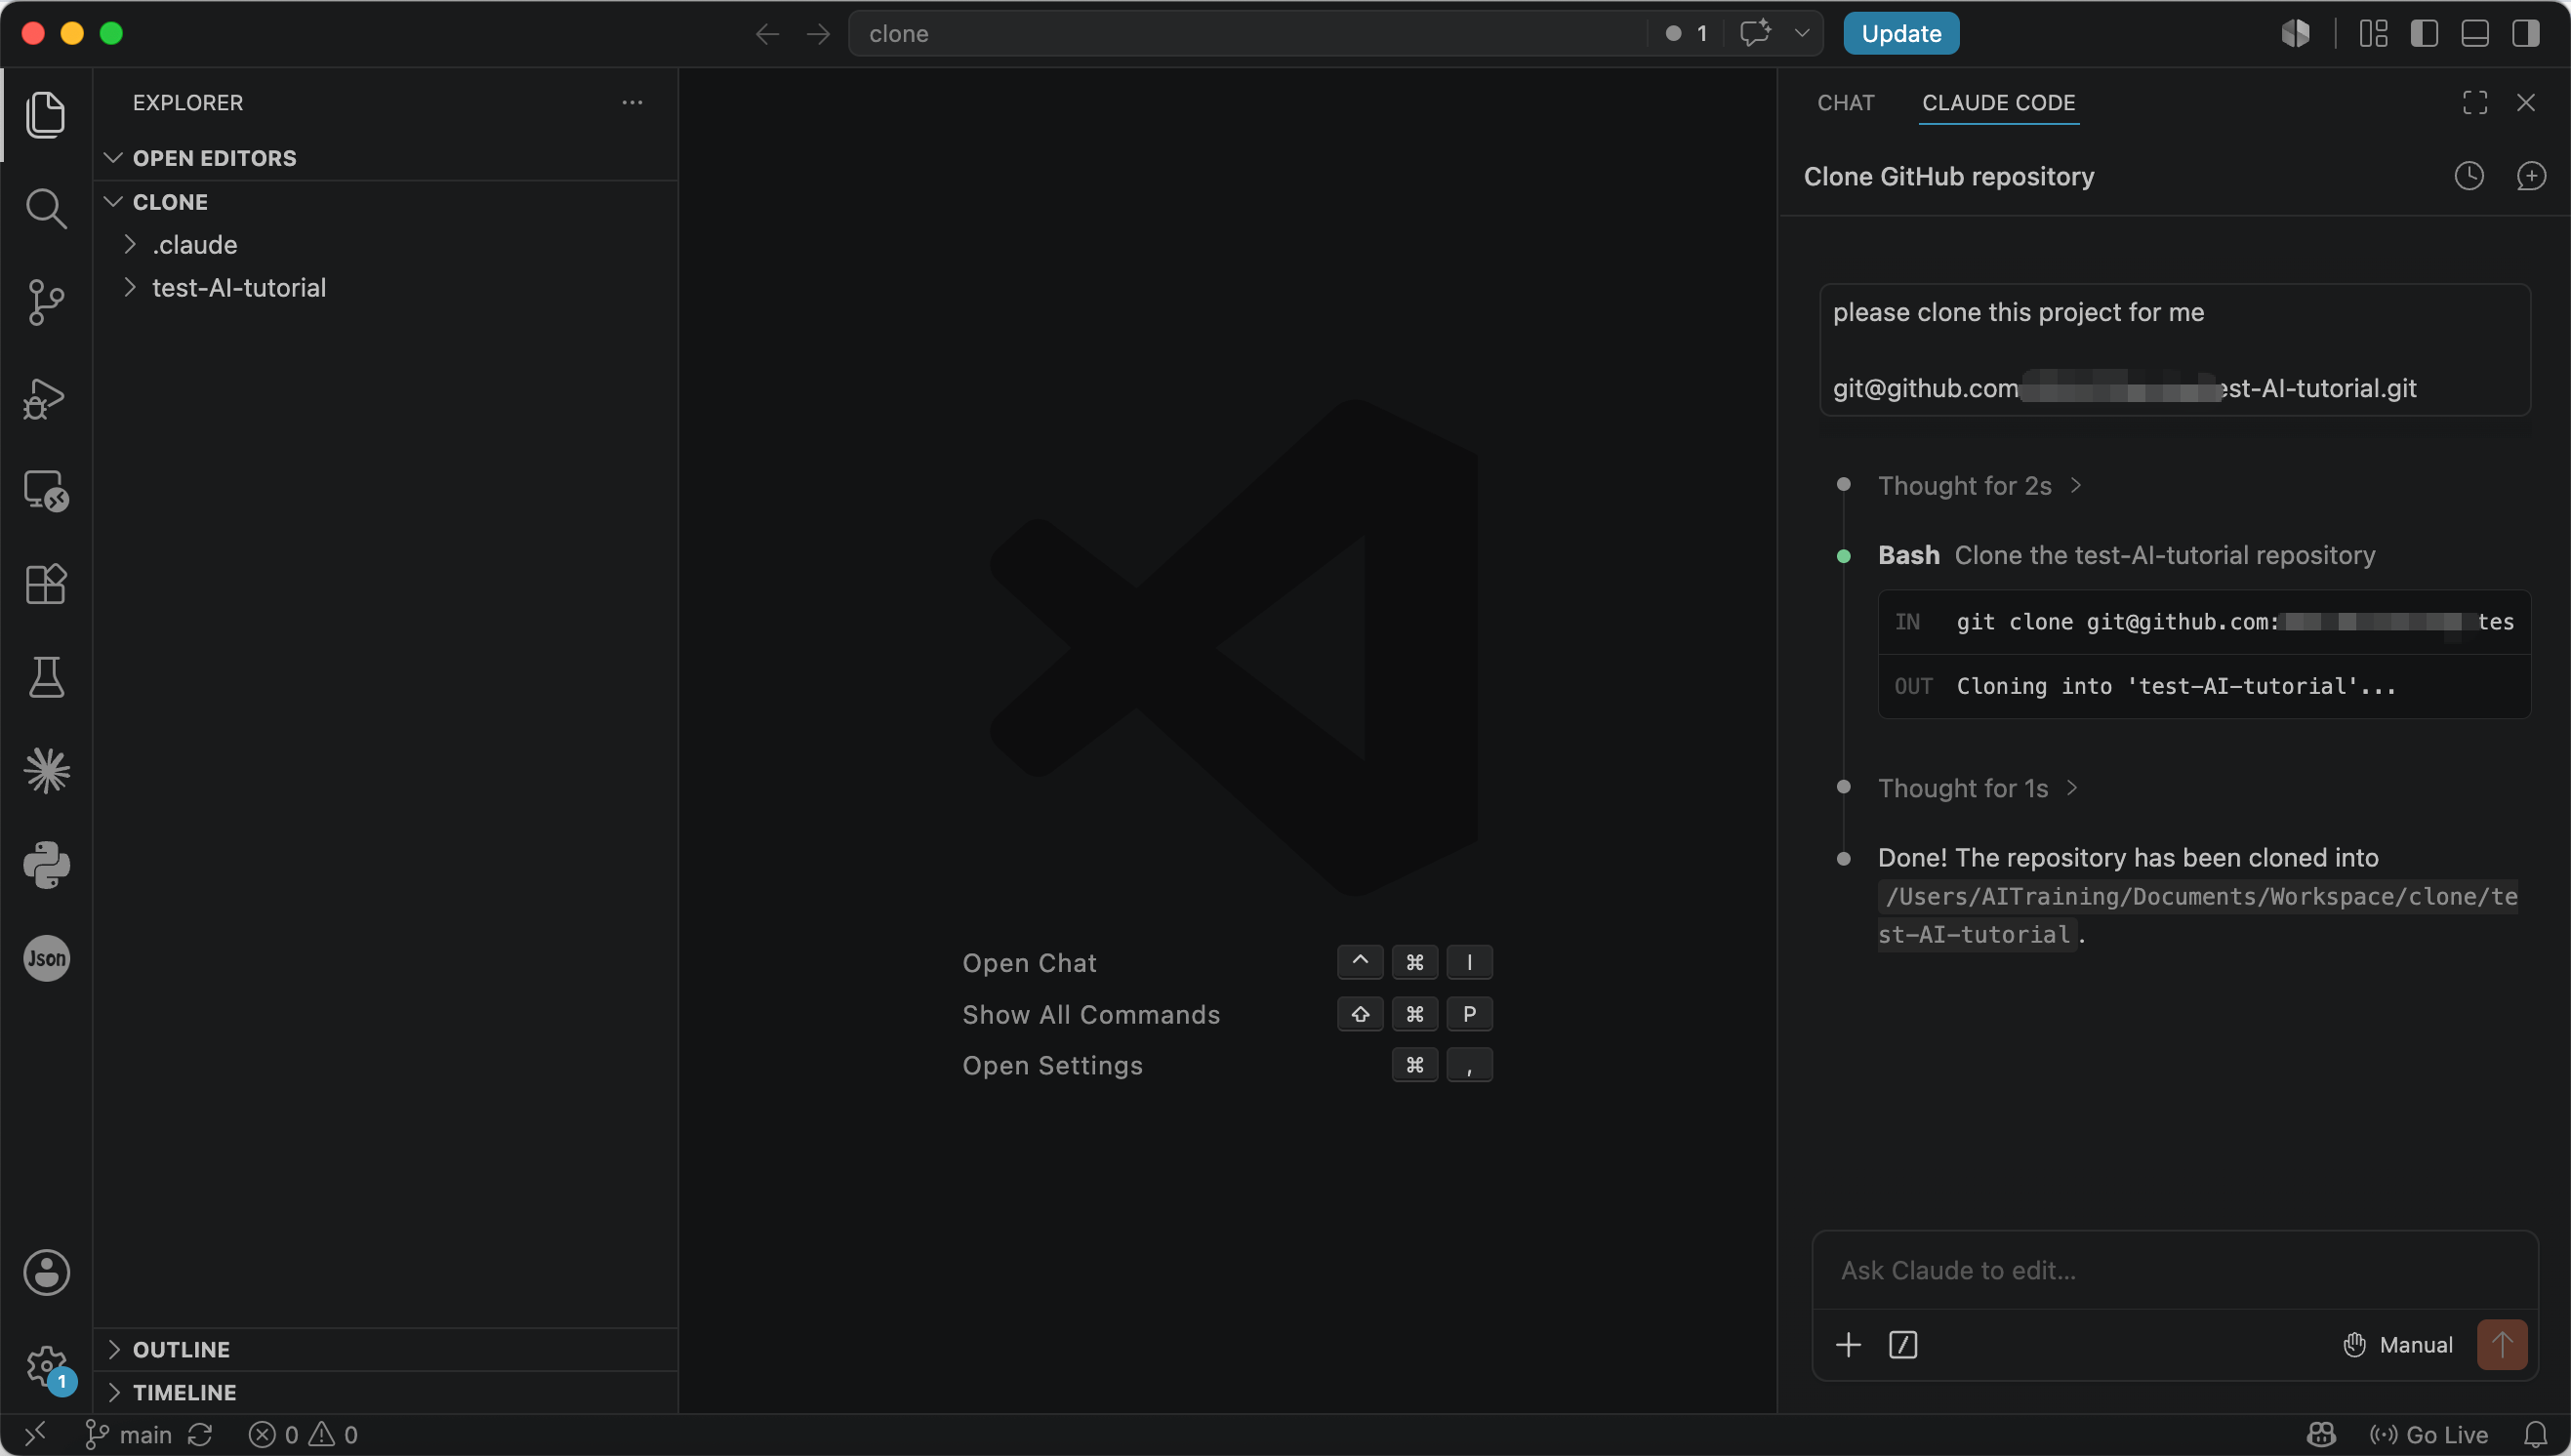
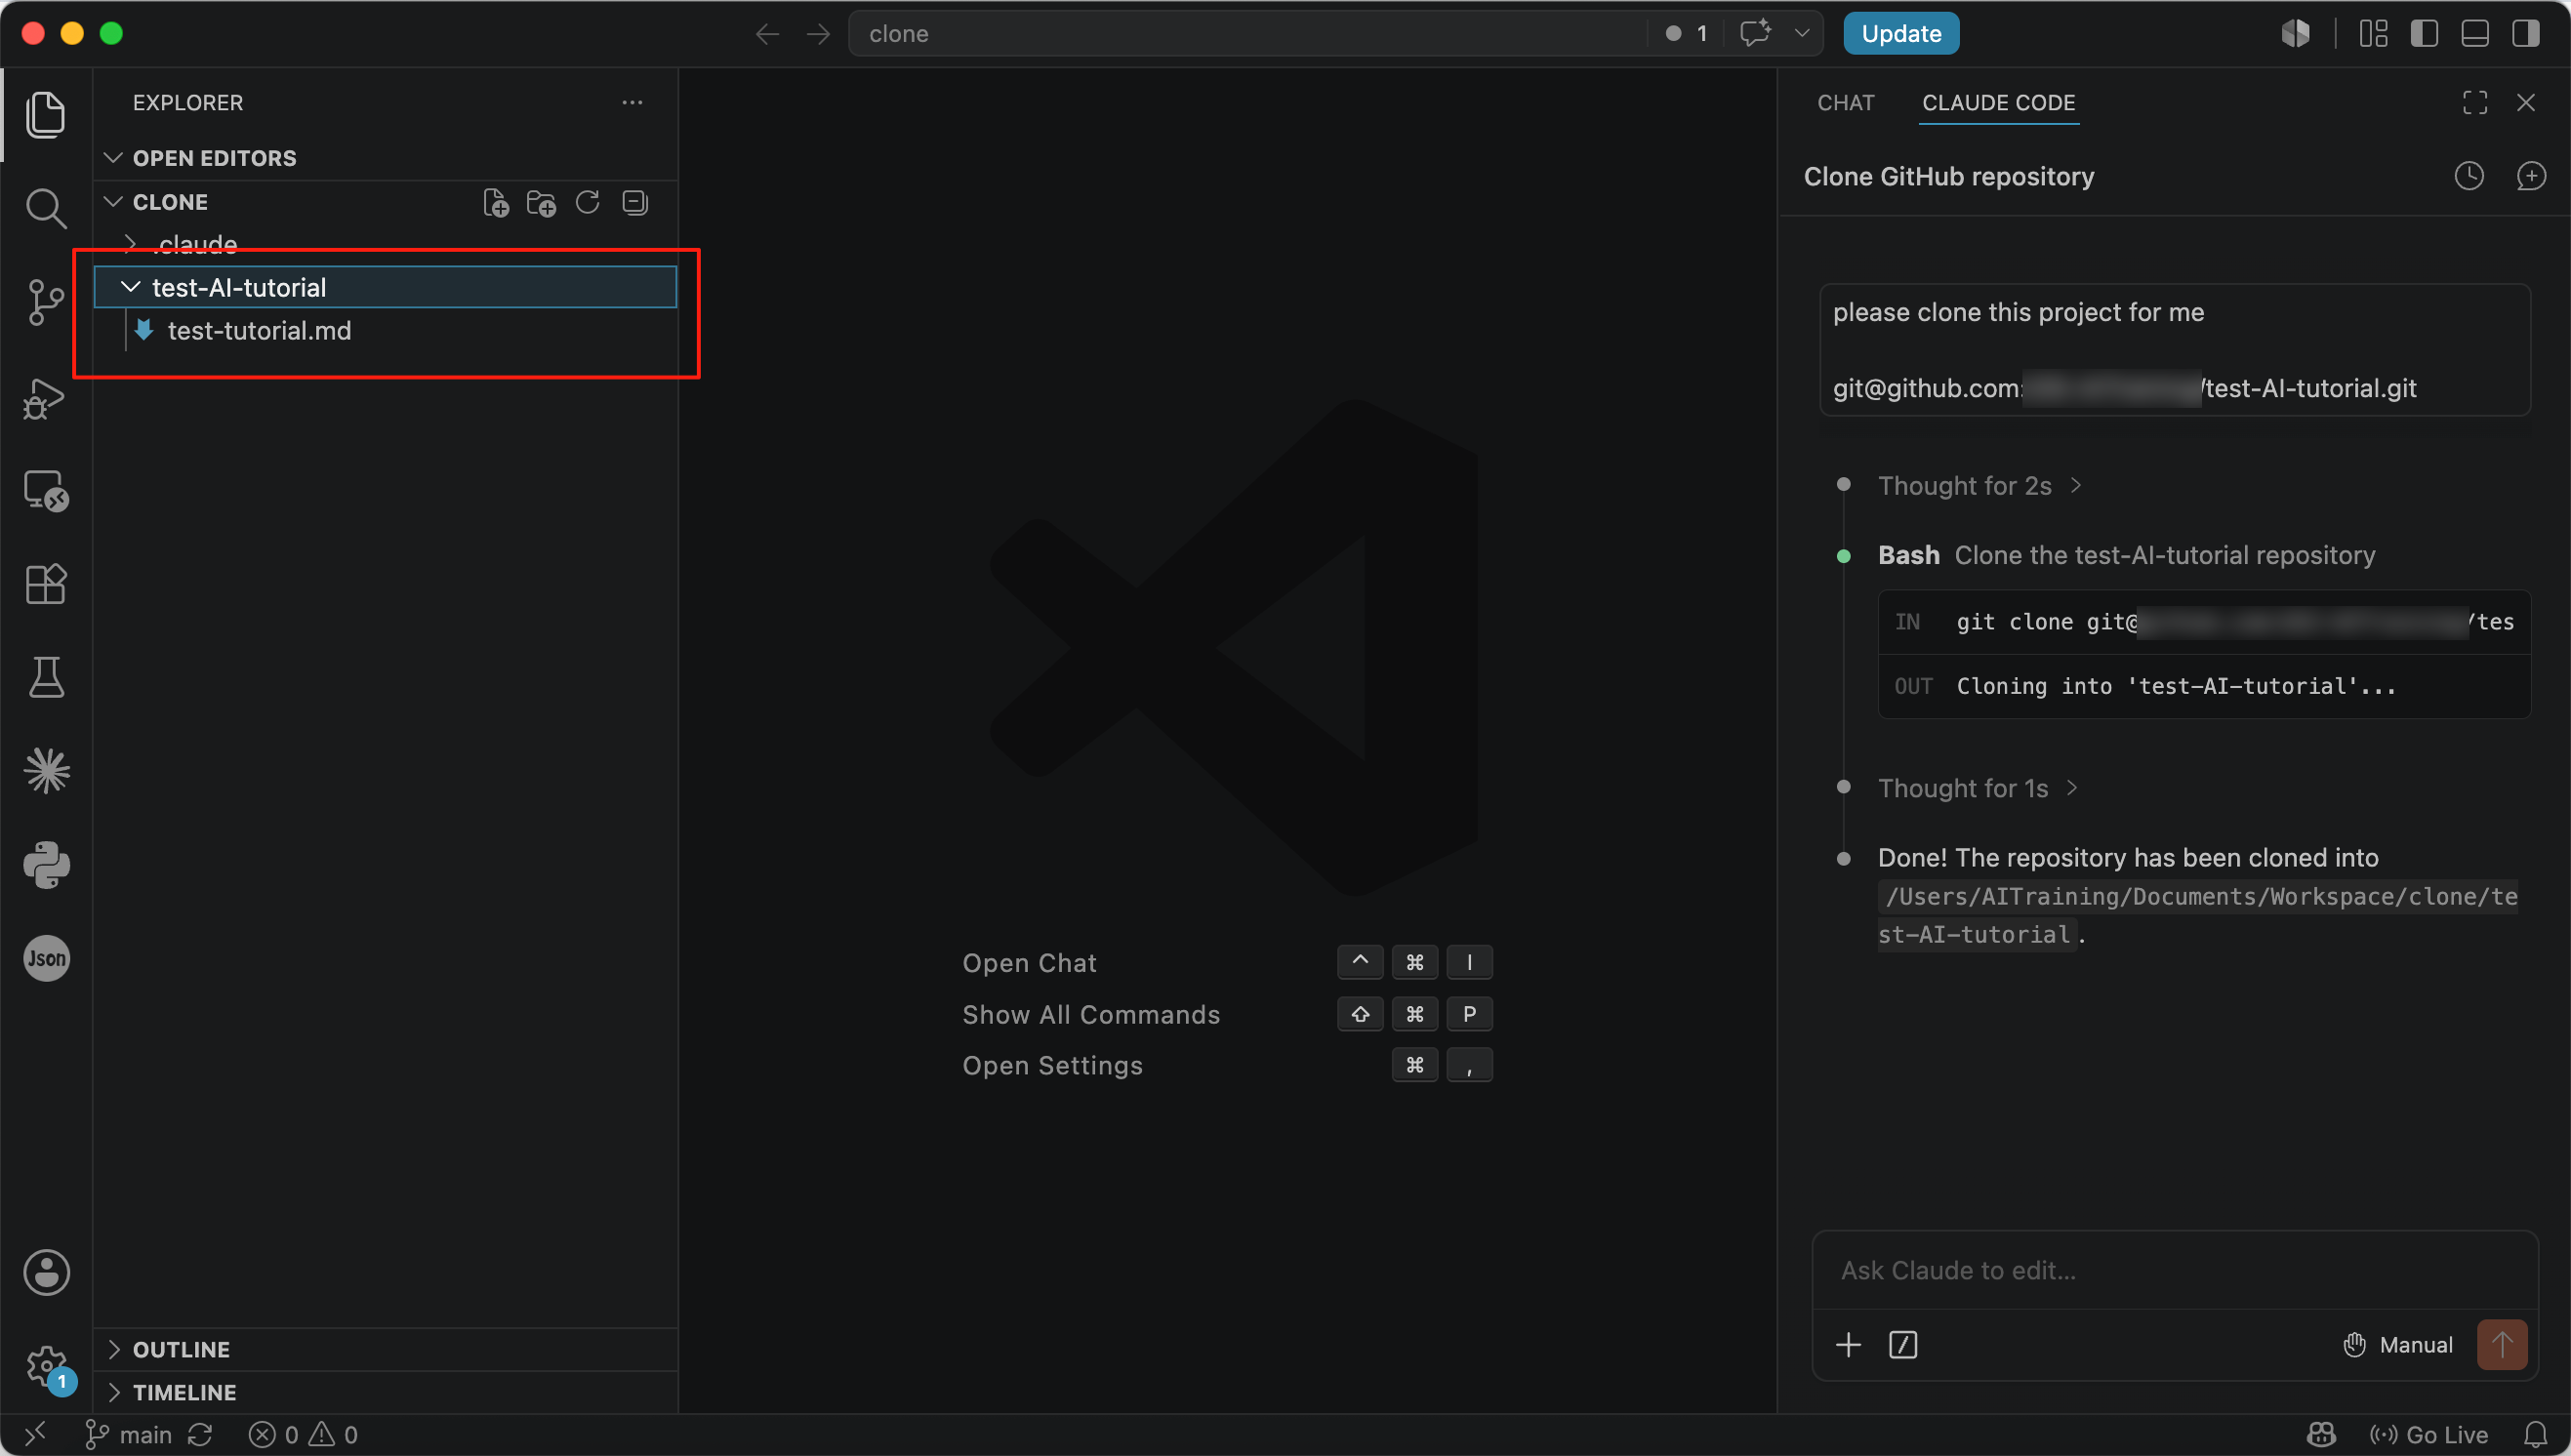
A cloned repository is typically ready to use without any additional configuration.
As long as your GitHub account has permission to access the repository, you can pull the latest changes from the remote repository and push your own commits whenever needed.
Push and Pull
After connecting your local repository to a remote repository, you’ll typically keep the two in sync as you continue working.
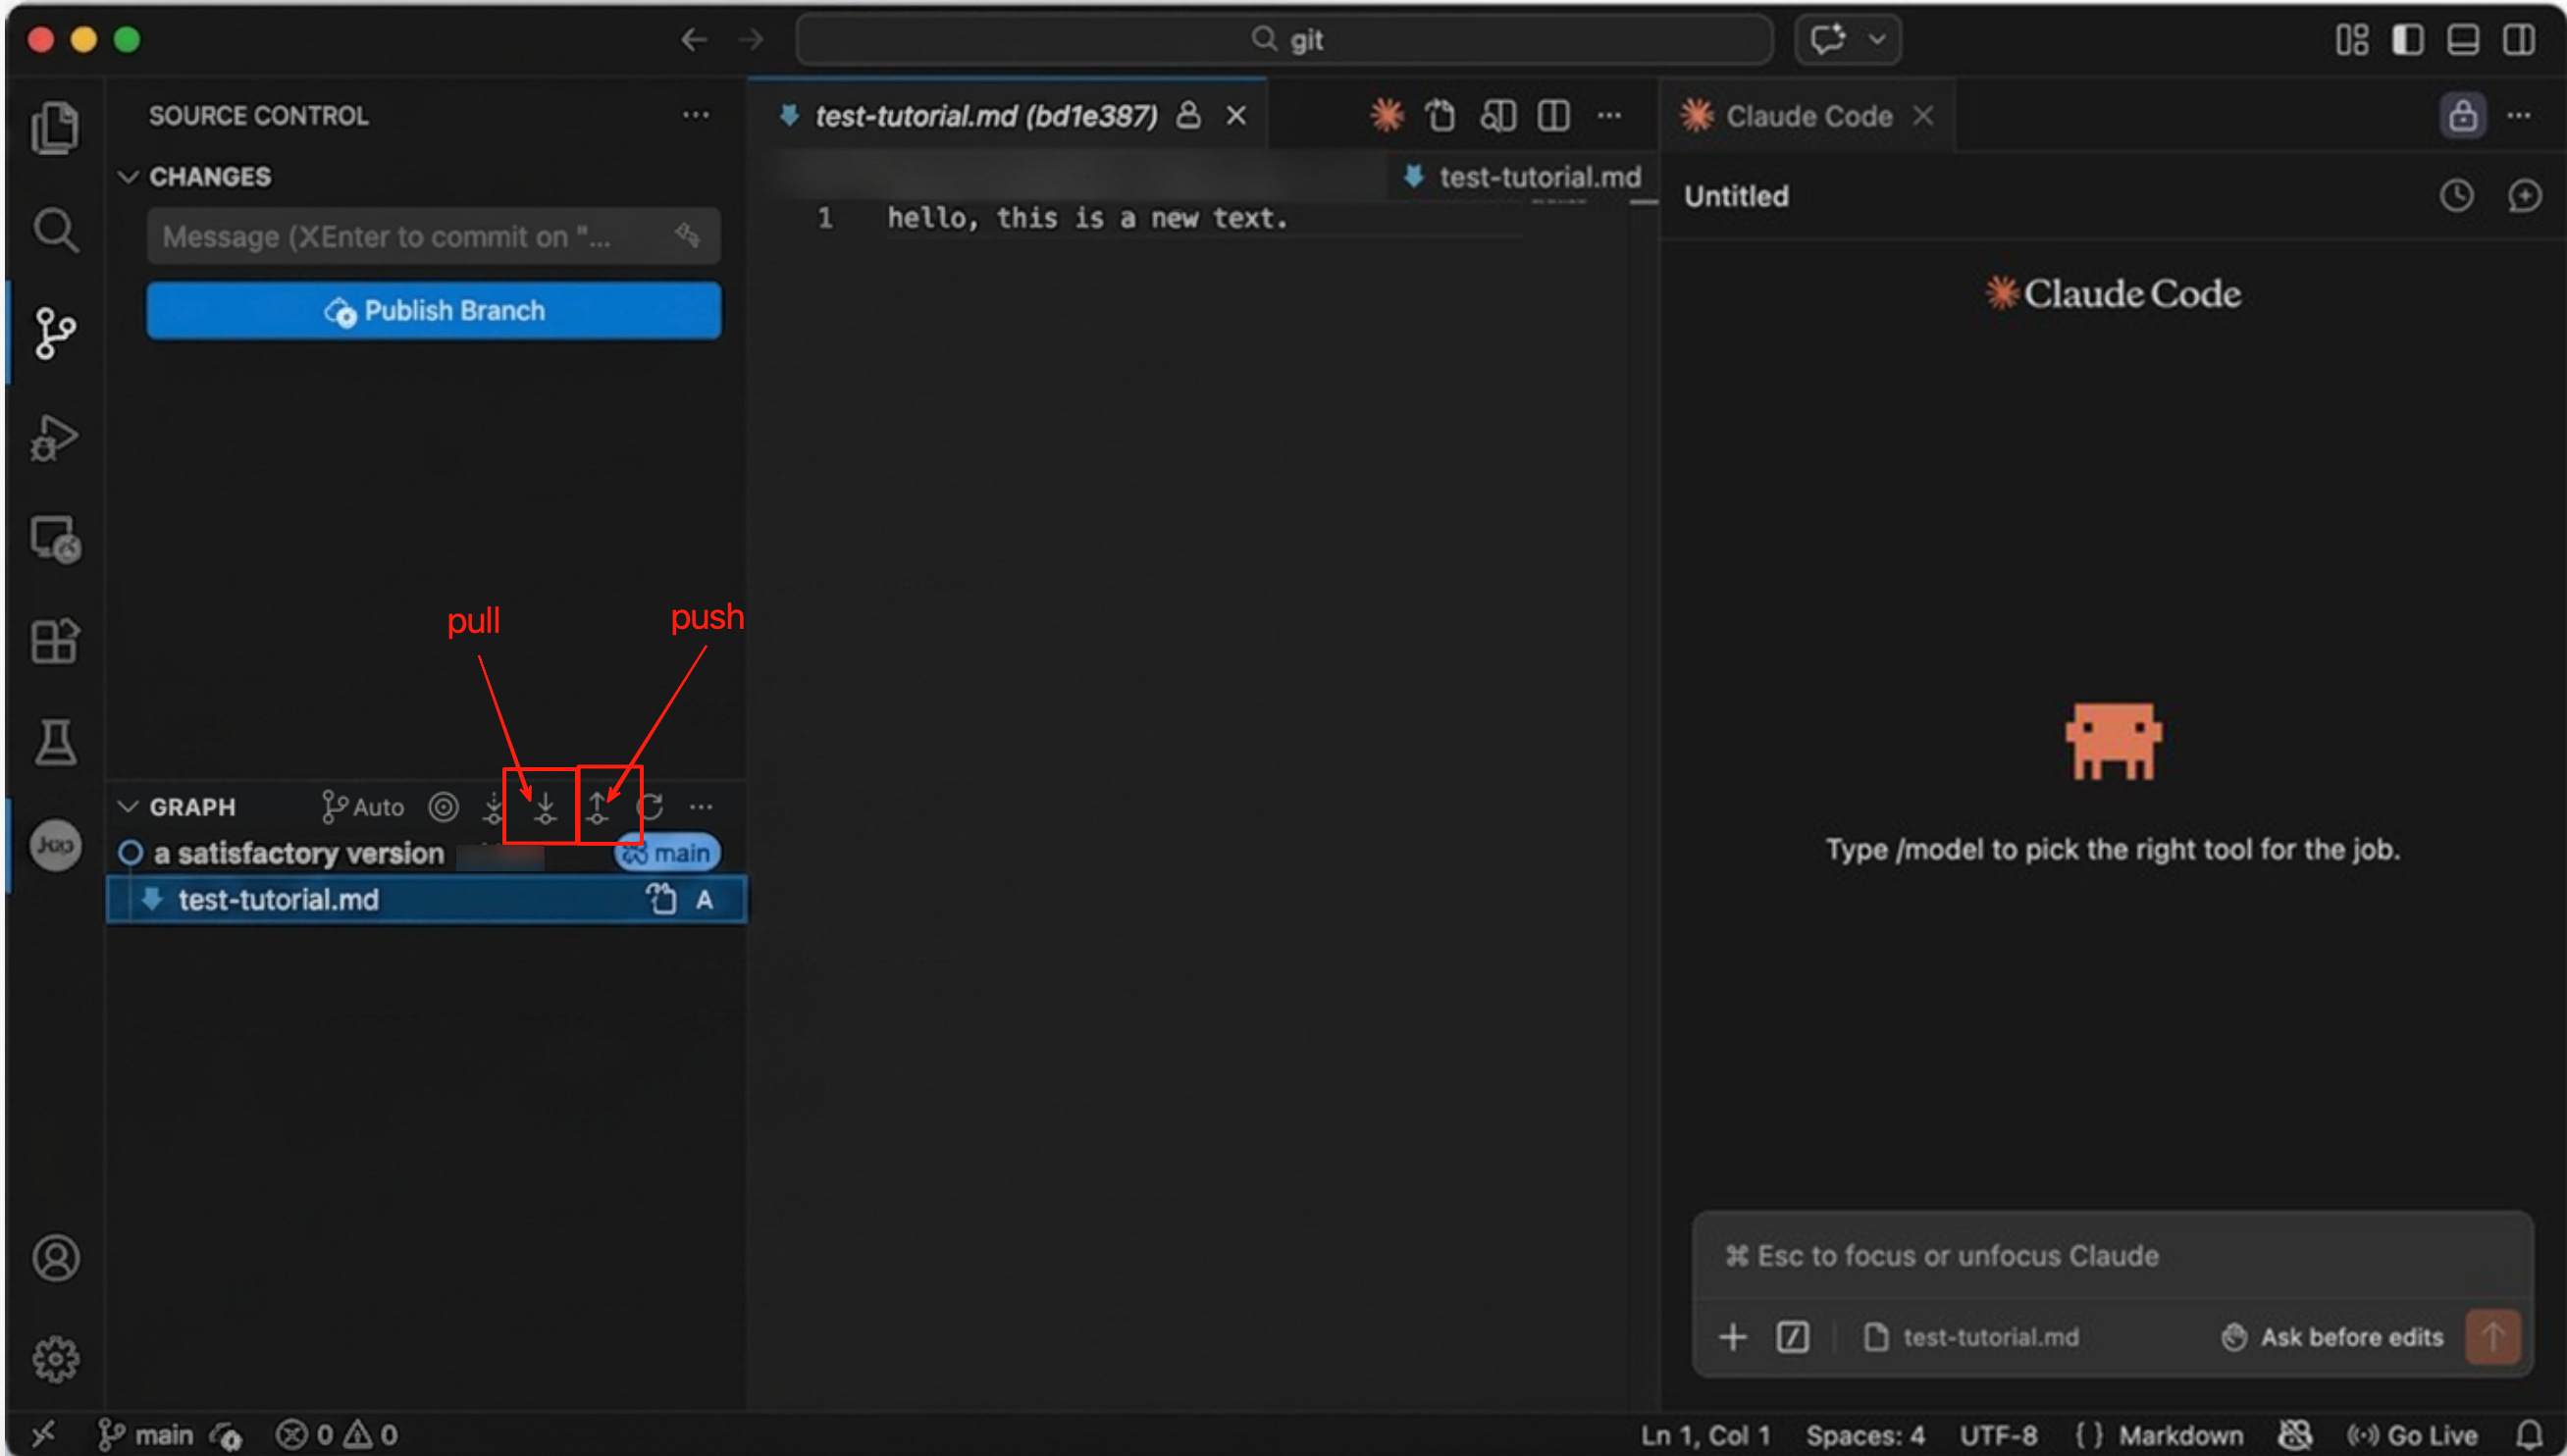
Click Push to upload your local commits to the remote repository. Click Pull to download the latest changes from the remote repository and update your local copy.
GitLab
This section introduces GitLab. Unlike GitHub, GitLab provides an open-source Community Edition that can be deployed on your own servers at no cost.
GitLab offers a comprehensive feature set, making it a popular choice for internal development environments in many organisations. If you need to self-host your development platform or retain full control over your data, GitLab is generally a better choice than GitHub.
Create a GitLab Account
Most organisations that use GitLab host their own GitLab server. In these cases, the system administrator usually provides you with an account, so you simply sign in using the company’s GitLab website.
GitLab also offers an official cloud service similar to GitHub. However, some advanced features require a paid subscription, so it is generally less popular than GitHub for public repositories. If you only want to learn GitLab or follow this tutorial, you can use the official GitLab cloud service.
Open the following website and sign in: https://gitlab.com/users/sign_in/
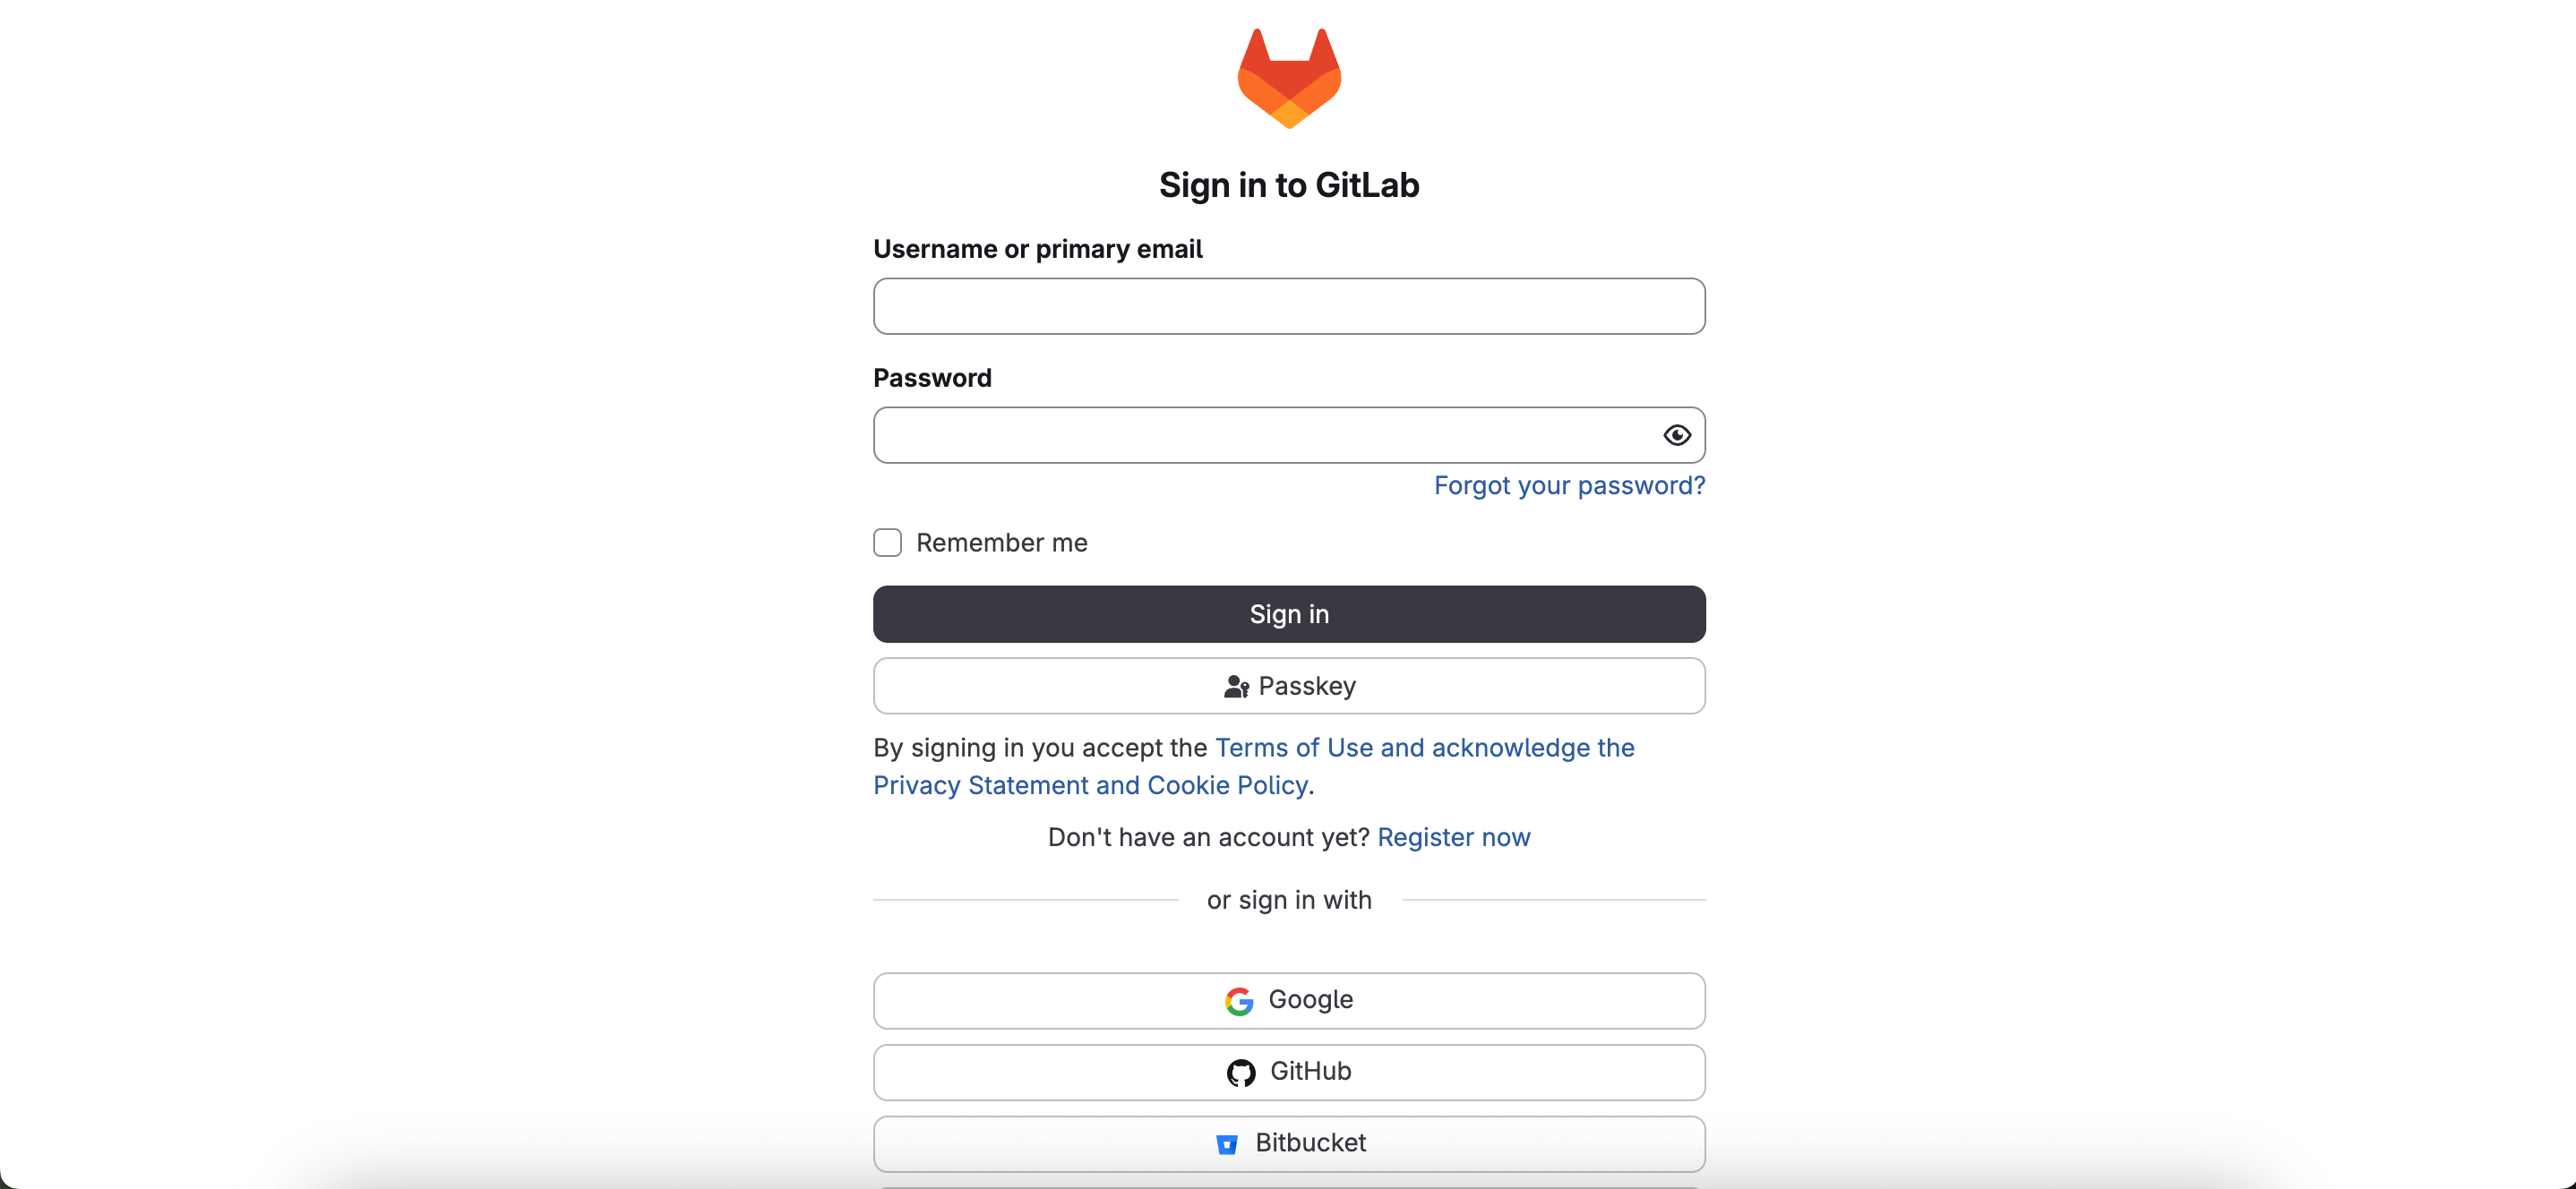
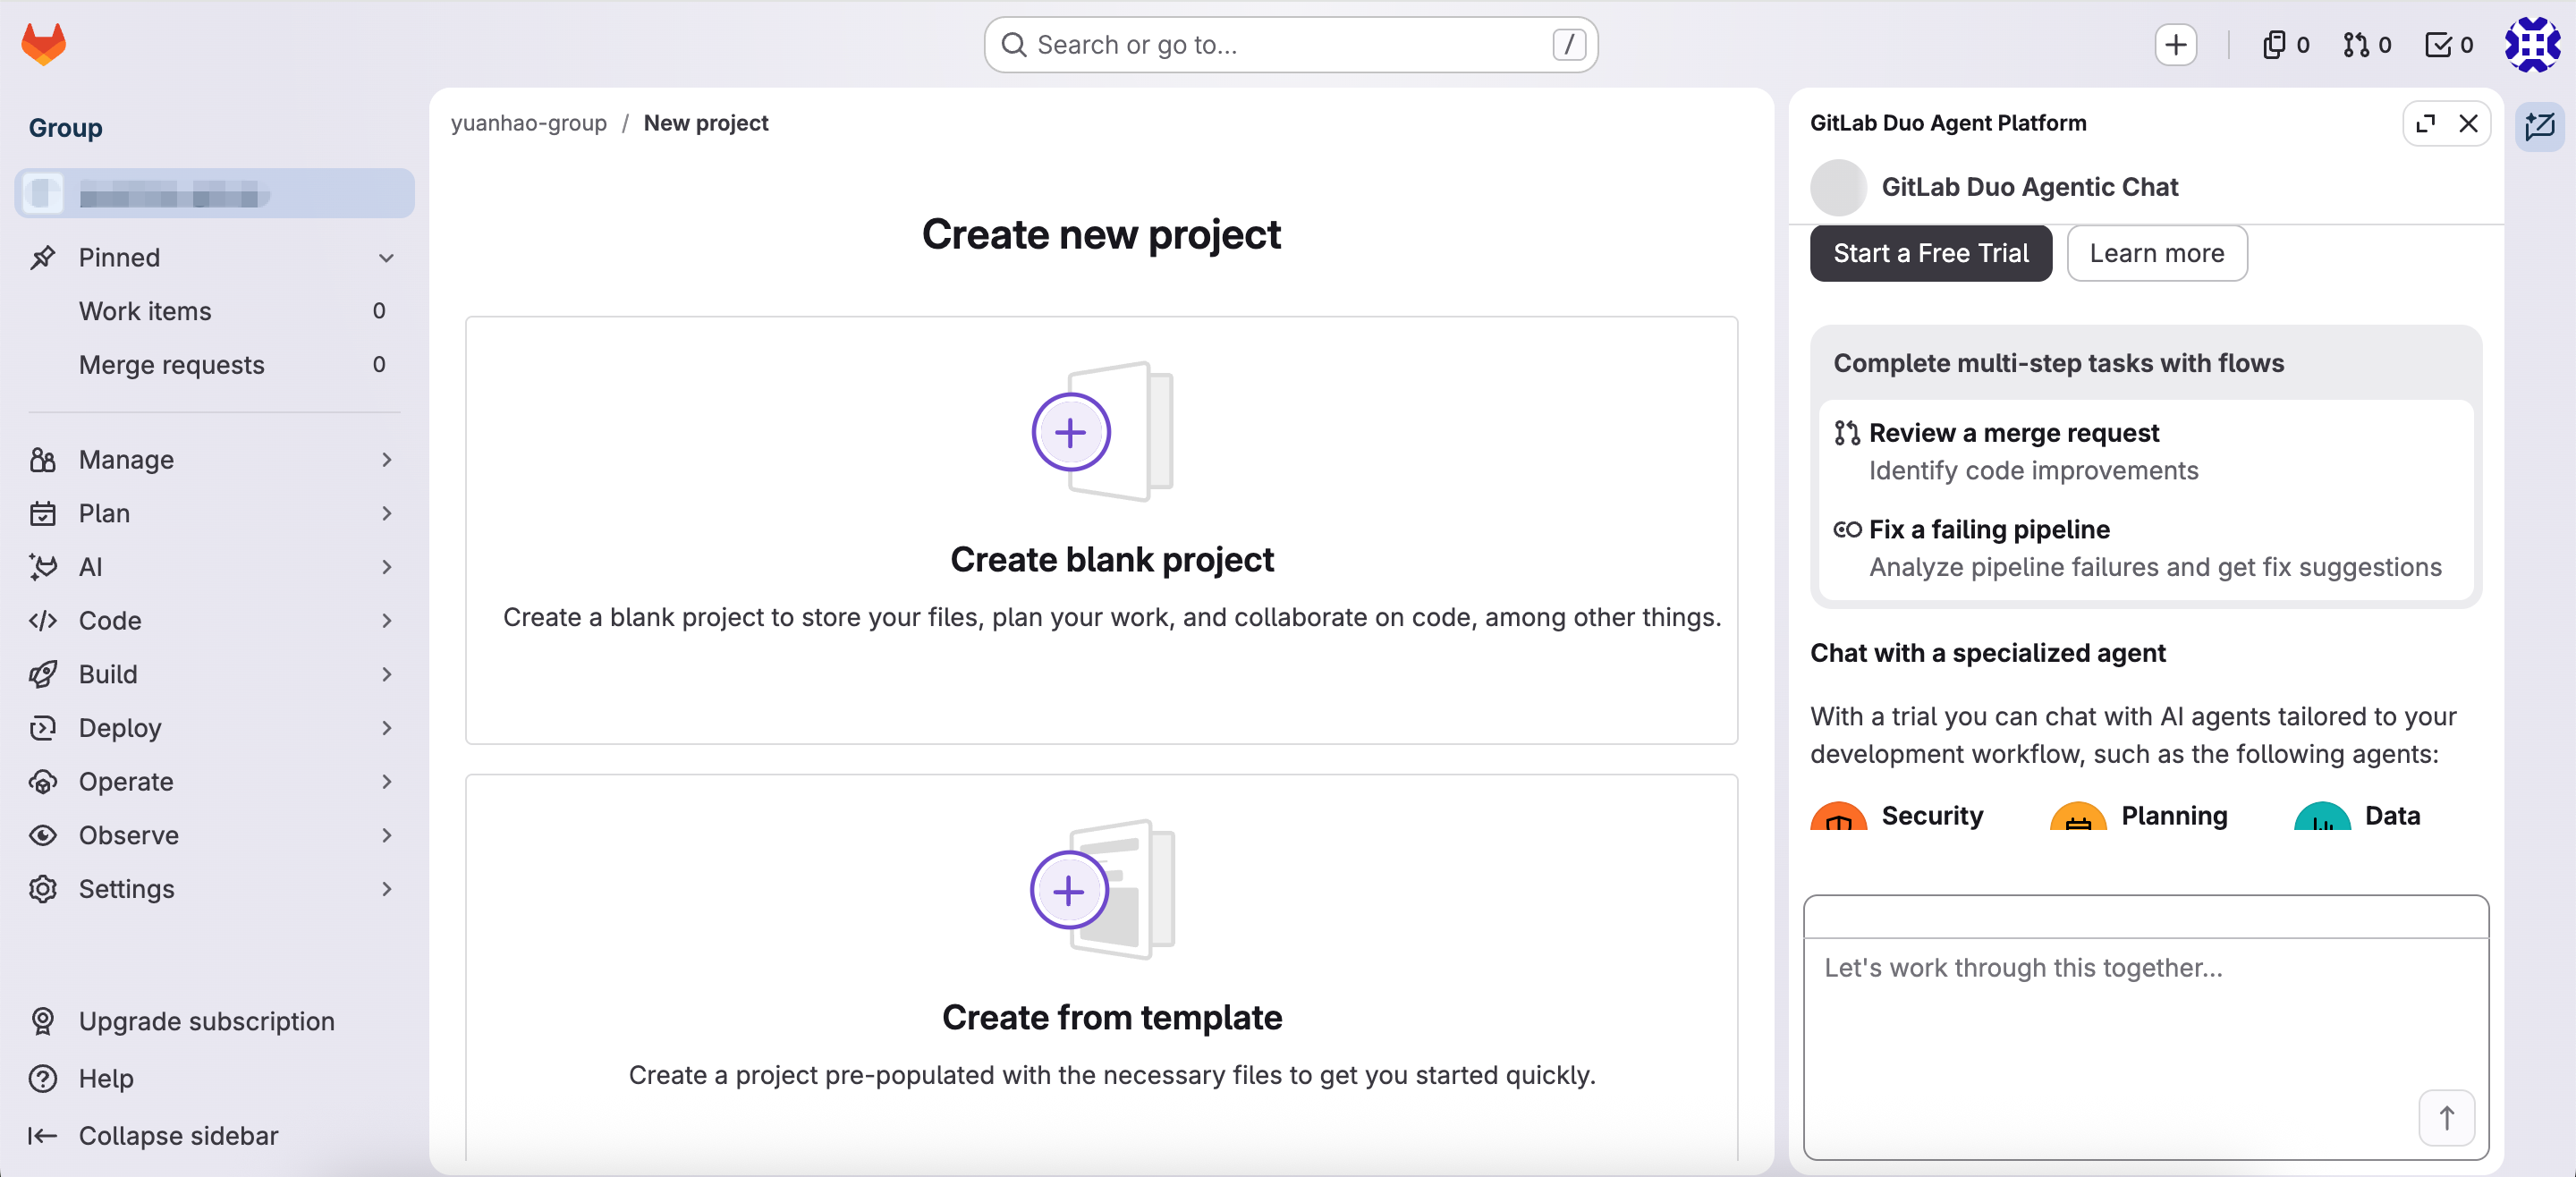
After signing in, you’ll see the GitLab home page. Since GitLab is open source, the interface may look different depending on the version or deployment. However, the workflow remains largely the same, with only minor differences in the locations of some buttons.
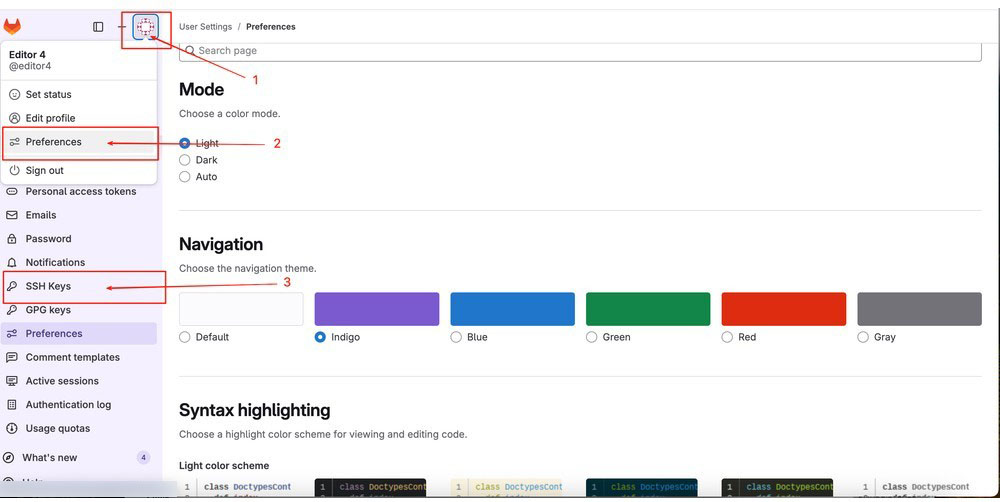
Add Your SSH Public Key to GitLab
Click avatar → Preferences → SSH Keys to enter the key configuration page.
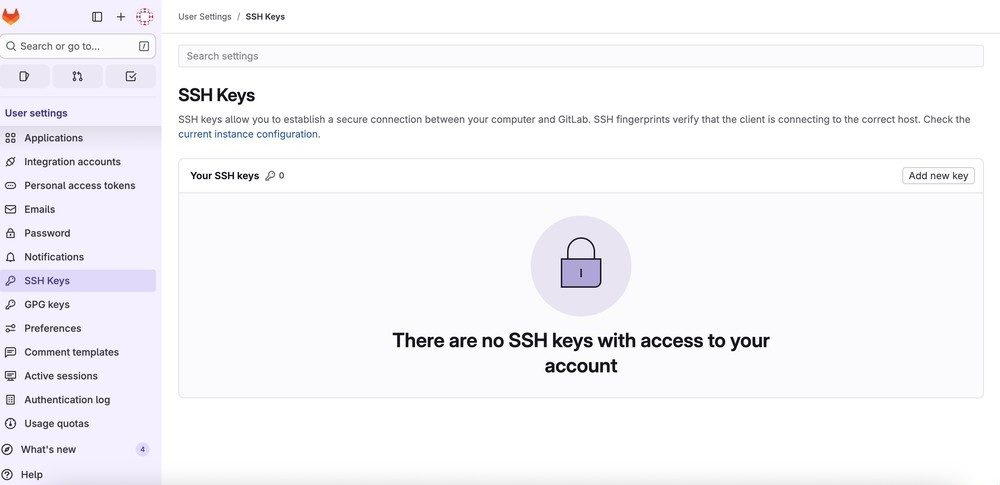
At this point, you’ll see no SSH keys configured yet.
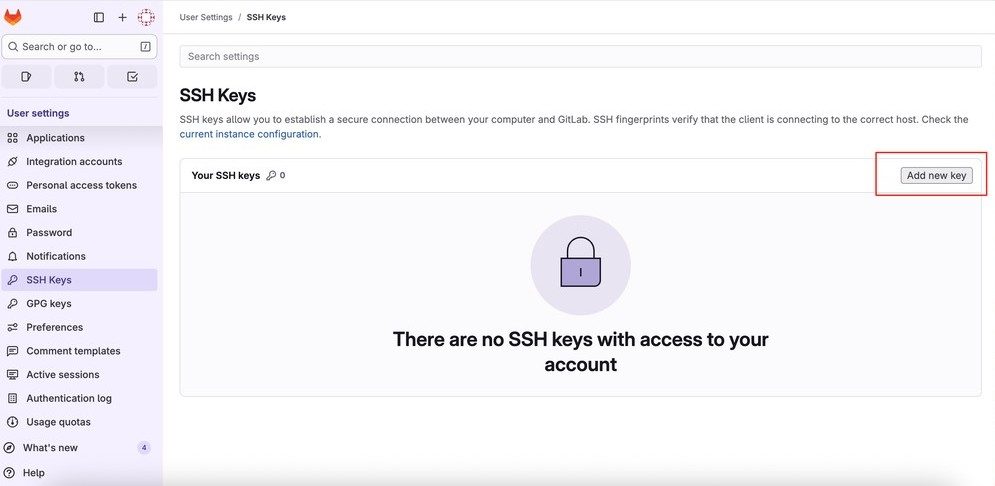
Click Add new key to create a new key entry.
Paste the public key you copied into the ‘Key’ input box, then click Add key.
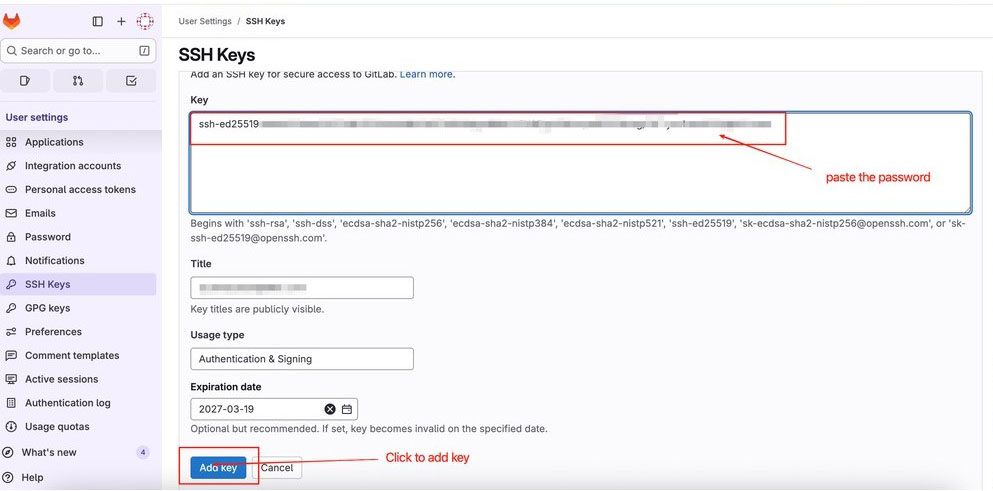
After this, the key is active.
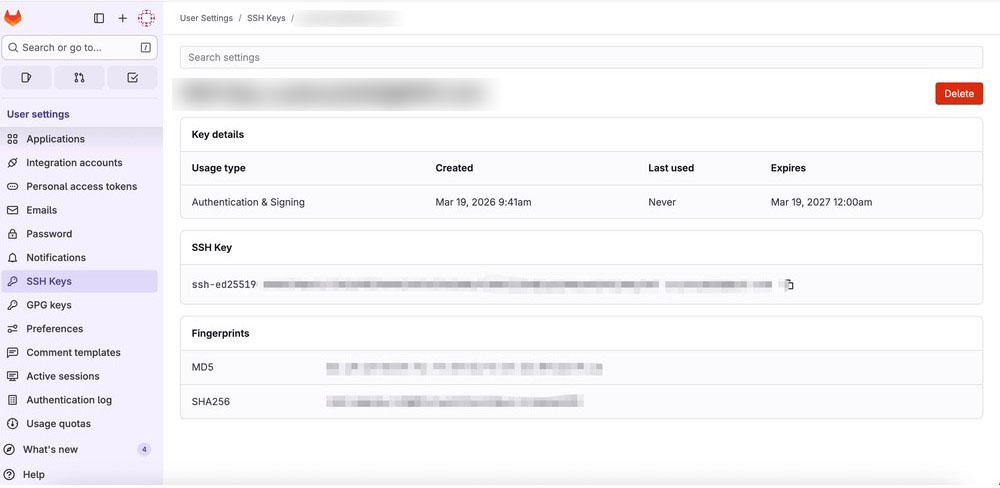
Create a New Remote Repository
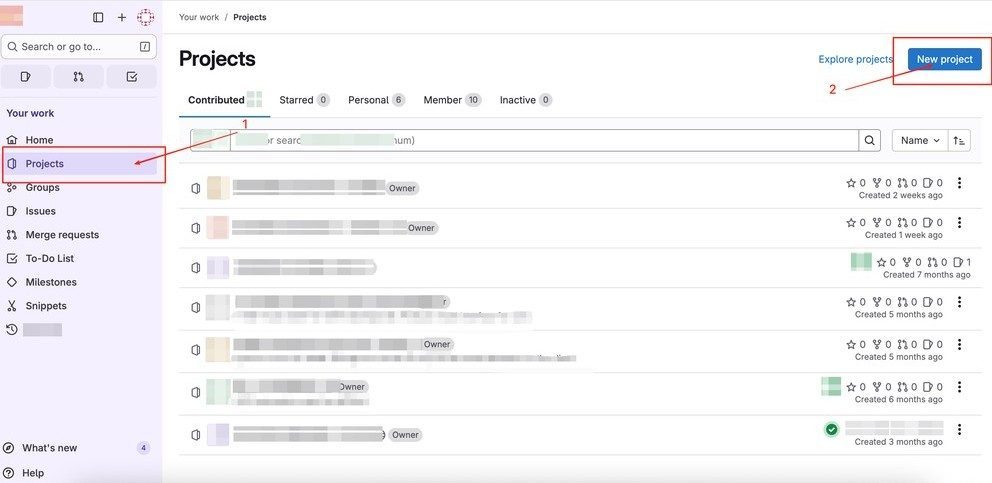
Open your Git hosting platform, then click Projects → New project.
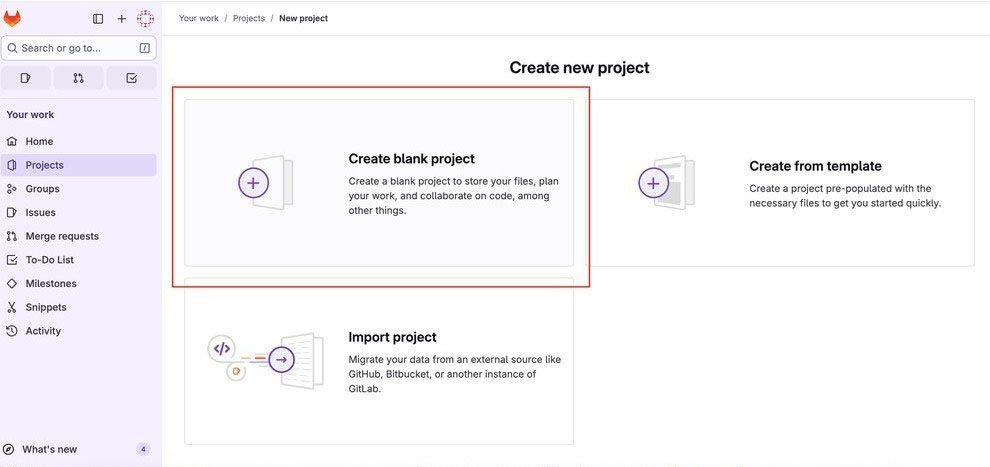
Click Create blank project.
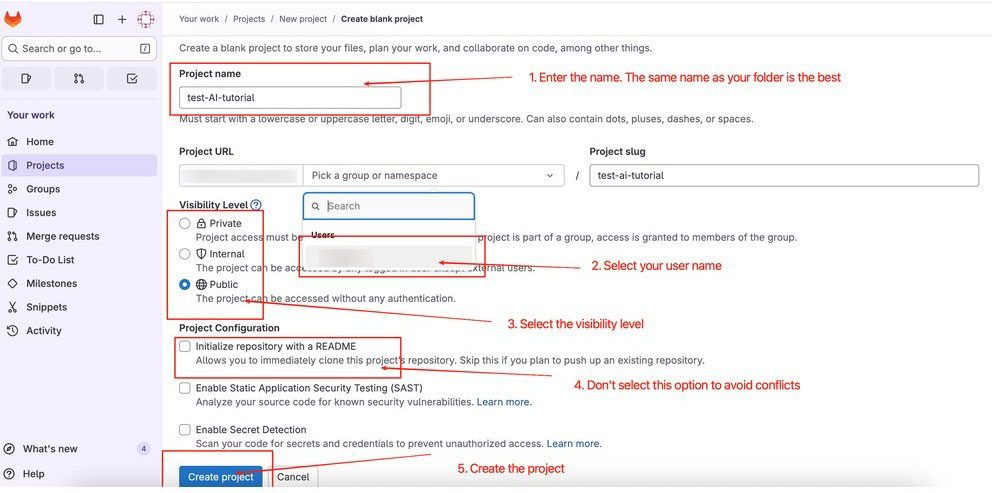
Fill in the following:
- Set Project Name, preferably the same as your local project folder.
- Choose your username under Project URL.
- Visibility Level controls who can see the repo: ‘Private’ (invite only), ‘Internal’ (visible to users in the same organisation), ‘Public’ (visible to everyone).
- In Project Configuration, it’s recommended to uncheck Initialise repository with a README. Otherwise, the remote repo starts with a README and your first push may fail due to mismatched histories.
After filling in everything, click Create project.
Connect a Local Repository to a Remote Repository
There are two common ways to connect to a remote Git repository:
- SSH: the repository URL begins with ‘git@’. This method requires you to configure an SSH key on your machine. Once set up, you can authenticate securely and perform operations such as ‘push’, ‘pull’, and ‘fetch’ without entering your credentials each time. It is the method most commonly recommended for regular management.
- HTTPS: the repository URL begins with ‘https://’. This method does not require an SSH key and is generally easier to set up. But some environments or workflows may have authentication restrictions.
In this example, we will use SSH to connect to a remote repository.
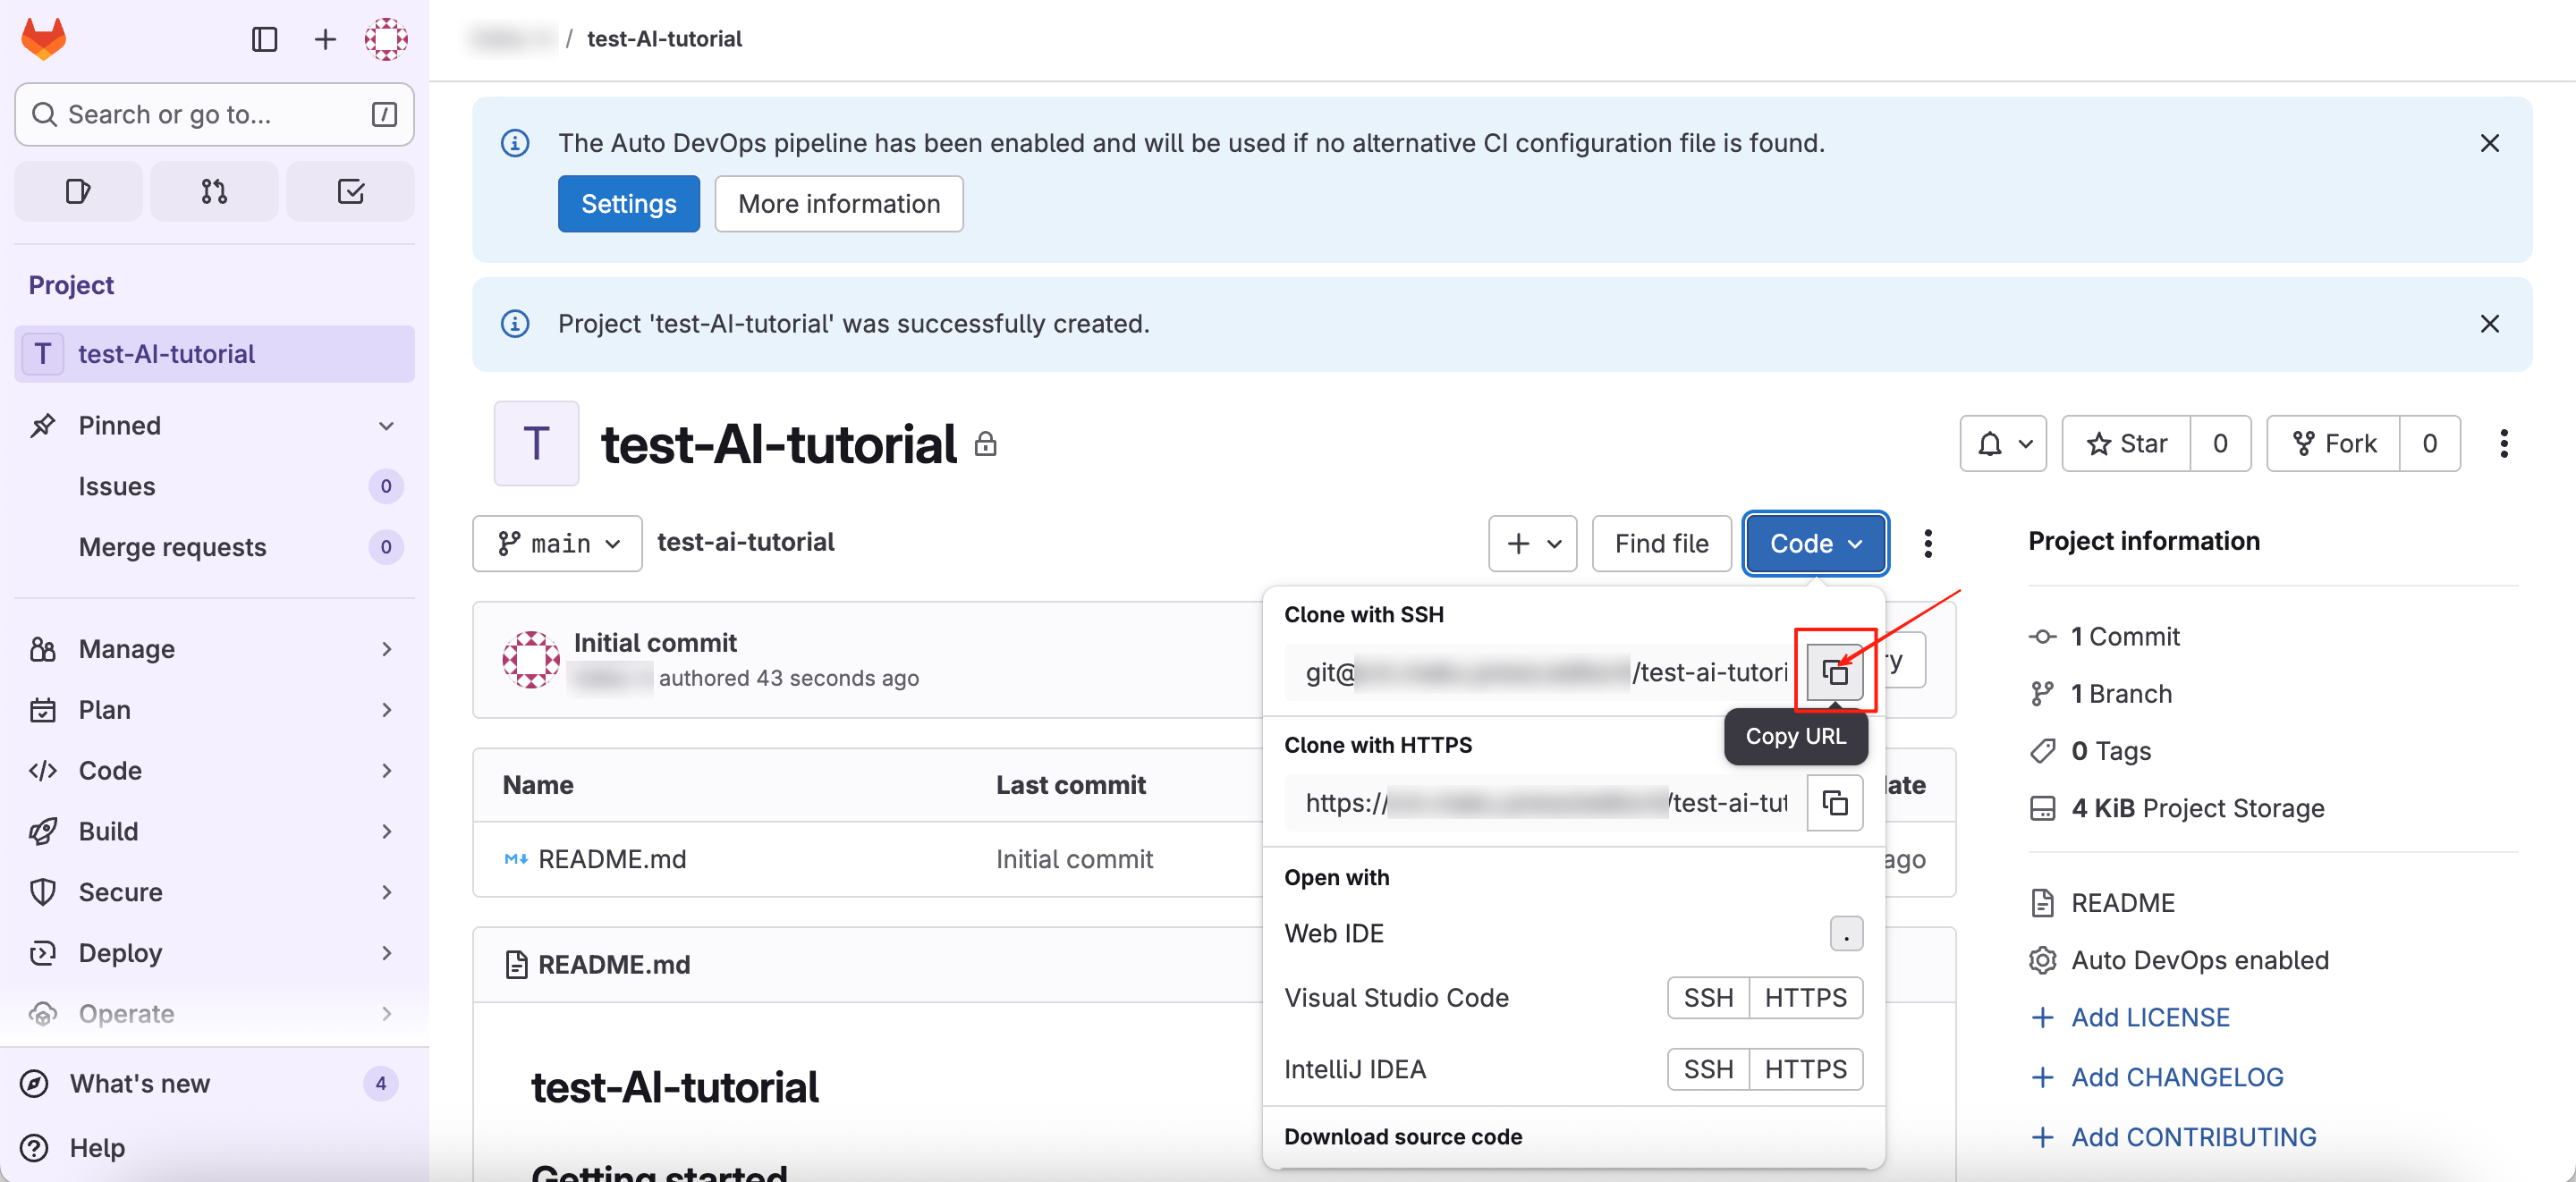
Inside the repository page, click Code → Copy URL, and copy the URL on the right side of Clone with SSH.
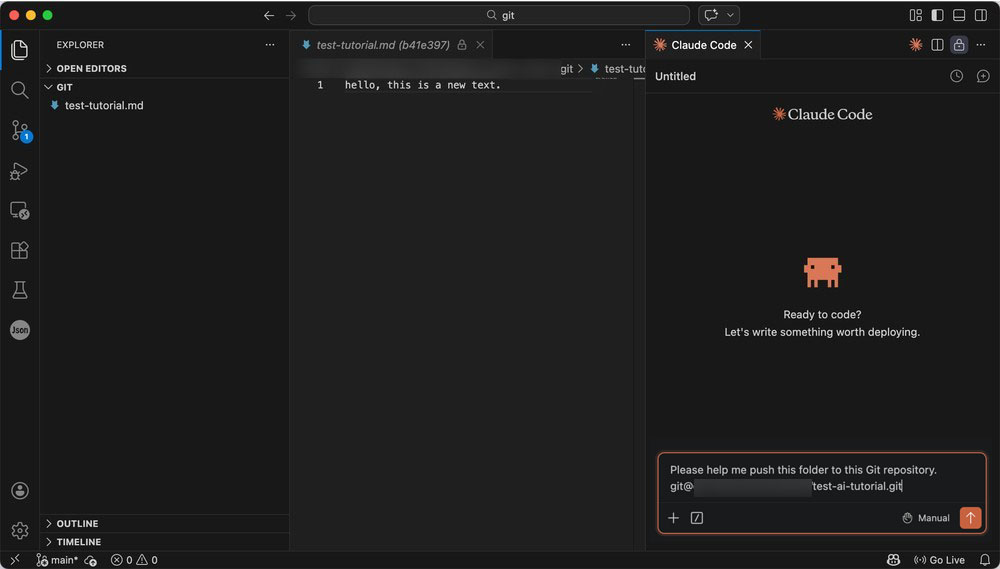
Open Agent, enter the following, then paste the copied SSH URL and wait for completion:
Please help me push this folder to this Git repository
Connect to an Existing Git Repository
Inside the repository page, click Code → Copy URL, and copy the URL on the right side of Clone with SSH.
Choose a working directory and open Agent. Enter the following, then paste the copied URL into the chat box:
Please clone this project for me.
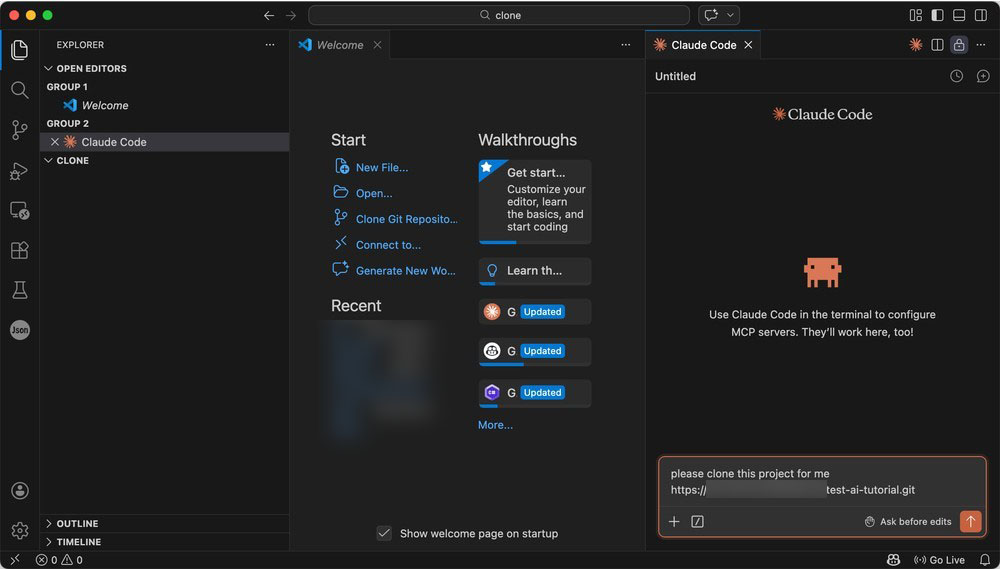
After the task completes, the project will be cloned locally.
A cloned project usually needs no extra setup. As long as you have repository permission, you can push to and pull from the remote repository.
Push and Pull
After connecting your local repository to a remote repository, you’ll typically keep the two in sync as you continue working.
Click Push to upload your local commits to the remote repository. Click Pull to download the latest changes from the remote repository and update your local copy.
Conclusion
Git helps you replace scattered local copies with a structured workflow: initialise a repository, commit meaningful changes, and sync them with a remote repository. That single workflow does three jobs at once. It tracks your work, so every version stays in the history and mistakes can be undone. It transports it, so the same project can be pulled down onto a new laptop, a colleague’s machine, or a server without anyone zipping up folders. And it shares it, so other people can read, review, and build on what you’ve written.
So once your project lives on GitHub, your collaborators no longer wait for you to send them a file. They clone the repository, pull your latest commits before they start, and push their own when they finish, and every change arrives with a name, a date, and a message explaining what it was for. There are no more ‘final-v2-real-final’ copies and no guesswork about whose version is newer, because there is one shared history and everyone works from it.